
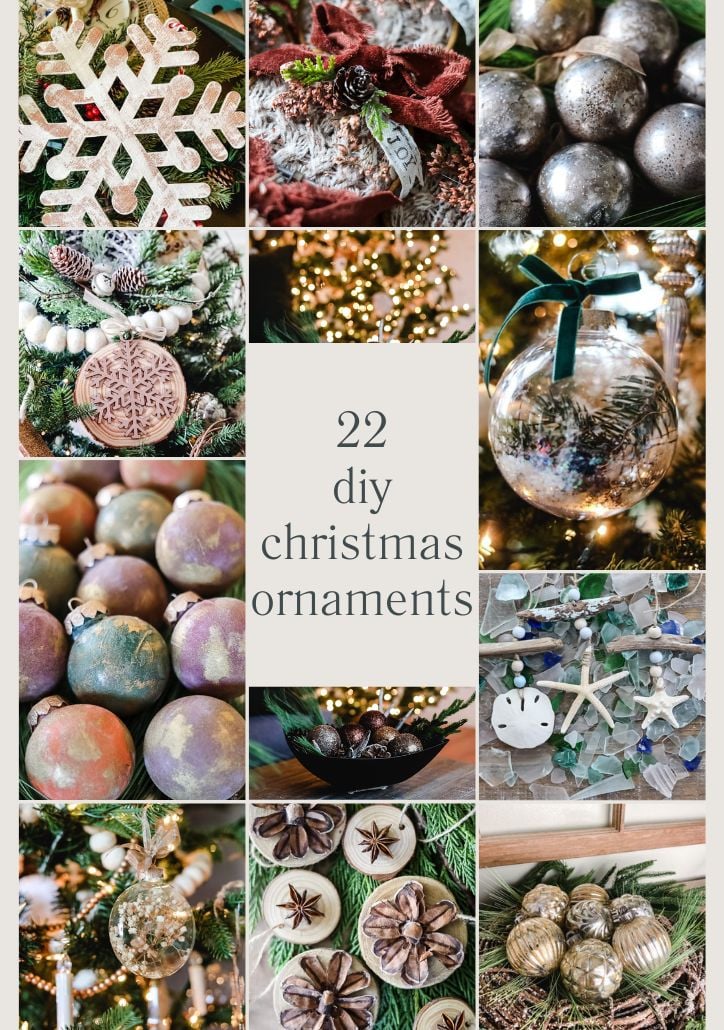
Get ready to make your Christmas tree sparkle with these 22 delightful DIY ornaments. No matter if you’re a craft pro or a total newbie, these simple and fun ideas will transform ordinary materials into charming decorations that reflect your unique style. So, grab your glue gun, gather your supplies, and let’s make some Christmas magic happen!
DIY Christmas Ornaments

Get ready to get creative this Christmas! Here are 22 ornament ideas that you can make to decorate your tree. Most of them are quite easy and you don’t need to be a skilled DIYer to make some adorable ornaments! It’s always so satisfying to see something that you made yourself hanging on your tree! Let’s get started!
This post may contain affiliate links, which means I may earn a small commission if you make a purchase through my links, at no extra cost to you. Read my disclosure policy here.
Mini Birdhouses
These cute little birdhouses were inspired by ornaments that I saw in the Pottery Barn catalog.
They started out as unfinished $1.49 wood birdhouses from the craft section of Michael’s. I spray-painted them white.
Then, when the white paint was dr,y I painted the roof with copper metallic acrylic paint and added fine copper glitter (while the paint was wet).
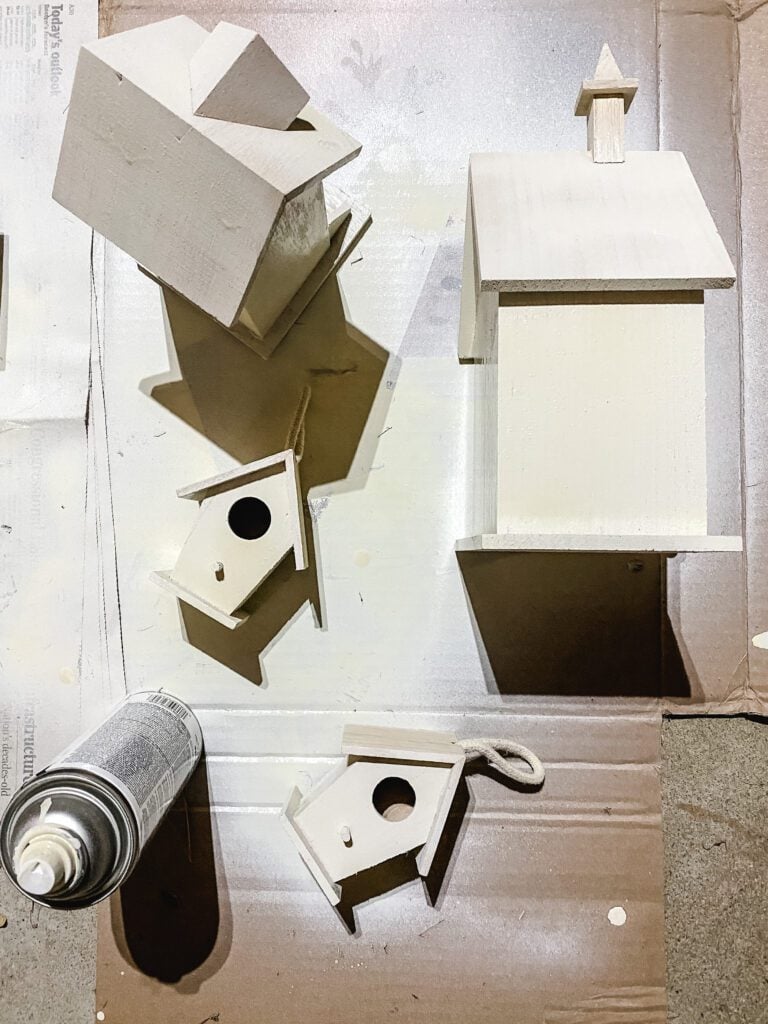

Check out my Christmas Village House tutorial to see pictures of each step of the process…I did the same technique on the houses as I did on the ornaments

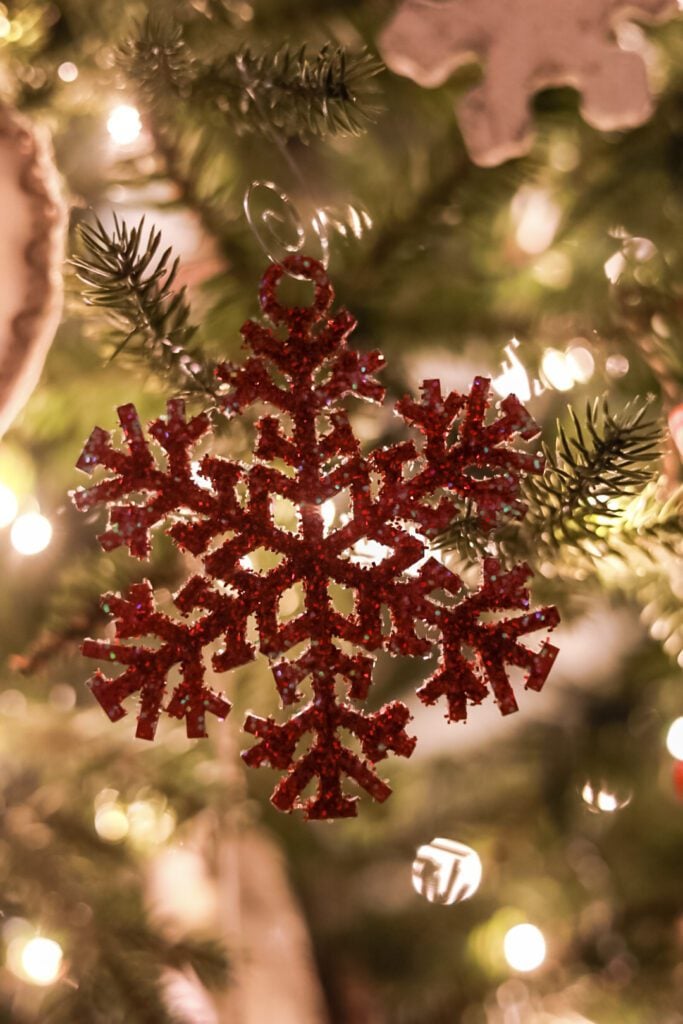
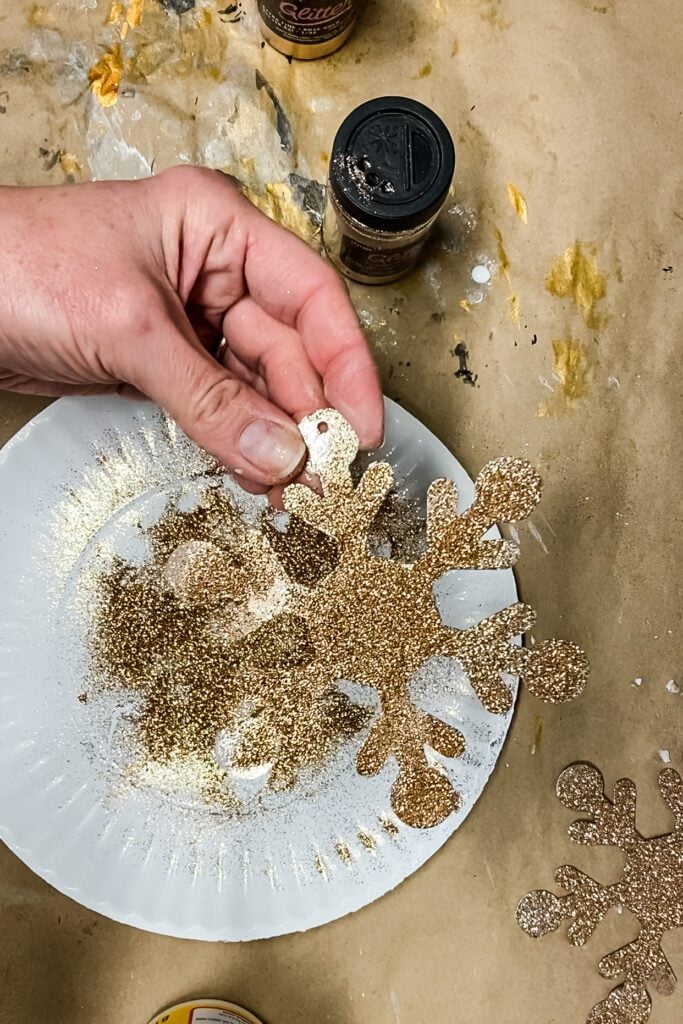
Red Glitter Snowflakes
This is a super easy ornament that looks really pretty on the tree…plus you can make a bunch to fill in your tree for only a few $$$! I bought a bag of these unfinished wood ornaments from Amazon

- I painted the ornaments red with a quick coat of acrylic paint and let them dry.
- Once the paint was dry the ornaments got a coat of spray adhesive.
- Then I sprinkled the ornaments with red glitter.
- Alternatively, you could add the red glitter to the wet red paint and cut out the spray adhesive step altogether.
You could use any combo of paint and glitter that goes with your own Christmas tree decor… I’m doing a red & white tree in my kitchen.


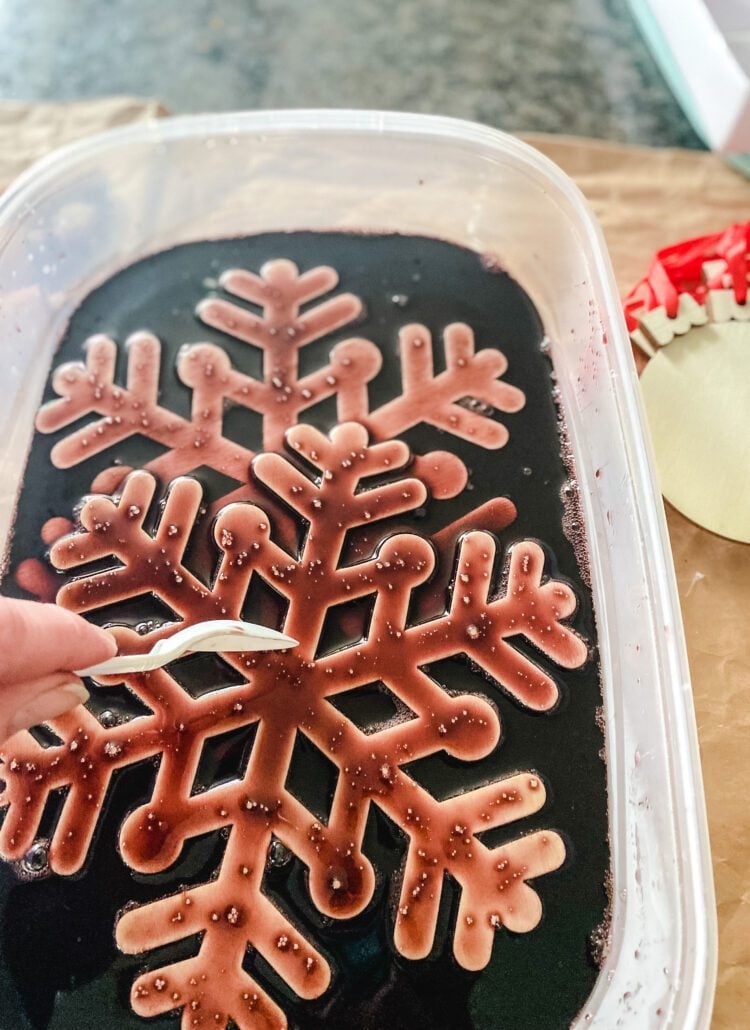
DIY Mercury Glass
This was a fun DIY ornament to make!! I love how they came out!! You need Krylon Looking Glass Paint, vinegar, clear plastic ornaments, and antique gold metallic acrylic paint to make a set of your own.

Here is the entire Faux Mercury Glass Ornament DIY tutorial. This one has a few steps to follow.
Dried Orange Slice Ornaments
Oh, I love how dried orange slices look!! I don’t know what it is about them…I just think they look beautiful mixed in with Christmas decor and ornaments.

How to make orange slice ornaments:
- Slice oranges to about ¼ inch in thickness and spread out on a cookie sheet lined with parchment paper.
- Bake slices in a 200° oven for a few hours ( 3-4 until they are completely dried), flip slices every 30 min.
- Use jute twine, hooks, or ribbon to make ornaments or run floral wire though them to add to garlands or wreaths. I love to add cinnamon sticks to the ornaments

Distressed Wood Ornaments
These ornaments started out with a package of oversized unfinished wooden snowflakes from Hobby Lobby…but my technique can be used on any unfinished-shaped ornament!
My favorite way to stain small things is with this trick…use brown Rit fabric dye! I poured a few tablespoons into a container of hot water and gave the snowflakes a bath.
It’s so much quicker than trying to stain each one…no muss no fuss!!

After the snowflakes were stained, I gave them a quick rinse and let them dry.
A super light brushing of white chalk paint…I barely touched the paintbrush to the ornament, creating a distressed effect without the messy sanding afterward.


Gingerbread Salt Dough Men
Making this cinnamon-scented salt dough is super easy! This year, I made a big batch and used it for 3 different projects.

recipe for cinnamon salt dough
- 2 cups flour
- 1 cup salt
- ¼ to ½ cup cinnamon (use the cheap kind)
- 1½ cups very hot water
Combine the dry ingredients of 2 cups flour, 1 cup salt, and ¼ to ½ cup cinnamon in a large bowl. Gradually stir in 1½ cups of very hot water, kneading the dough until it forms a smooth ball.
Roll out the dough to a ¼-inch thickness on a silicone baking mat or a lightly floured surface. Cut out your desired shapes using gingerbread man cookie cutters or other holiday-themed shapes. Create a hole for hanging by poking a straw through the top of each ornament.
Bake the ornaments in a 250°F oven for 2 hours, flipping them halfway through. Once the dough is hard and completely dry, they are ready for decorating (I used red and white puffy paint) or hanging. You can hot glue baker’s twine to the back of each ornament for easy display.


Botanical Ornaments
This is one of my favorite ornaments that I made this year! I love bringing natural elements into my decorating style…and this includes Christmas! I made a set of these botanical ornaments to hang on my living room Christmas tree. My living room is decorated in a winter woodland theme.


To make botanical ornaments, I started with a set of large bulbs (mine are about 4 inches) and layered in a few different botanical elements.
I started with a sprinkling of fake snowflakes on the bottom and then added angel vine, different dried moss, dried flowers, and artificial winter greens.

Wood Slice Wreath
I had a bag of leftover wood slices from a previous project and wanted to repurpose them. I started by placing a round wooden lid in the center as the base. Then, I arranged the wood slices in a circular pattern around the lid.
Next, I created a second layer. To do this, I applied wood glue to the back of each slice and positioned them between two adjacent slices from the bottom layer.


Once the glue was dried I wrapped jute twine around the top to make a hanger and then tied a pretty green velvet ribbon to the front.

Stained Bulb Ornament
When I was making the distressed snowflake ornaments, I also dipped a bag of these unfinished bulb-shaped ornaments into the Rit dye bath. I had a bag of assorted snowflake ornaments leftover from my Countdown To Christmas Calendar last year.
While the bulb ornament was drying, I painted the wood snowflakes with red acrylic paint.


After everything was dry, I put a little glue on the back of the snowflakes and attached 2 to each ornament…on a diagonal.
A red and white chenille ribbon finished off these cute ornaments.


Rose Gold Metal Snowflakes
Do you have any galvanized metal ornaments you are kinda over?? This technique will transform them into a total 2021 look!
First, I sprayed the galvanized ornaments with rose gold metallic spray paint
Once the paint was dry, I brushed Mod Podge over the front of the ornament.


Then I sprinkled rose gold fine glitter over the Mod Podge. You want to use fine glitter for this ornament…the big chunky glitter won’t look as elegant on your tree.

Wood Slice w/ Snowflakes
I can’t believe I made 11 ornaments this season…geez, no wonder my hands are so tired!!! This is a super quick one to make, so perfect for my last one.
I used a large wood slice round and a large wooden snowflake ornament.
Then, spray spray-painted the snowflake with a metallic copper color. When the paint was dry, I brushed a coat of Mod Podge onto the back of the snowflake and placed it onto the wood slice…making sure the hanging loop was past the edge of the wood slice so I could hang the ornament.


Vintage Angel Christmas Ornaments

Add a bit of old-world charm to your Christmas tree this holiday season with these easy-to-make vintage angel Christmas ornaments. I’ve included the free vintage angel printable so you can make them at home. A lovely addition if you love shabby chic or romantic decorating styles at Christmas.
Metallic Glitter Ornaments

Another idea for clear glass or plastic ornaments. Make a set of metallic glitter ornaments for only a few dollars that look like the expensive home decor store ones. This is an easy DIY project to try this holiday season.
Dried Flower Ornaments

A beautiful ornament to make with clear glass disc ornaments and an assortment of dried flowers. Perfect ornament for a French country-themed tree, or if you decorate with a more natural style.
Botanical Imprint Clay Heart Ornaments

Using air-dry clay, a heart-shaped cookie cutter, and dried flowers to make the sweetest ornaments for your tree.
Coastal Inspired Ornaments

For the coastal lovers out there! These ornaments are made with starfish sand dollars, and driftwood for a fun look for your Christmas tree.
Felt Acorn Ornaments

If you are decorating with a woodland or natural Christmas tree theme this year then make a set of these adorable felt acorns to add a little charm to your holiday.
Rustic Pinecone Ornaments
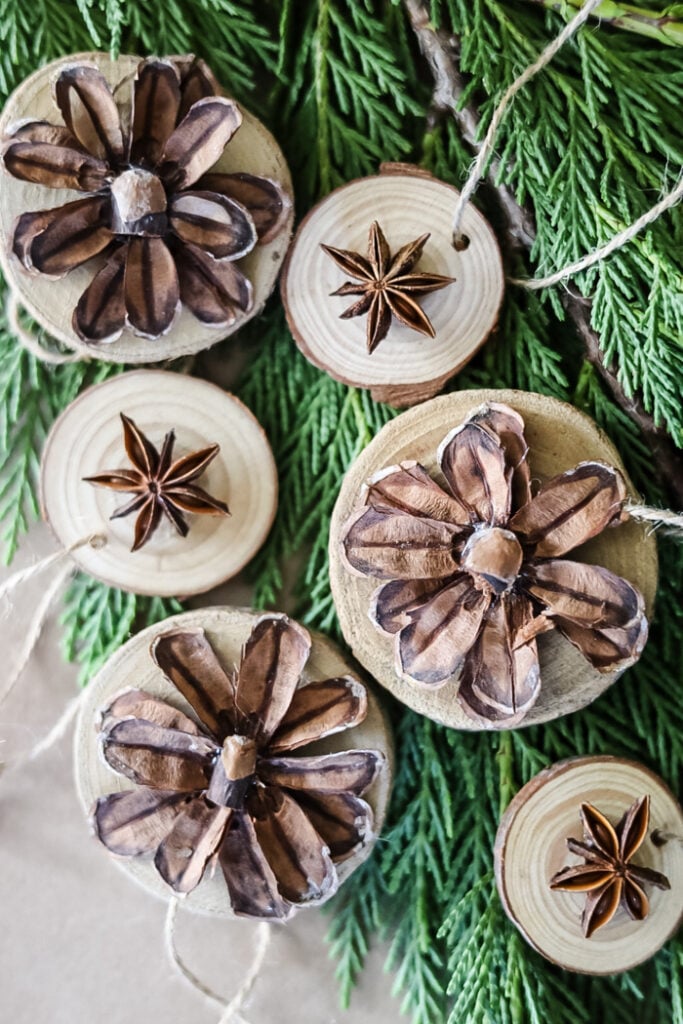
For a rustic touch to your Christmas tree try making a set of these wood slice ornaments with pinecone flowers. Easy to make with inexpensive wood slices and a pinecone that has been taken apart.
Upcycled Sweater Ornament

Turn an old sweater into the coziest ornaments for your Christmas tree. This is an easy project and perfect for beginner-level crafters. So look through your closet or hit the thrift store and find a sweater and grab a set of mini embroidery hoops to get started.
Vintage Touch Ornaments

Start out with a humble box of clear ornaments and transform them into beautiful baubles for your Christmas tree. This is another simple project using paint, baking soda, and a tube of gold Rub n Buff.
Metallic Mercury Glass

This set of metallic mercury glass style ornaments is made with clear glass ornaments and spray paints. You will need a can of looking glass paint, gold spray paint, and bronze spray paint. This one is so pretty!
Clay Leaf Ornaments

Have some fun with clay! These gold leaf ornaments add a touch of natural elegance to your Christmas tree.
Well, now you have plenty of DIY ideas to keep you busy this holiday season! If you make any of these projects I would love to see them! Send in your photos to jennifer@cottageonbunkerhill.com so I can share them with the Cottage on Bunker Hill community.
Have a wonderful holiday season!!
xo, Jennifer
2025
Holiday Shop
My Top Finds To Deck Your Halls This Season
The Latest Christmas Ideas


The Best Christmas Ideas: A Week of Inspiration From Top Bloggers
Pin for Later


All tips and ideas are wonderful. I hope people will get an idea to decorate their homes beautifully for Christmas. Thank you and keep posting more!
Jennifer, you have some great ideas for ornaments. Love all of your projects.
I’ve always loved seeing the dried orange slices on trees and wreathes but was too embarrassed to ask how they made them. I agree, what is it about that smell and Christmas- they just fit together. Thank you so much for the tutorial. I’m going to be making them this year. Do they go mouldy during the holiday season? Happy Christmas from one Jenny to another.
Jenny, you can ask me anything…email me at cottageonbunkerhill@gmail.com anytime!! No, they are so dried out that they don’t get gross at all…I do toss them at the end of the season, but they are so easy to make I don’t feel bad about it. Merry Christmas!!
I love them all! My favorites are the wood slice and gingerbread ornaments! Well done, friend!
Thanks Kim!!! The gingies are so cute!!