
Gather the family! Today I’m sharing one of my favorite holiday projects that’s as fun to make as it is to display! While browsing Michaels recently, I stumbled on these adorable unfinished wooden gingerbread houses and immediately knew they’d be the perfect craft to share with you.
When I was at Michael’s the other day I found wooden unfinished gingerbread houses and thought they would be a perfect project to make and share with you all. It’s a perfect combination of budget-friendly project and doable (even for my not-to-crafty followers). I gave mine that freshly-baked charm with rich brown paint, a dusting of glitter (for a little winter magic!), and fluffy white puffy paint that looks just like piped royal icing.
Gingerbread House Transformation: From Unfinished to Fabulous
In this tutorial, I’ll walk you through the steps of how I decorated my gingerbread houses. I’ll also share some tips and tricks for creating your own unique gingerbread houses too.

This post may contain affiliate links, which means we receive a small commission if you purchase through our links. See our disclaimer page for more information.
Gather Your Supplies
For this DIY gingerbread house project, I will be making over 3 unfinished wood houses to create my Christmas village. I used the same technique on all 3: paint, add glitter, and pipe with dimensional fabric paint.
I am using a white metallic fabric paint, but if you don’t want the shimmer, buy the regular white paint. Another optional step will be adding glitter to the houses. I will demonstrate how it looks so you can decide when you are making your houses.

What You Will Need For This Project
- Unfinished Wood Village Houses
- (2) DecoArt Milk Chocolate Paint
- Mod Podge
- Iridescent or Clear Glitter
- Tulip Metallics White Fabric Paint(4oz)
- optional: baking soda or plaster of paris to add texture to paint.

Step 1: Create the Gingerbread Base with Paint

Start by giving your wooden houses that classic gingerbread look with brown acrylic paint. I found DecoArt in “Milk Chocolate” to be the perfect shade, it’s rich and bakery-worthy!
What You’ll Need for 3 Houses:
- 2 bottles of brown acrylic paint (enough for 2 full coats)
Pro Tip: Add Cookie Texture!
For an extra touch of realism, I mixed Plaster of Paris into the paint to create a subtle cookie-like texture. Baking soda works exactly the same way if that’s what you have handy!
- How to do it: Sprinkle in your texturing agent and stir until the paint thickens slightly
- Don’t worry if you skip this: It’s totally optional-your houses will still look adorable without it!

Step 2: Add a Sparkle with Glitter

To give my gingerbread houses that magical, frost-kissed look, I generously sprinkled fine iridescent glitter over the entire surface. A quick note: while it photographs with a bluish-green glow, the glitter is actually clear and catches the light beautifully!
Glitter Application Tips:
- For full sparkle: Cover the entire house while the Mod Podge is still tacky
- For subtle accents: Focus on just the roofs or trim for a hint of magic
- Work smart: Cover your surface with newspaper or kraft paper first—glitter truly does get everywhere!

Securing the Sparkle:
- Use a sponge brush to apply Mod Podge to areas you want to glitter
- Sprinkle glitter generously over the sticky areas
- Let dry completely before adding the “icing” (this is crucial!)
Step 3: Pipe the “Icing” Details

This was hands-down the most enjoyable part—it truly feels like decorating Christmas cookies! The dimensional fabric paint comes in a bottle with a super-fine tip, making it perfect for creating delicate icing details.
I followed the outline of the roof around all the windows, etc. The houses had some details on them, like wreaths on the windows and a cross on the front of the church. I piped on the paint there as well.
Where to Pipe:
- Outline all the roof edges and windows
- Highlight existing details like wreaths and the church cross
- Create decorative patterns on the roof surfaces

Roof Design Ideas:
- Simple criss-cross (easiest!): Paint lines left to right, then cross right to left
- Scalloped edges for a traditional look
- Dots and swirls for something more whimsical
- Mix and match patterns across your houses!
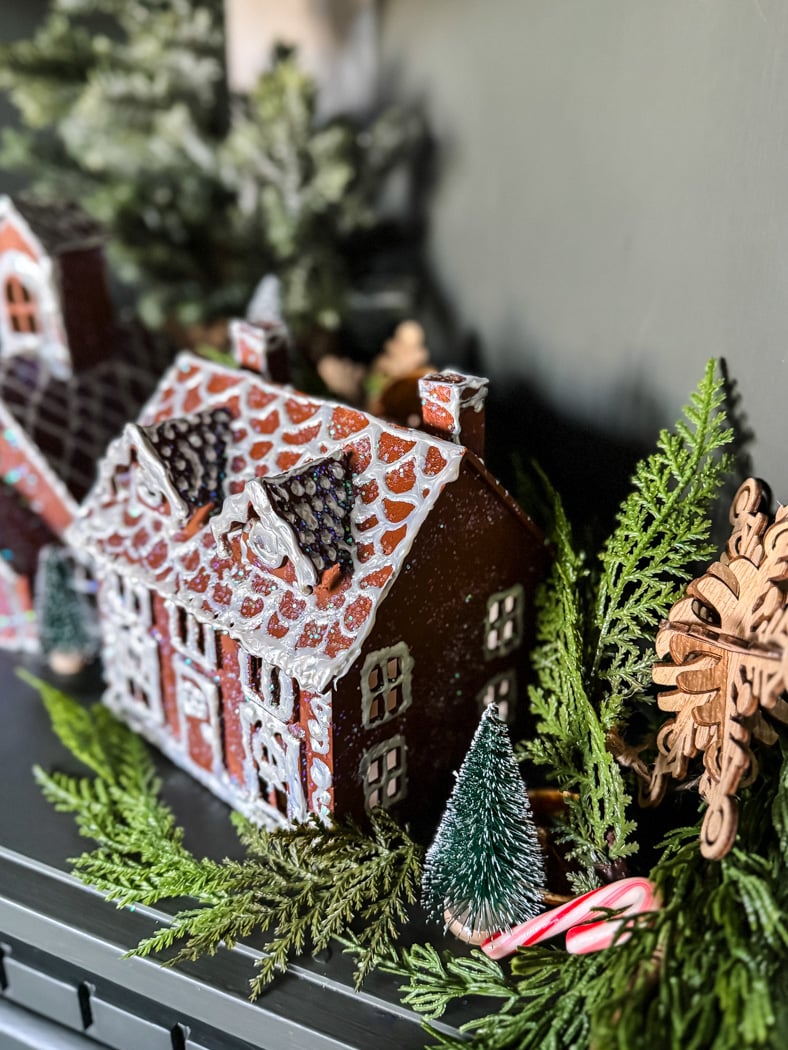
Step 4: Icing Inspiration & Close-Up Details
Want to see the magic up close? Here’s a look at the dimensional paint details that really make these gingerbread houses come to life:

Above: Notice how the fine tip creates perfect “piped icing” lines along the roof edges and windows-just like real royal icing!
Don’t worry about perfection! I’ve always been a bit of a cookie decorating disaster, so I just let loose and had fun with these gingerbread houses.
Quick Tips I Learned:
- Apply even pressure on the bottle for consistent lines
- Practice on paper first if you’re new to dimensional paint
- Don’t stop mid-line: keep the flow moving for the smoothest results

Above: The criss-cross roof pattern shows how effective simple designs can be. The texture of the puffy paint really mimics freshly piped gingerbread house icing!
Important Drying Note:
The fabric paint takes much longer to dry than you might expect! I learned the hard way that rushing can smudge your beautiful work. Let your houses dry completely overnight before moving on to decorating.
Style Your Magical Christmas Village
Once your gingerbread houses are completely dry, the real fun begins-bringing your Christmas village to life! Here’s how I created this festive display:

Building the Scene:
- Start with greenery – I used a cedar garland as a lush backdrop
- Add height – Place a small tree at the back of your shelf or display area
- Create depth – You can arrange your gingerbread houses at varying heights using small boxes or books underneath
- Fill with festive accents – Tuck in bottlebrush trees, dried orange slices, and wood snowflake ornaments

Styling Tips:
- Cluster items in odd numbers (groups of 3 or 5) for visual appeal
- Mix textures – The wood houses pair beautifully with fuzzy bottlebrush trees and rustic wood ornaments
- Add lighting – Consider tiny fairy lights for extra magic as evening falls
Your finished creation makes the perfect mantelpiece, entryway display, or holiday centerpiece that’s sure to spark joy all season long!
Shop the Supplies:
Your Cozy Gingerbread Village Awaits!
And there you have it,a charming, rustic gingerbread village that will last for holidays to come! This project proves that with a few simple materials and a little creativity, you can create magical holiday decor that’s full of personality (and doesn’t cost a fortune!).
I’d love to see your gingerbread house creations and add you to the Reader’s Spotlight gallery. Send a photo to me at jennifer@cottageonbunkerhill.com
xo, Jennifer
More Fun Holiday Projects

Here is another Christmas Village idea to try! This one also starts with unfinished wooden houses, in this case birdhouses. This is an easy project, just paint and glitter!
Bottlebrush Tree Wreath

Looking for another fun DIY project? Try this adorable bottlebrush tree wreath! If you can operate a hot glue gun you can make this one!
Gingerbread Salt Dough Projects

Mix up a batch of gingerbread salt dough and learn how to create ornaments, a garland, and the cutest gingerbread man wreath!
Christmas
22 DIY Ornaments
Learn to Make 22 Different Christmas Ornaments!


These turned out so great! Hope I get one in the mail!
I’ll bring it to you!