

Using air dry clay, a cookie cutter, and a few sprigs of dried flowers I created the prettiest botanical imprint clay heart ornaments. They could be hung individually or in a bunch.
A Touch of Nature: Botanical Imprint Clay Heart Ornaments
Tired of the same old holiday decorations? Craving a touch of nature and a unique handmade touch? This tutorial will guide you through creating stunning botanical imprint clay heart ornaments. Using simple materials and a bit of creativity, you’ll learn how to transform dried flowers and leaves into exquisite keepsakes. Perfect for Valentine’s Day, weddings, or simply adding a personal touch to your home, these charming ornaments are sure to impress.

This post may contain affiliate links, which means I may earn a small commission if you make a purchase through my links, at no extra cost to you. Read my disclosure policy here.
Materials Needed
- Air Dry Clay
- Rolling Pin
- Heart Cookie Cutter
- Botanicals (Fresh, Dried, or Artificial)
- Jute Twine or Thin Ribbon

Step 1: Roll Out the Clay

To make rolling and cutting easier, I placed a silicone baking mat underneath the clay before rolling it out. This is a helpful tip for working with any type of clay when cutting out shapes.
For these heart ornaments, I find a thickness of 1/4 inch to be ideal. This creates sturdy hearts that dry relatively quickly.
Step 2: Make Flower Imprints

Once the clay was rolled out, I carefully arranged the dried botanicals on top.

There are two methods for creating the botanical imprints:
- Rolling Pin Method: Gently roll over the flowers with a rolling pin to create the imprints.
- Finger Pressing Method: Gently press the flowers into the clay using your fingers.
Step 3: Cut Out the Shapes

Next, I used the heart cookie cutter to cut out the shapes.
- Design Tip: Carefully position the cutter over the botanical imprints to create the desired design. Some hearts looked lovely with the imprint centered, while others were more striking with the imprint towards the edge.
- Reusing Clay: When I ran out of space to cut more hearts, I simply rolled up the excess clay and repeated the process. You can make as many ornaments as you’d like
Step 4: Finishing Touches

To hang your ornaments, use a straw to poke a small hole in the top center of each heart (right under the bow). The clay will come right out when you lift the straw.
For smoother edges, gently run a damp finger around the edges of the hearts. This technique also helps to smooth out any cracks or lines in the clay.
Step 5: Let Clay Dry

I placed all of my clay hearts on a drying rack to allow for proper air circulation and speed up the drying process.
You’ll know the hearts are completely dry when they feel hard and firm to the touch
Step 6: Paint the Heart Ornaments

For this project, I used glossy white spray paint for the quickest application.
However, you can also use glossy acrylic craft paint in any color you prefer. I opted for a neutral color scheme for my ornaments.”

Making the Clay Heart Ornaments


For extra detail, I painted unfinished wood beads with blush-colored paint. To make painting easier, I threaded each bead onto a toothpick. Then, I inserted the toothpicks into a small pine cone to hold them securely while drying
- Individual Ornaments: Cut pieces of jute twine to your desired length for each ornament.
- Cluster of Hearts: Cut pieces of jute twine approximately one yard long (adjust as needed).

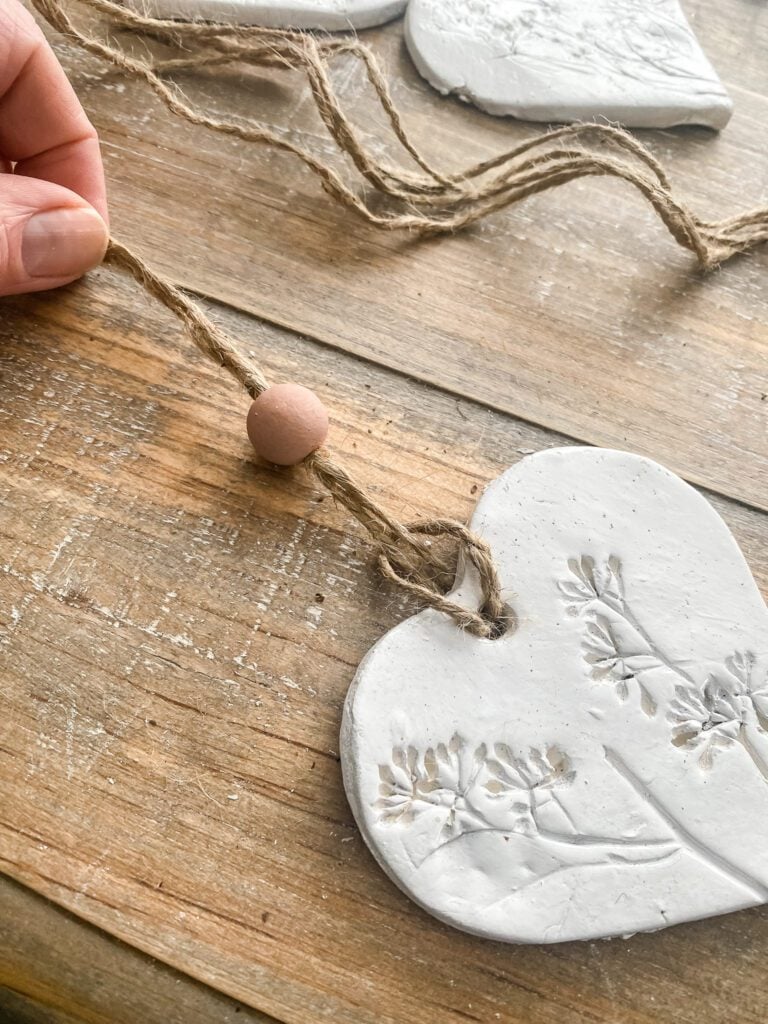
To hang an ornament:
- Fold a piece of jute twine in half.
- String a bead onto the two ends of the folded twine.
- Thread the closed loop of the jute twine through the hole in the top of the ornament.
- Tighten the twine by pulling on the ends until the bead rests at the top of the heart.

Creating a Hanging Set of Hearts:
To create a visually appealing hanging set, gather an odd number of ornaments (e.g., 3, 5, 7).
- Example with 5 Hearts: I staggered the hearts by varying the length of the jute twine for each ornament, ensuring they are visible when hung together.
- Example with 3 Hearts: Place the longest twine in the middle and shorter twines on either side or stack them so they hang in a straight line.
Once I determined the desired spacing, I tied a simple knot near the top of the jute twine to secure the hearts together. Finally, I added a decorative bow made from pink chiffon ribbon.

Here is an example of a hanger with 3 clay hearts.

Here is a 5 heart hanger. Both ways looked so pretty, it just comes down to personal preference.
I love the look of something hanging on an old mirror like this one. First I hung a delicate artificial piece of greenery onto the mirror before hanging the clay hearts.
I hope you enjoyed this tutorial on creating botanical imprint clay heart ornaments. These charming decorations make wonderful gifts for loved ones or a sweet addition to your own home decor. Experiment with different colors, shapes, and botanicals to create unique and personalized keepsakes. Happy crafting!
See your projects featured! If you were inspired by this or any of my other DIY projects I would love to see them and add you to the Reader’s Spotlight gallery. Send a photo to me at jennifer@cottageonbunkerhill.com
xo, Jennifer

Botanical Imprint Clay Heart Ornaments
Using air dry clay, a cookie cutter, and a few sprigs of dried flowers I created the prettiest botanical imprint clay heart ornaments. They could be hung individually or in a bunch.
Instructions
- Roll air-dry clay to 1/4 inch thickness
- Place botanicals on top of the clay
- Lightly roll with a rolling pin or use your hand to press flowers into the clay.
- Using a heart-shaped cookie cutter, cut out shapes in the clay.
- Make a hole for hanging with a straw.
- Place hearts on a cooling rack for quicker drying time to allow air to circulate.
- Paint any color you like.
- Hang with jute twine or ribbon
Recommended Products
As an Amazon Associate and member of other affiliate programs, I earn from qualifying purchases.
Delightful DIY Valentine’s Day Ideas

Looking for more ideas? Check out these 25 pretty heart DIY ideas for a lovely Valentine’s Day.
25 DIY Projects Using
flowers & botanicals


Save to Pinterest


I love these, made a bunch for my Sisters and friends…only wish I knew your secret for getting them up without distorting the heart shapes after rolling them? I ended up using a knife but they looked pretty banged up on the back side and some were distorted in shape because they stuck to the silicone? Thanks for the tutorial Crystal
I usually use a dough scraper. Maybe your clay got too warm when you were working with it? Try parchment and see if that is easier for you.
This is the cutest idea for Valentine’s Day, Jennifer. You had me at botanical!
What an amazing DIY!! I’ve never seen anything quite like these before. I LOVE the botanical imprints in them. The wood beads are the perfect touch. These can be used in so many ways and are the perfect muted color. Pinned!
Aww, thanks, Rachel!
These are just adorable Jennifer! Pinned.
Thanks, Wendy!!
I love this project, Jennifer. The blush beads are so pretty.
What a fun DIY i love this!
Hi Jennifer
What delightful ideas. The clay hearts are so very pretty. I can’t wait to make some. The wreaths are gorgeous as well !
Thank you for demonstrating such pretty ideas. They inspire me to get busy!!!!!
Aww, thanks, Kathy!!! I appreciate it
Jennifer, these are adorable. I love the flowers imprinted in the clay.
Okay, I love this project too! The clay beads are so pretty!
These are wonderful, Jennifer. I love everything about them—the air clay—the herbal/floral imprints—and the dangling heart garland.
Thank you for this tutorial! Sandra
Jennifer
These clay hearts are so cute. I love the botanicals also.
I simply adore the sweet clay hanging hearts. I’ve been searching for a new craft project and this is just the sort of project I enjoy. Thank you for sharing!
I’m so glad!! If you think of it send me a picture of yours so I can share it! cottageonbunkerhill@gmail.com
This is so pretty! I would love to share this on my weekly newsletter. Thanks for the inspiration.
Awww, thanks, Renae! I appreciate that!