

Let’s make ornaments that feel like a warm, woolly hug! I created these ‘Sweater Weather’ keepsakes using a $4 thrifted sweater stretched taut in mini embroidery hoops. Each one becomes a miniature world of cozy texture, which I then embellish with a snippet of velvet ribbon, a delicate dried flower, and a rustic mini pinecone. The final, personal touch? A hand-stamped ribbon tucked inside, bearing a festive word like ‘joy’ to complete the charming scene.
Thrift Store Treasures: Upcycled Sweater Ornaments for Christmas
What do you get when you combine a $4 thrifted sweater, miniature embroidery hoops, and a handful of nature’s finest trinkets? The coziest ornaments your Christmas tree has ever seen! In this DIY, I’ll show you how to frame the perfect scrap of woolly texture, then embellish it with lush velvet ribbon, a tiny pinecone, and a sprinkle of dried flowers. I finished each one with a hand-stamped word like ‘joy’ or ‘peace’ tucked inside, as the final, personal touch that makes them truly special.

This post may contain affiliate links, which means we receive a small commission if you purchase through our links. See our disclaimer page for more information.
Gather Your Supplies:
To make these adorable Christmas ornaments, you’ll need to find an old sweater, preferably a cable knit. The color of the sweater can be any color you like, but I prefer a natural color for a more cozy look.

Let’s collect everything you’ll need to create these cozy sweater ornaments! The star of the show is a cable knit sweater; the more texture, the better. I found the perfect one at my local thrift store for just $4 (it took me less than a minute to spot it!).
The other required material to create these sweater ornaments is mini 3″ embroidery hoops. They are the perfect size for this project.
Materials for this Project
- Old Sweater
- Embroidery Hoops (mini size)
- Varathane Less Mess Stain (optional)
- Mini Pinecones
- Dried Flowers
- Ribbon
- Letter Stamps (optional)
- Ink Pad (optional)
Step-By-Step Instructions:
Get ready to upcycle your way to a cozy Christmas! In this tutorial, you’ll learn how to transform a thrifted sweater into adorable, one-of-a-kind ornaments. By staining mini embroidery hoops and adding pieces of the sweater, you’ll create a charming base for your decorations. Then, get creative with velvet ribbon, pinecones, dried flowers, and stamped messages to personalize your ornaments. Let’s get started!
Step 1: Prepare & Stain Your Hoops

Start by deciding on your finish: leave the hoops in their natural bamboo state for a light, airy look, or stain them for a richer, vintage feel. I personally love the depth a darker stain adds, but this is where you can let your personal style shine!
My Staining Secret Weapon:
Confession time- I usually avoid stain because of the mess and fumes. That’s why I was thrilled to discover Varathane Less Mess Stain! The bottle has a built-in sponge applicator, making it incredibly easy to control and virtually odor-free. It’s been a total game-changer for my craft projects.
Simple Staining Steps
- Disassemble your embroidery hoops
- Apply stain evenly using the sponge applicator
- Immediately wipe away excess with a cloth for a perfectly aged finish
- Let dry completely before assembling your ornaments

Assemble the Ornaments:

Using fabric shears, cut squares of sweater fabric that are slightly larger than the embroidery hoops. Select sections of the sweater with the most appealing patterns to enhance the design of your ornaments.

Start by placing the bottom hoop piece on a flat surface. Add the sweater fabric, then top it with the top hoop piece. Tighten the hoop to stretch the fabric and secure it in place.

Flip the ornament over and trim off the excess material with fabric shears. Get as close to the bamboo hoop as you can.

Add Decorative Touches
Now, the fun part, it’s time to personalize this ornament to fit with my Christmas decorating style.
from nature:

You can decorate these ornaments in so many different ways! I’m going for a natural, rustic look, so I’ll be adding delicate pink flowers, mini pinecones, a bit of greenery, and a russet velvet ribbon.
Other ideas are using just greenery, adding small jingle bells, buttons, or even a small sprig of red berries.
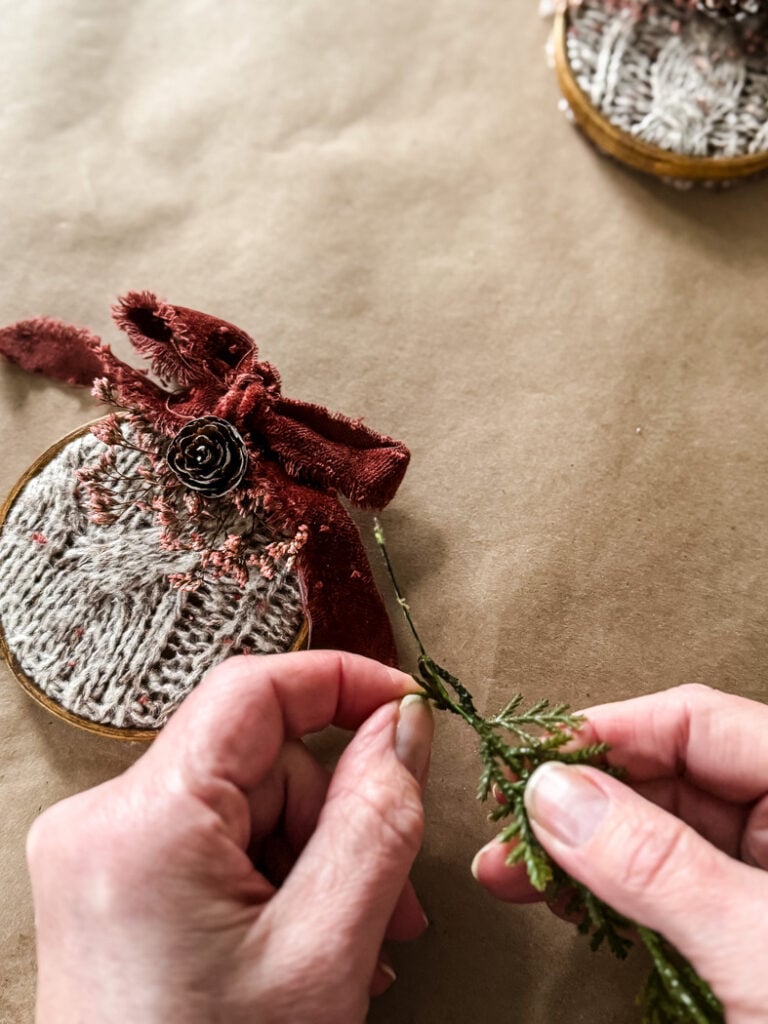
Using hot glue, I secured small sprigs of dried pink flowers to the ornament. Then, I added a mini pinecone to the center and a tiny sprig of greenery on each side. (I pulled small pieces from a larger greenery pick.)
Once the glue was set I tied a simple bow out of frayed velvet ribbon at the top of the sweater ornament.
stamped tag

For an extra special touch (completely optional), I stamped pieces of ribbon with seasonal messages like “Joy,” “Peace,” and “Love.” I then used hot glue to attach the ribbons to a few of the ornaments.

To hang your ornaments you can add a piece of jute twine for a rustic look or use an ornament hook (it will slide under the screw at the top of the hoop).
Ready For Your Tree!

And there you have it! A simple and beautiful DIY project to add a touch of rustic charm to your holiday decor. Remember, the beauty of this project lies in its customization. Feel free to experiment with different colors, patterns, and embellishments to create unique ornaments that reflect your personal style.

So, gather your supplies, put on your favorite holiday tunes, and let your creativity shine. Happy crafting, friends!
See your projects featured! If you are inspired by this or any of my other DIY projects, I would love to see them and add you to the Reader’s Spotlight gallery. Send a photo to me at jennifer@cottageonbunkerhill.com
xo, Jennifer
2025
Holiday Shop
My Top Finds To Deck Your Halls This Season
Christmas
22 DIY Ornaments
Learn to Make 22 Different Christmas Ornaments!

10 Days of Christmas Inspiration
100s of ideas to make your season bright!
- Day 1 – Christmas DIY Ideas
- Day 2 – Front Porch Decorating Ideas
- Day 3 – Christmas Tree Ideas
- Day 4 – Christmas Table Decor Ideas
- Day 5 – Christmas Cookies and Sweet Treats
- Day 6 – Christmas Decorating Ideas
- Day 7 – Christmas Hacks You Should Know
- Day 8 – Christmas Gift Wrapping Guide
- Day 9 – Wreaths & Front Door Decor
- Day 10 – Winter Greenery


Very cute idea my friend.
Thanks Rac!!