
Hi friends! Is there anything better than that feeling of taking something old, a little forgotten, and maybe a bit “junky,” and turning it into something beautiful? I live for those moments!
DIY Rustic Succulent Planters: How to Repurpose Junky Finds into Garden Charm
Who knew rust and succulents would be such a dream team?
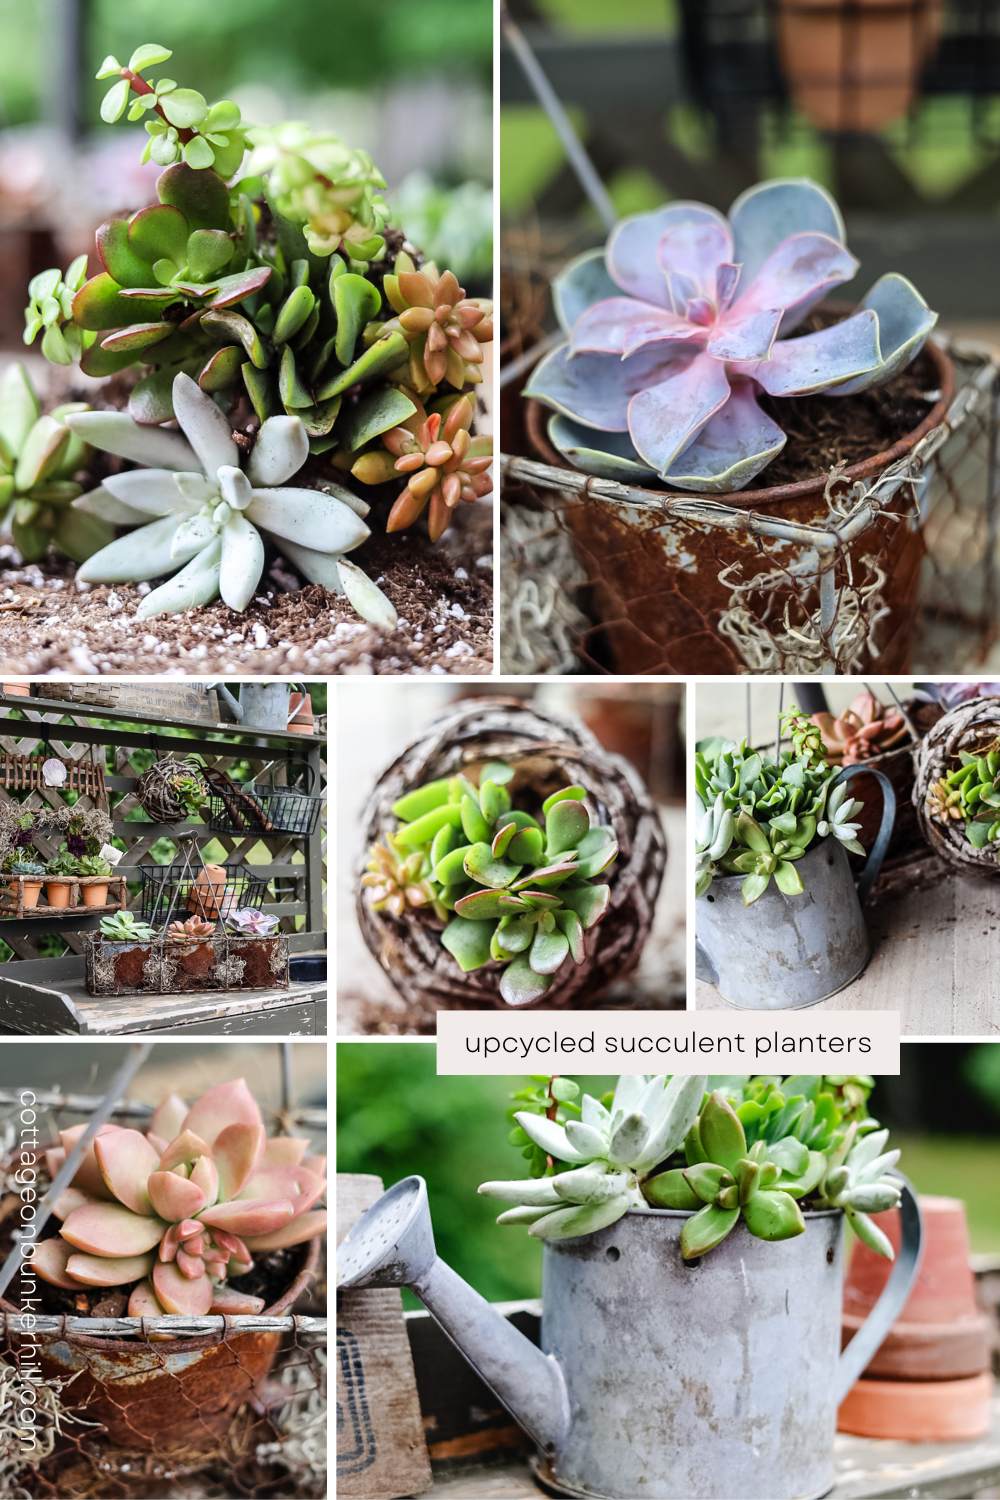
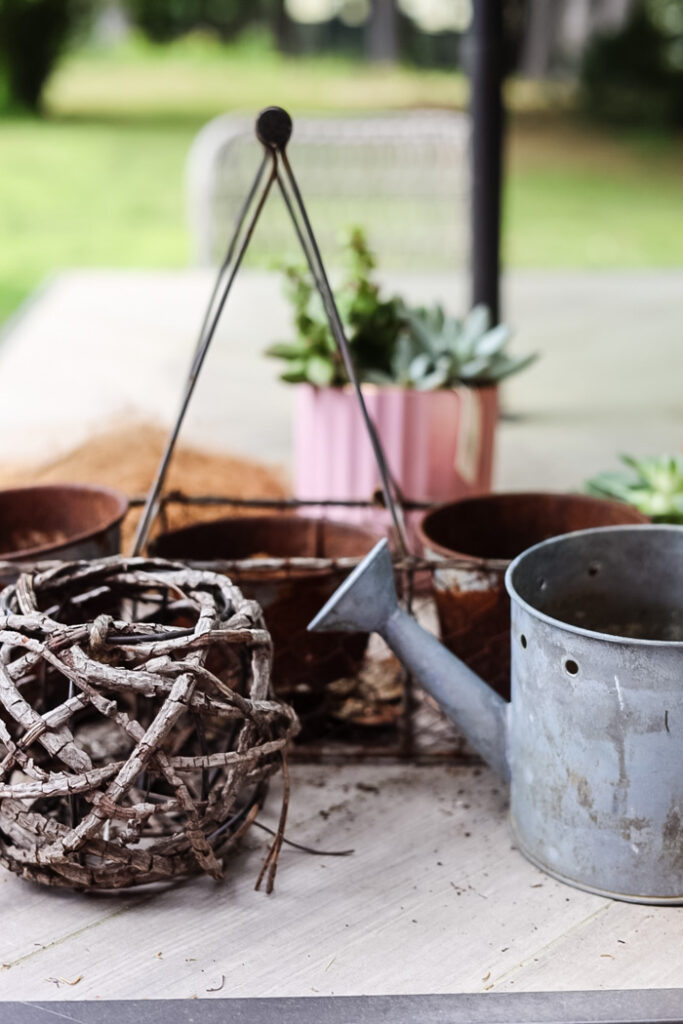
There’s something so satisfying about giving old, discarded items a new life—especially when they end up covered in greenery! Recently, I rummaged through my stash of ‘junk’ (you know, those odds and ends we can’t bear to toss because someday they’ll be perfect for something) and unearthed three unlikely candidates for a garden makeover: a rusty chicken wire basket with metal pots, a mini branch orb, and a tiny galvanized watering can. Instead of collecting dust, they’re now the most adorable succulent planters, adding whimsy and texture to my outdoor space.
This project was quick, easy, and budget-friendly, just the way I like my DIYs! If you’ve got a few forgotten treasures lying around (or spot some at a flea market), I’ll show you how to turn them into eye-catching succulent displays. Plus, I’m sharing my best tips for keeping outdoor succulents happy all season long.

This post may contain affiliate links, which means we receive a small commission if you purchase through our links. See our disclaimer page for more information.
What You Will Need
Materials for this Project
- Salvaged Containers (think outside of the box!)
- What I am Using:
- Rusty chicken wire basket with metal pots
- Mini galvanized watering can (similar)
- Grapevine orb
- Assorted succulent plants (choose hardy varieties like Sedum, Echeveria, or Sempervivum). Amazon has live succulents too.
- Potting mix (well-draining, cactus/succulent blend)
- Optional: moss, pebbles, or decorative sand for finishing touches
DIY Step-by-Step: Turning Forgotten Treasures into Succulent Planters
Step 1: Clean & Prep Your Containers
General Tips for Any Found Container:
Before planting, give your upcycled treasures a little TLC to make them plant-friendly:
Remove Dirt & Debris:
- Scrub with soapy water and a brush (or wipe down with a damp cloth).
- For rusty or grimy items, use vinegar or baking soda for a deeper clean (rinse well!).
Check for Drainage:
This is the most important step for happy outdoor succulents. They absolutely cannot sit in water.
- No holes? Add them! Use a drill (for metal/wood) or a nail and hammer (for thinner materials like tin).
- Can’t drill? Layer the bottom with lava rocks or pebbles (1-2 inches) to prevent soggy roots.
Stabilize Weak Spots:
- Reinforce wobbly handles or loose seams with glue (E6000 works great for metal/wood).
- Line fragile containers (like baskets or grapevines) with coconut coir, burlap, or moss to hold soil.
Embrace Imperfections:
- Rust, chipped paint, or patina add character! Just make sure your container won’t crumble apart.
Safety Note: Wear gloves when handling sharp or rusty edges!
Step 2: Add Liners
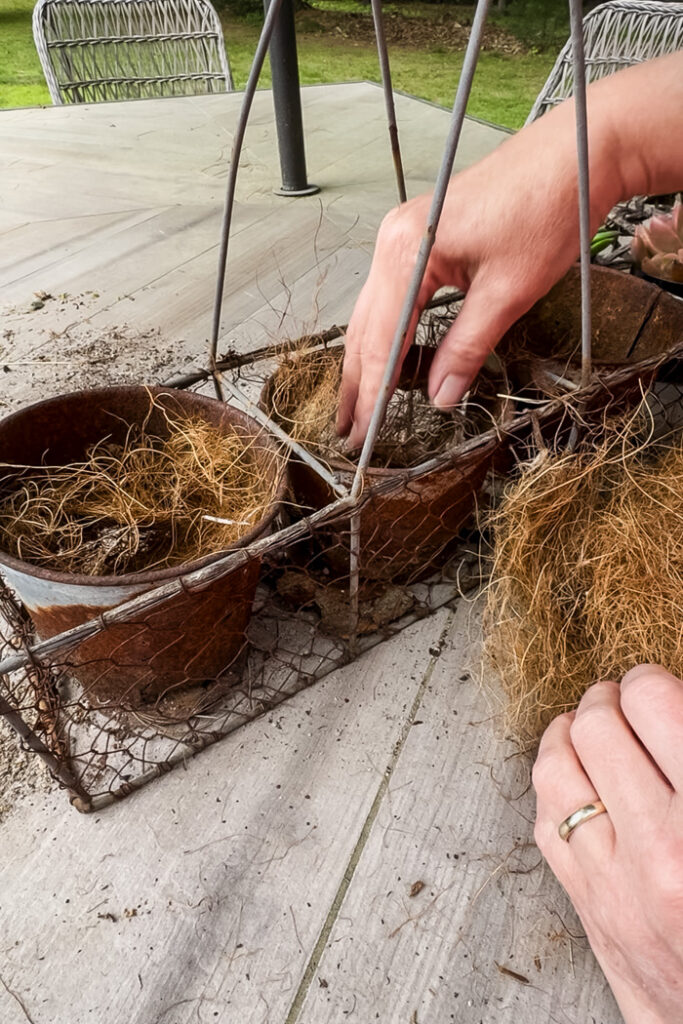
For any containers with large gaps, like my chicken wire basket and grapevine round basket (I think it was a votive holder originally?), you’ll need a liner to hold the soil.
What To Do:
- Press a piece of coco liner or a generous handful of sphagnum moss firmly inside the container, molding it to the shape. This will keep your soil snug inside while still letting water drain through.
Step 3: Fill With Soil
Make sure to use a cactus and succulent potting mix. Don’t pack it down too tightly!
What To Do:
- Fill your planter ⅓ to ½ full with succulent potting mix, leaving enough room for your plants’ roots. (Small containers need less soil; larger ones need more!)
Step 4: Plant Your Succulents
Now for the fun part, let’s bring these planters to life!
Prep Your Plants:
Gently remove succulents from their nursery pots and loosen the roots slightly to encourage growth.
What To Do:
- Arrange with Style:
- Small planters (watering can): Place smaller succulents near the front and let trailing varieties spill over edges.
- Chicken wire basket: I used one larger succulent (like an Echeveria) in each of the three pots for balance.
- Grapevine basket: Since mine will hang, I clustered tiny succulents around the opening for a “living frame” effect.
- Secure & Backfill:
Once you love the layout, add more soil around the roots, pressing lightly to eliminate air pockets. Tip: Leave a little space at the top to prevent spills when watering! - Top dressing: Sprinkle sand, tiny pebbles, or moss to cover bare soil and reduce evaporation after you plant.
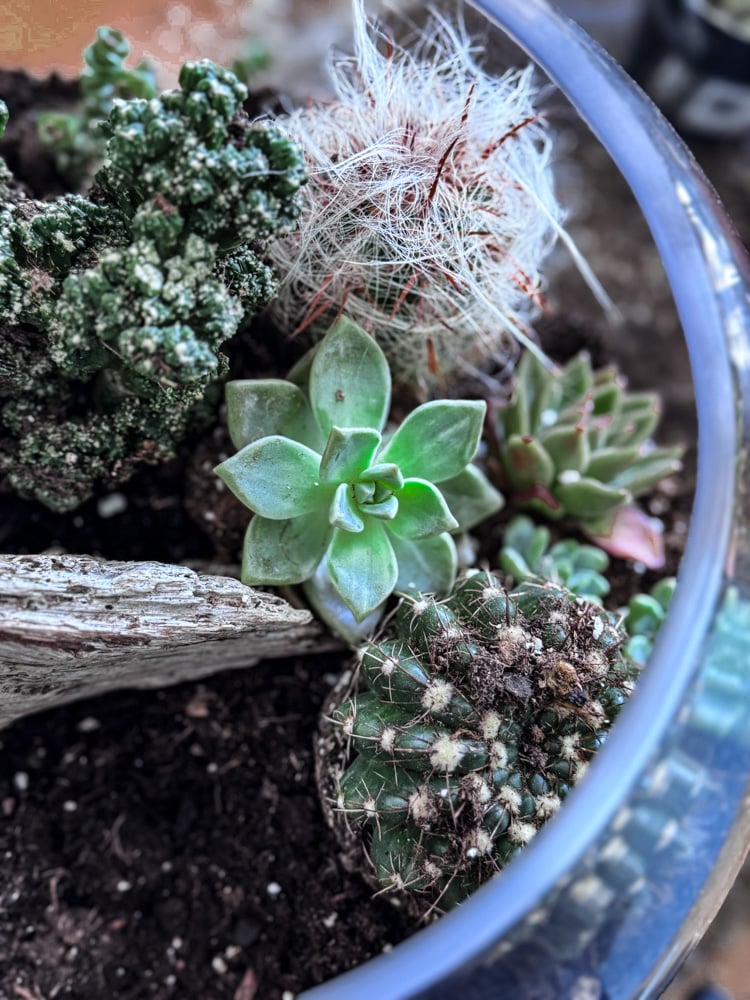
Pro Tip: When planting small containers, choose 3-5 contrasting succulents for maximum visual effect.


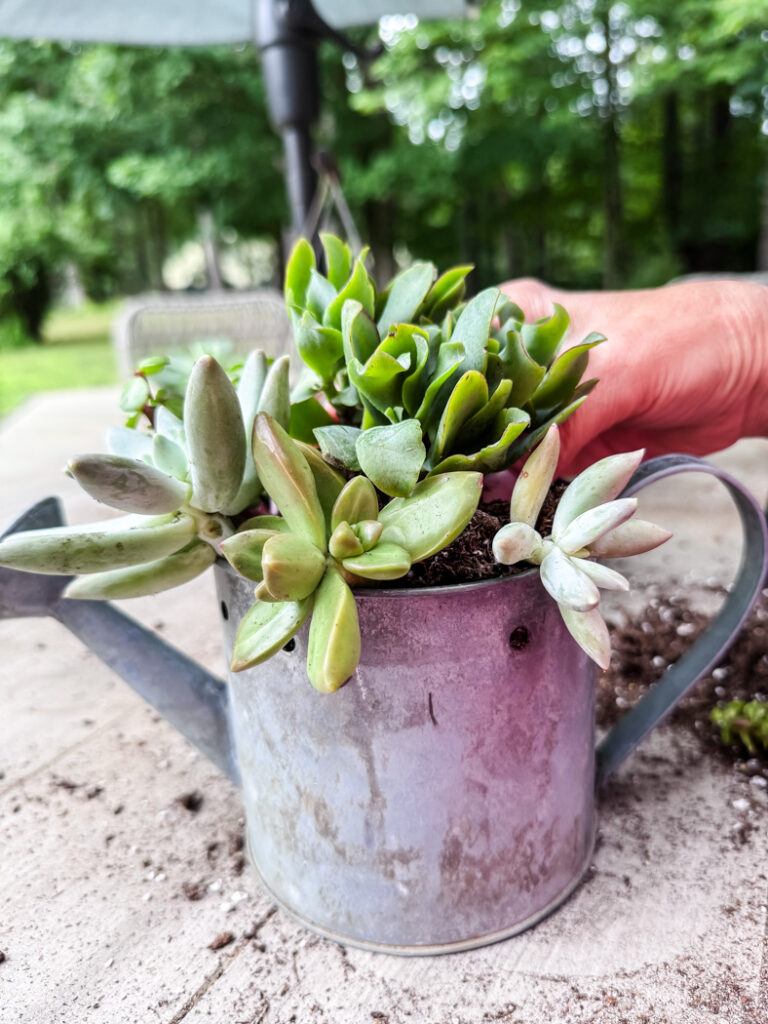
Mini Watering Can
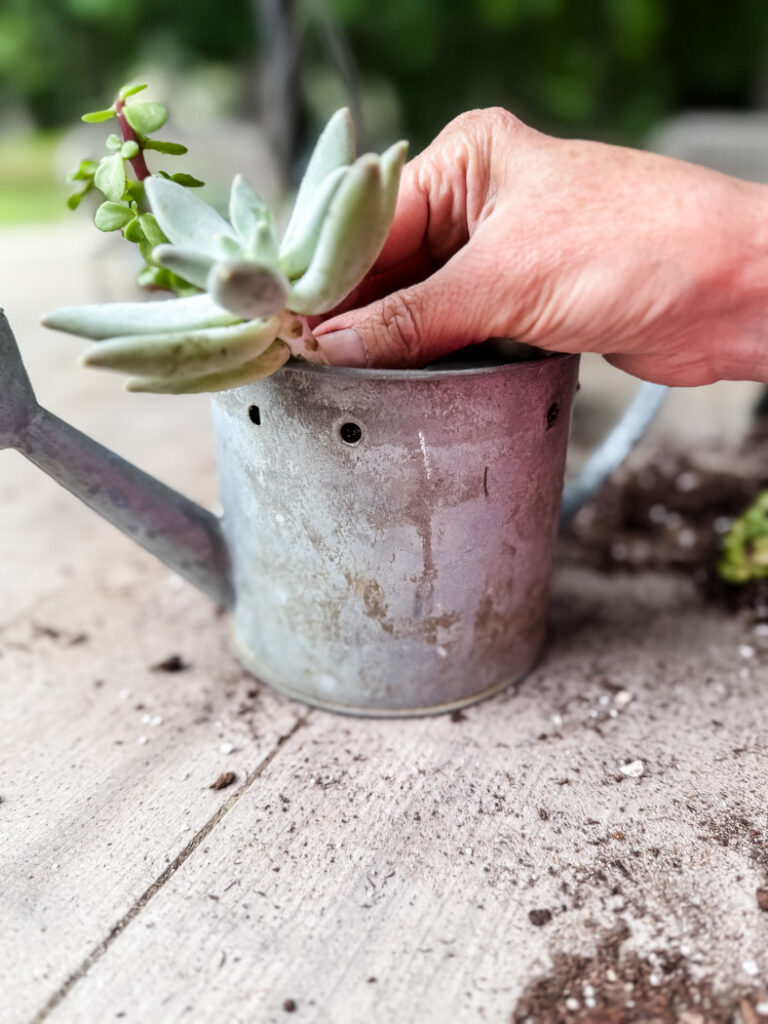
Place smaller succulents near the front and let trailing varieties spill over edges.
To give this small planter a big impact, I packed it with five different succulents. The key was to vary the shapes, textures, and colors, which makes the simple container look full and visually interesting.
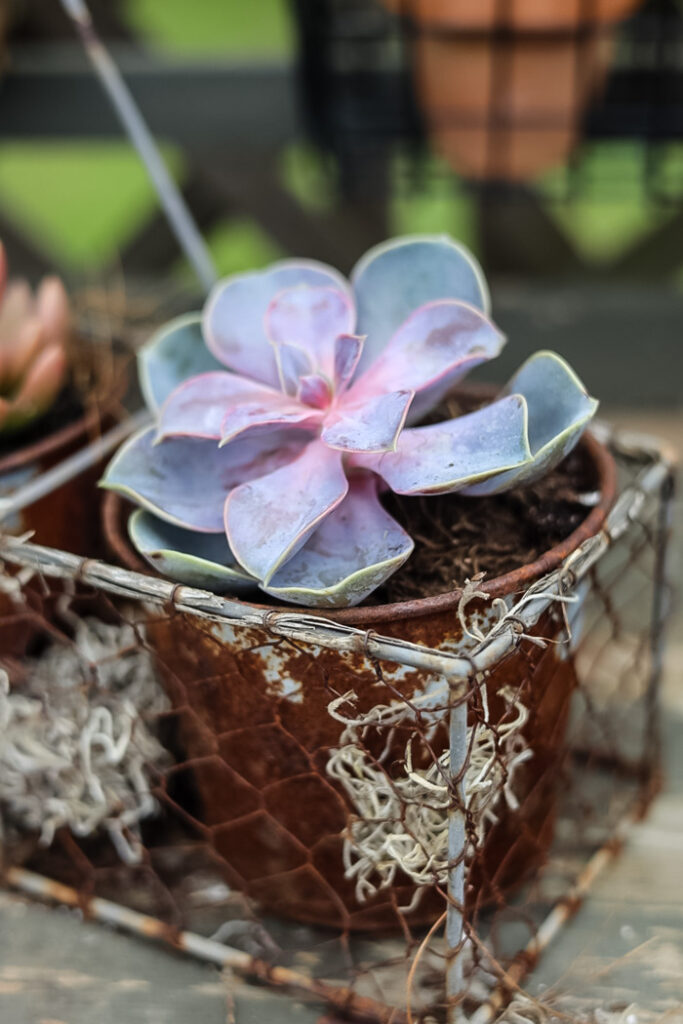
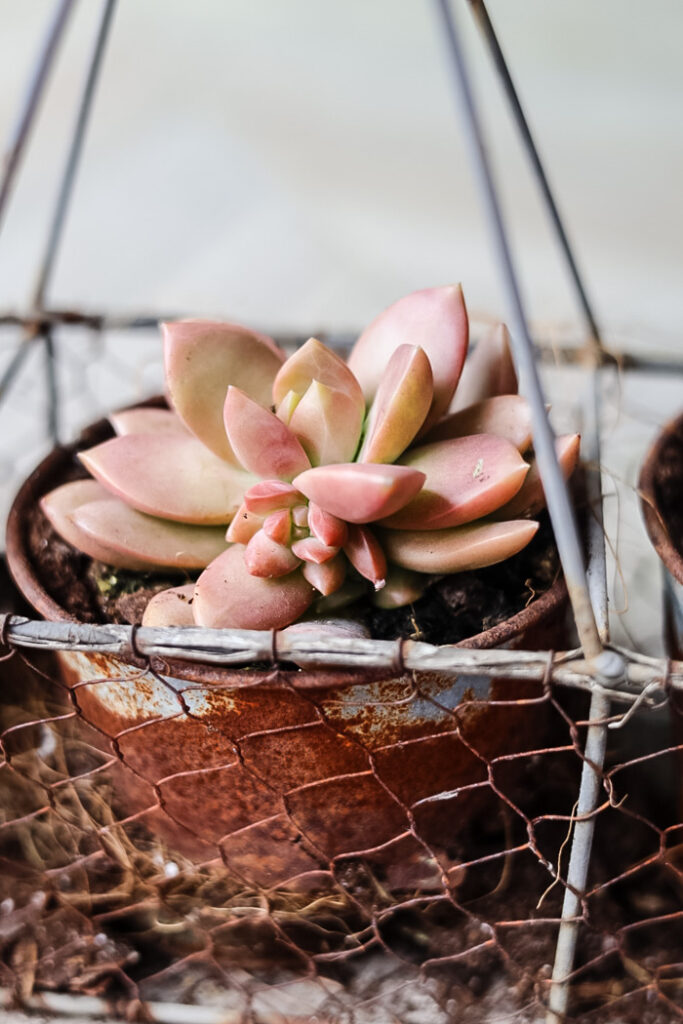
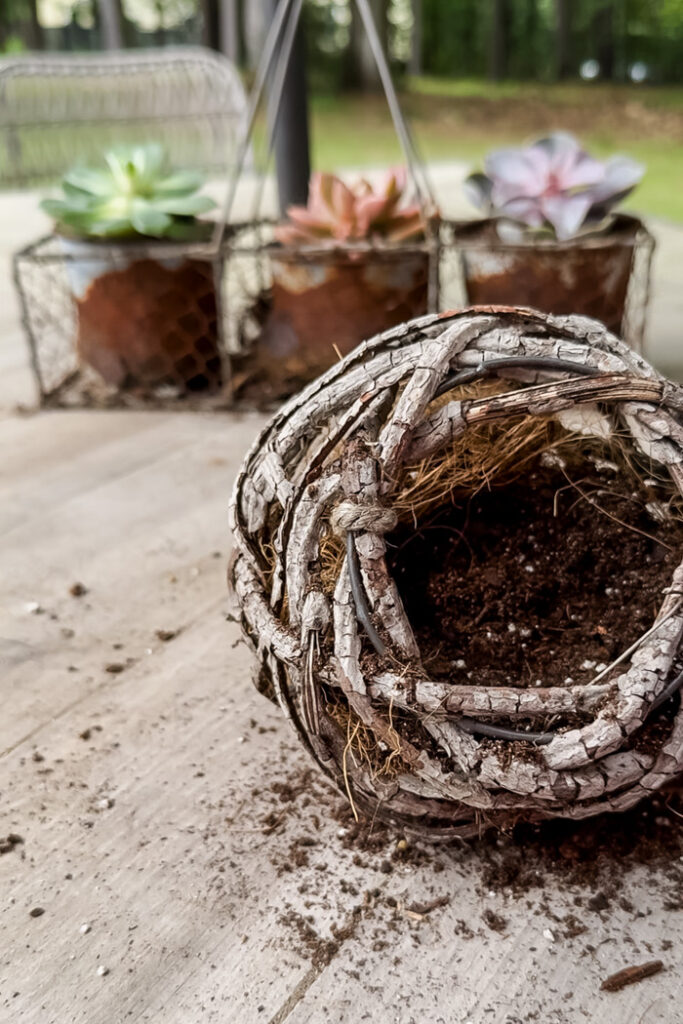
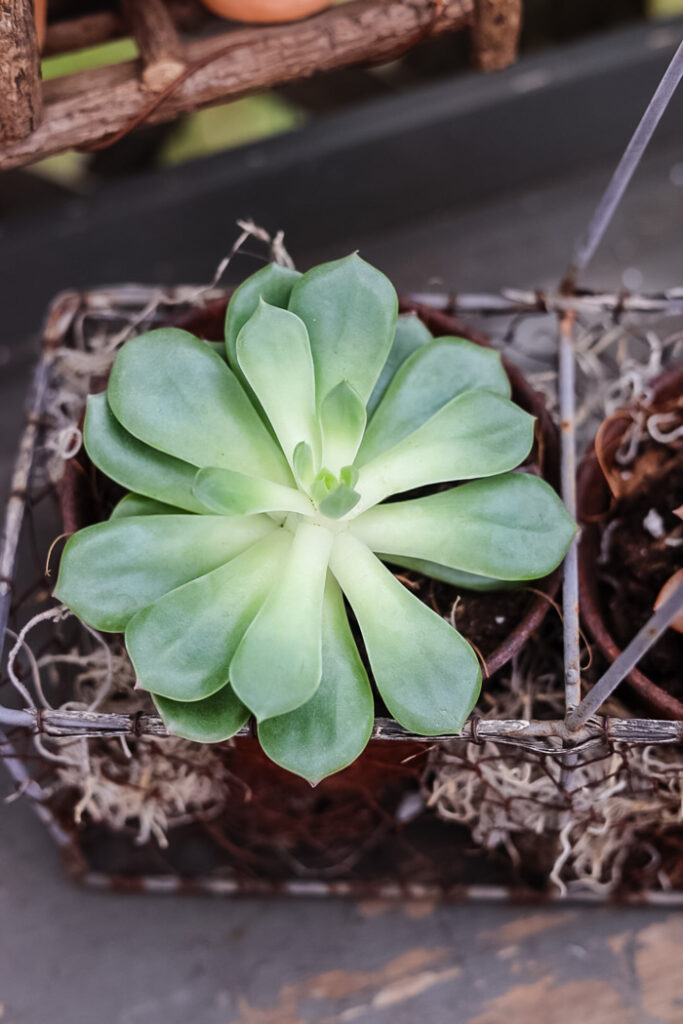
Chicken Wire Basket
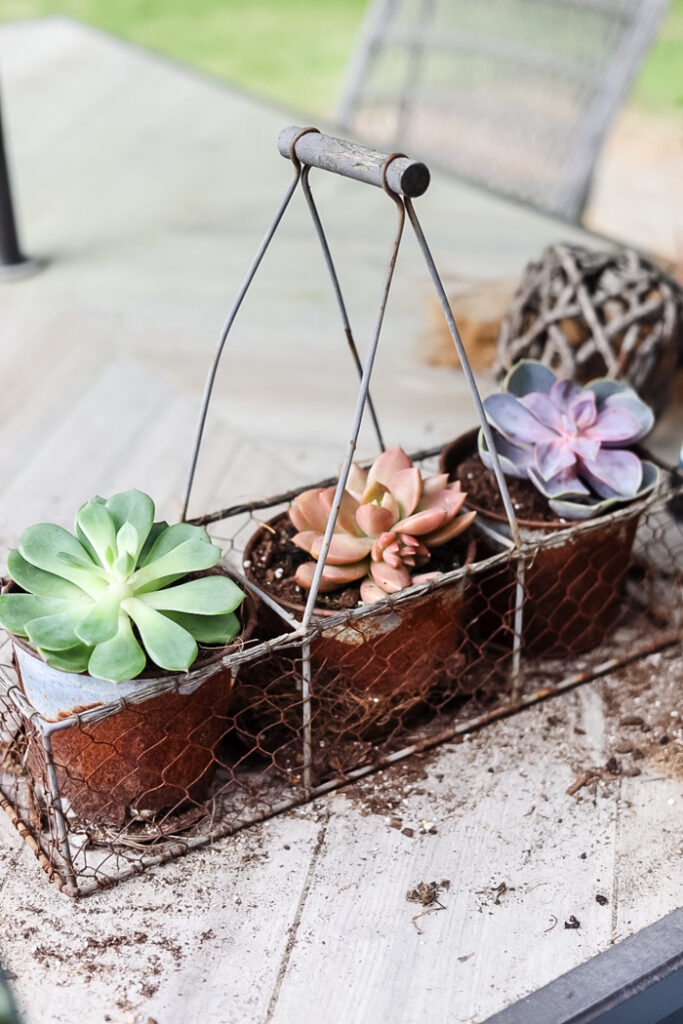
For this piece of junk chicken wire basket, I used 3 larger succulents for maximum impact. When I was succulent shopping at Lowe’s, I was immediately drawn to the colors of these 3 echeveria (especially the pink and coral tones)
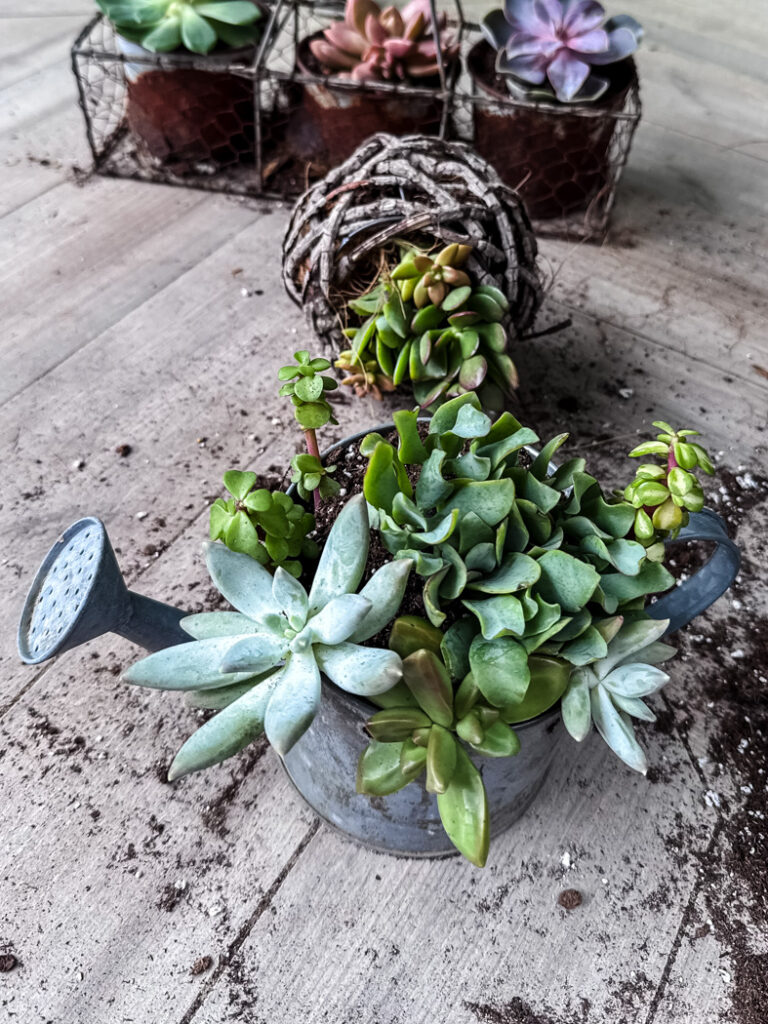
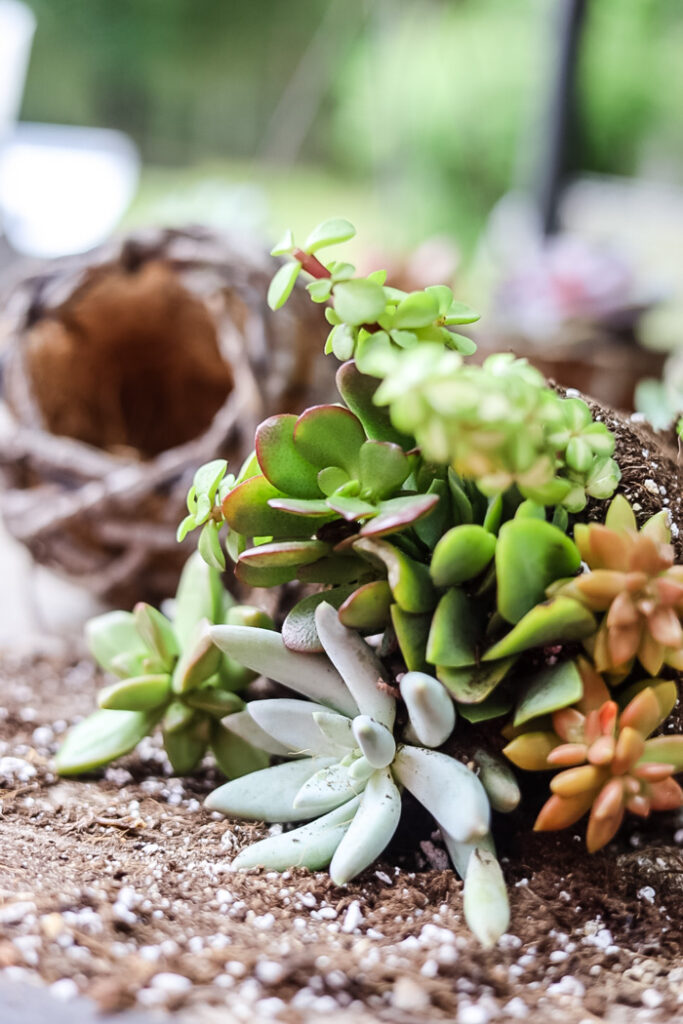
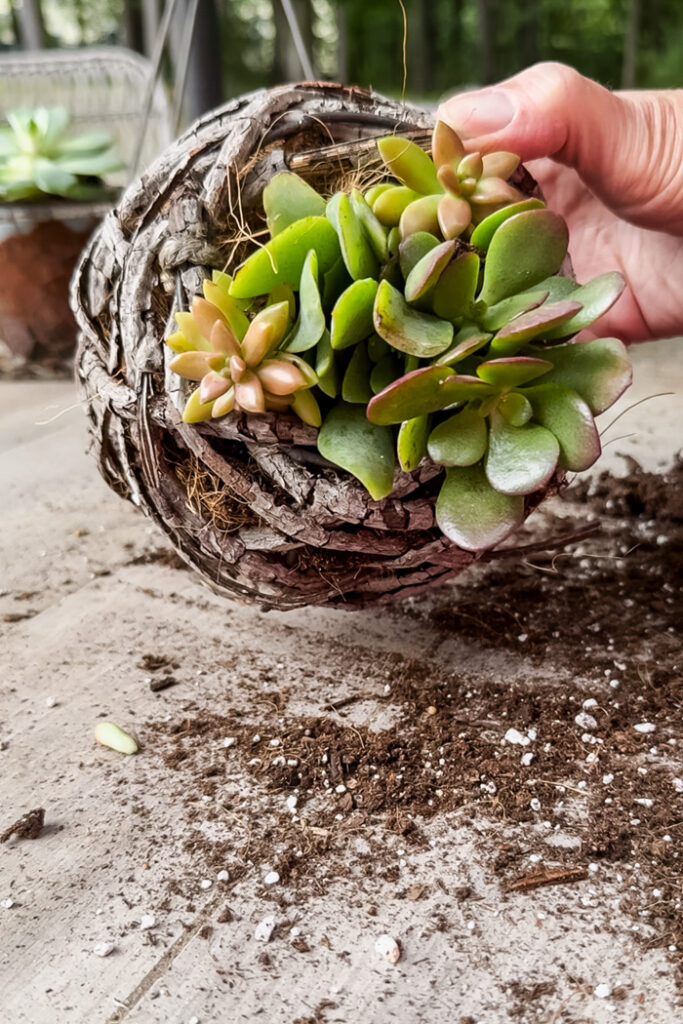
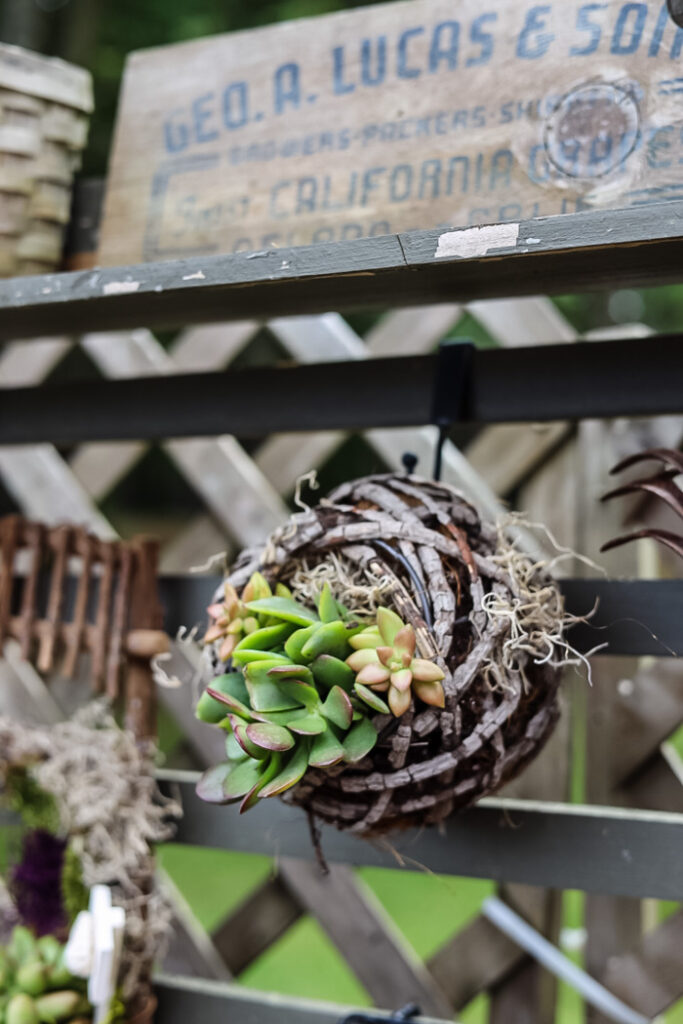
Round Grapevine Basket
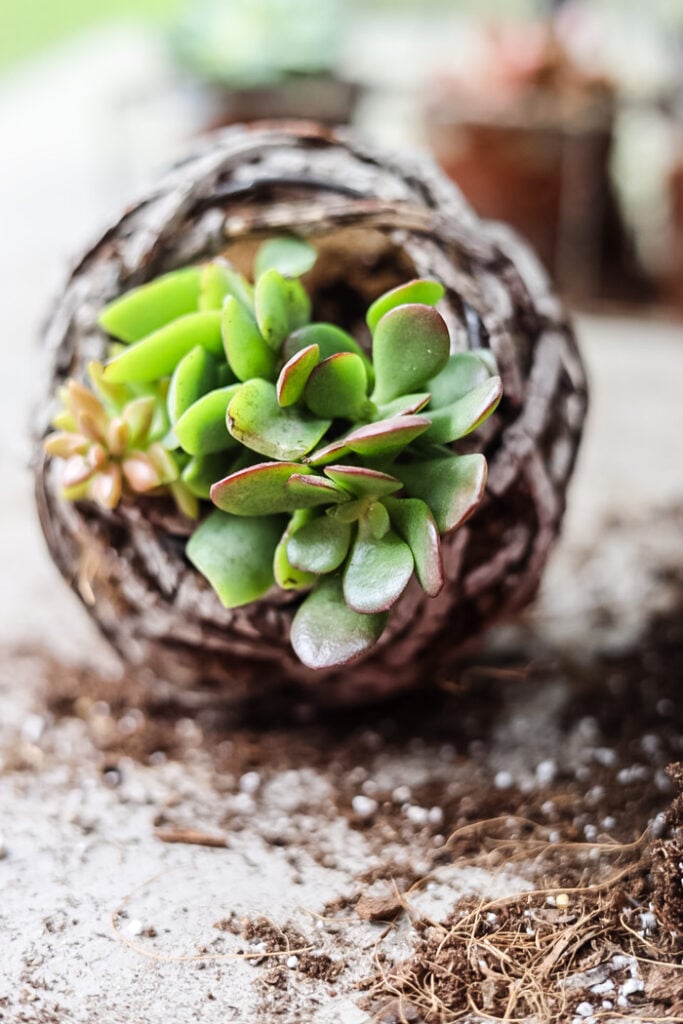
This little planter was such a joy to create! Designed to hang with its succulent ‘bouquet’ facing forward, I tucked petite varieties snugly around the opening—like a living floral wreath. The small-scale plants nestle together perfectly, creating a lush display from every angle!
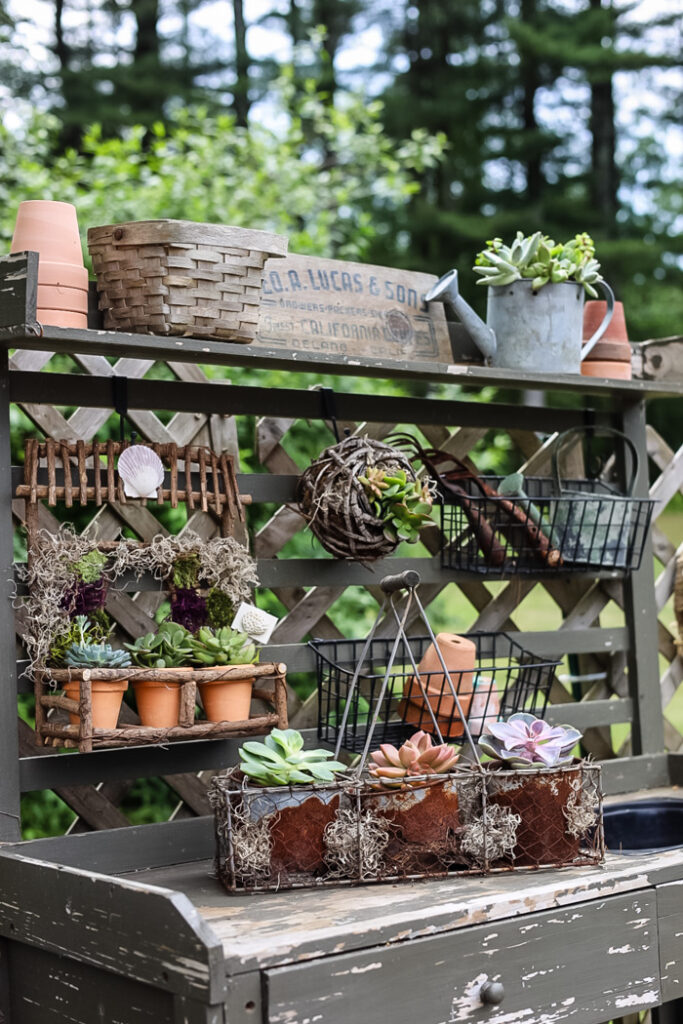
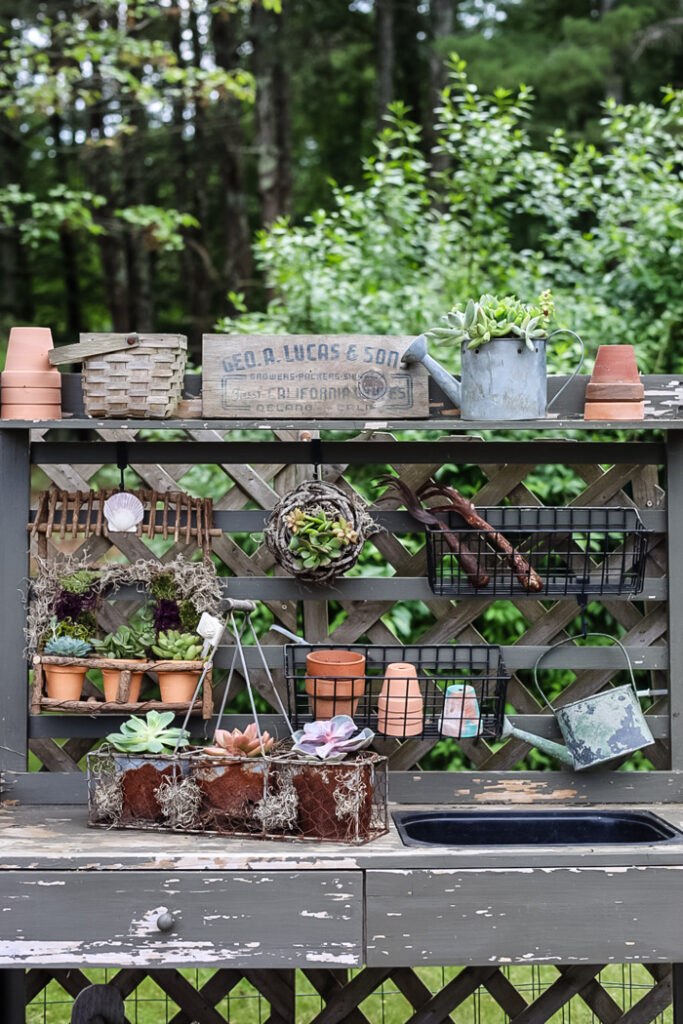
The Big Reveal: Styling the Planters in the Garden
And now for my favorite part… the moment that makes every DIY project so worthwhile! After a bit of planting and creating, it was time to bring these little upcycled planters out to the garden and find them a home.
My old potting bench, with its weathered green paint and rustic look, felt like the perfect stage. It’s amazing how a few separate, humble items can come together to create a scene that feels like it’s been here forever. I am just so thrilled with how it turned out!
Chicken Wire Caddy
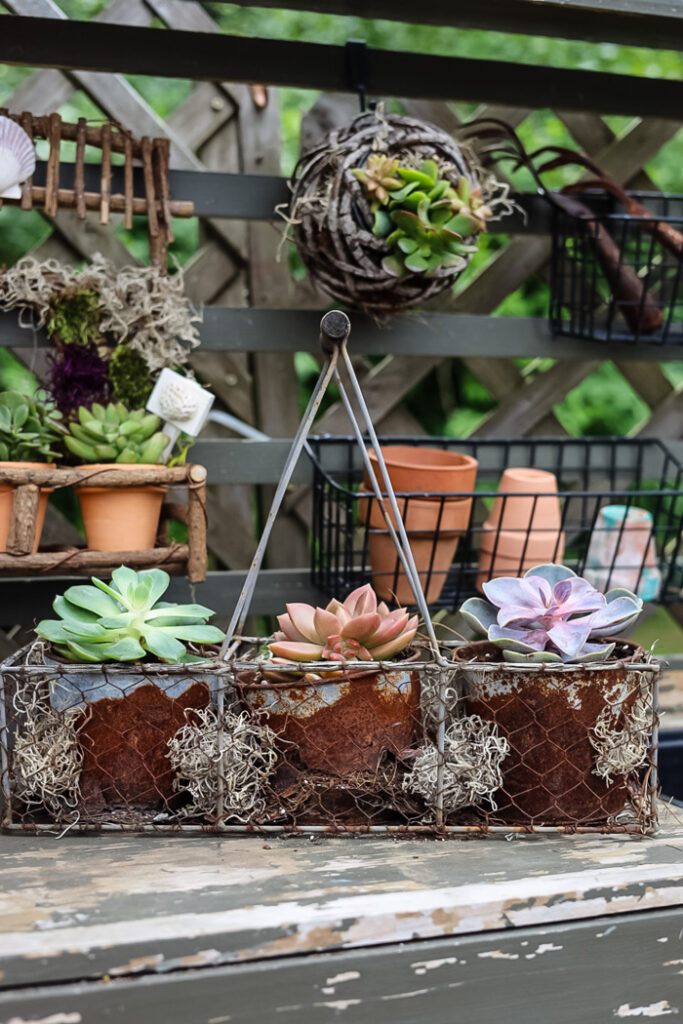
The rusty chicken wire caddy really steals the show! I placed it front and center on the bench. The contrast between the rough, aged metal and the soft, fleshy succulent leaves is just what I was hoping for. The mix of greens, purples, and pinks packed into the old pots brings so much life and color to the whole display. I may move this one to the small seating area on my front porch for the Summer.
The Mini Galvanized Watering Can
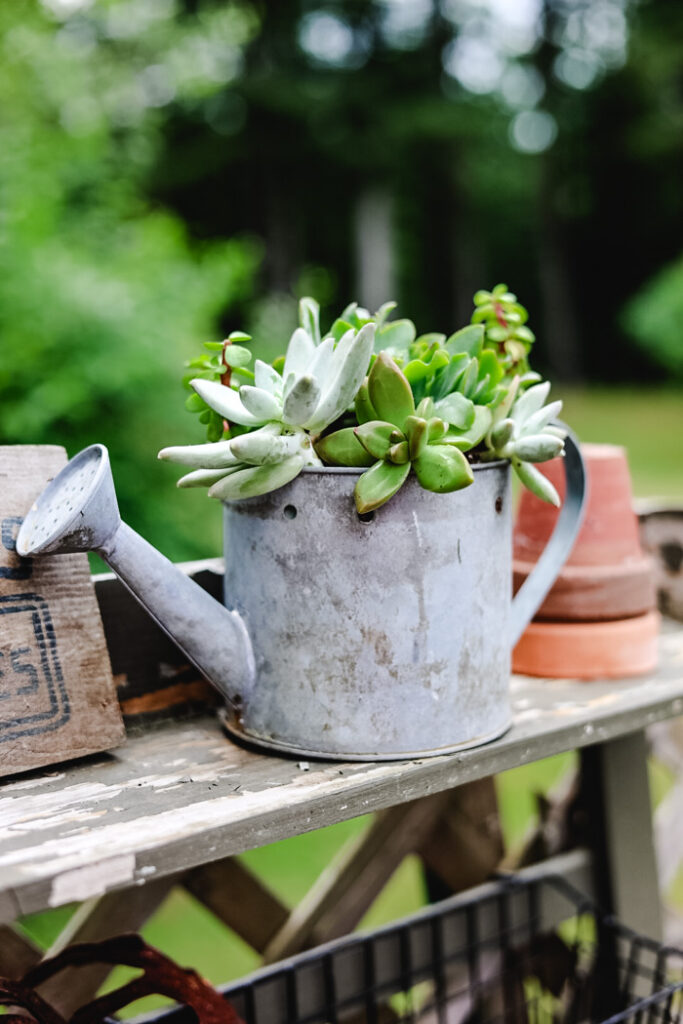
Perched on the top shelf of the bench, as the plants grow, I can imagine the trailing succulents spilling over the sides. The contrast between the shiny metal and the muted greens/blues of the plants is so satisfying!!
Hanging Succulent Planter
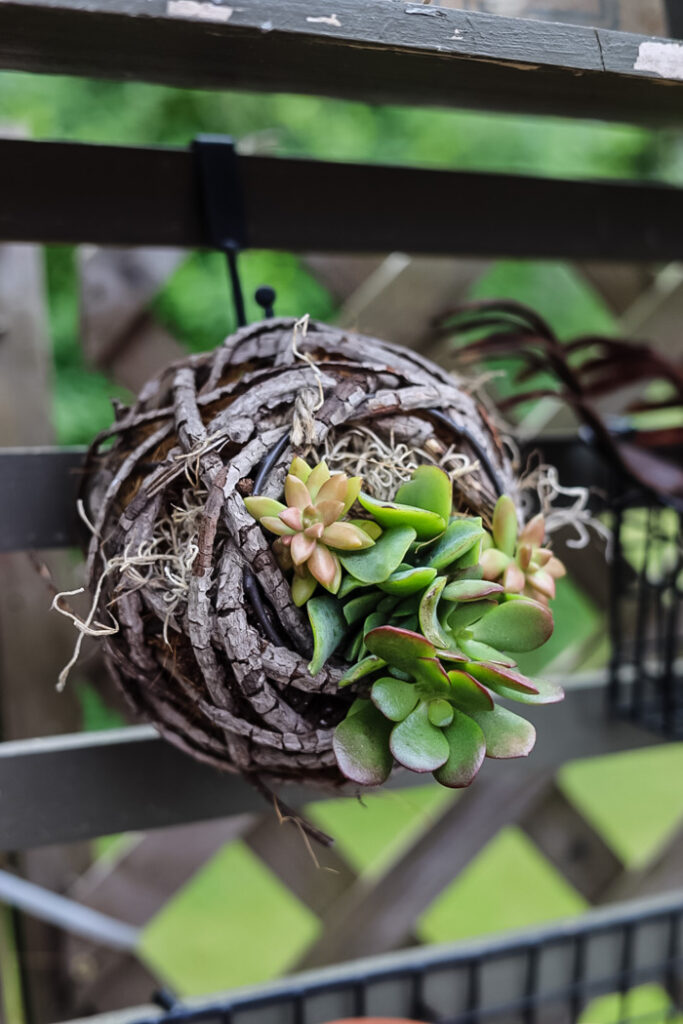
Hung from a hook above the bench, this one feels like a living wreath. The succulents peek out from the opening, creating a “frame” of foliage that’ll only get fuller as they grow. It adds such a playful, whimsical touch to the potting bench.
The 4th succulent planter that is hanging was made from a thrift store find. You can see the Instagram reel here. The tutorial is coming, so stay tuned!
How to Keep Your Outdoor Succulents Thriving
One of the best things about succulents is that they are wonderfully low-maintenance. They follow the “easy care, not no care” rule. Once you understand the basics of what they love—plenty of light, not too much water, and good drainage—you’ll be rewarded with beautiful, healthy plants all season long. Here’s everything you need to know to care for your new outdoor succulent planters.
Let the Sun Shine… But Not Too Much
Succulents are sun-lovers, but the intense, direct sun of a hot summer afternoon can sometimes be too much, causing their leaves to scorch.
- The Sweet Spot: Aim for a location that gets at least four to six hours of direct morning sunlight. A spot that gets some protection or dappled shade during the hottest part of the afternoon (around 1-4 PM) is perfect.
- Acclimate Them: If your succulents have been living indoors or in a shady nursery, don’t move them into bright, direct sun right away! Just like us, they can get a sunburn. Acclimate them over the course of a week, starting with just an hour of direct sun and gradually increasing the time each day.
The #1 Rule: The “Soak and Dry” Method
If there is one secret to happy succulents, this is it. The most common mistake is overwatering. Succulents are desert plants and absolutely hate having their roots sit in wet soil, which leads to rot.
- How to Water: When the soil is completely dry, give the planter a thorough watering until you see water run out of the drainage holes. This ensures all the roots get a good drink.
- When to Water: Do not water again until the soil is bone dry. Don’t water on a fixed schedule! The best way to check is to stick your finger about an inch down into the soil. If you feel any moisture at all, wait another day or two. In the peak of a New Hampshire summer, this might be once a week. During cooler, cloudier periods, it could be every two to three weeks.
Soil and Pests
- The Right Foundation: As we covered in the DIY steps, using a fast-draining cactus and succulent mix is essential. This is the foundation of good drainage and happy roots.
- Unwanted Visitors: It’s rare, but outdoor succulents can sometimes attract pests like ahpids, mealybugs (they look like tiny white bits of cotton), or even squirrels. If you spot any bugs, simply dip a cotton swab in diluted rubbing alcohol and dab them off.
Preparing for a New England Winter (The Most Important Step!)
The beautiful, fleshy succulents we used (like Echeverias and Sedums) are tender and will not survive a frost or a snowy New Hampshire winter. To keep your creations for next year, you must bring them inside.
- Watch the Calendar: Plan to bring your planters indoors before the first frost, typically around late September or early October here. A good rule of thumb is to bring them in when the nighttime temperatures consistently drop below 50°F.
- Debug and Clean: Before bringing them inside, give your planters a good inspection for any hiding pests. It’s a good idea to give them a gentle spray with a hose to knock off any potential hitchhikers.
- Find a Sunny Spot: Place them in the sunniest window you have for the winter—a south-facing window is ideal. They need as much light as they can get indoors.
- Drastically Reduce Water: Your succulents will go into a dormant state during the winter. They need very little water to survive. Water them lightly only when the leaves start to look a little wrinkled, maybe once every month or six weeks. Come Spring, when you see new growth, you can gradually increase watering again before they head back outdoors after the last frost.
A Little Rust, A Lot of Charm
What started as a pile of forgotten odds and ends has become one of my favorite garden features! These upcycled succulent planters prove that with a little imagination (and a few drought-tolerant plants), even the “rustiest rejects” can transform into meaningful, living decor.
I love how they blend practicality with personality—the watering can’s playful spill of greenery, the basket’s sturdy vintage vibes, and the grapevine orb’s whimsical look. But the real magic? They’ll keep evolving. As the succulents grow and trail, these planters will only get more charming with time.
If you take away one thing from this tutorial, let it be this: Don’t toss those quirky containers hiding in your garage or thrift store finds begging for a purpose (even if your husband asks what is that junk!) . With drainage holes, good soil, and the right plants, anything can become a planter.
Now I’d love to hear from you:
- Have you upcycled something unexpected into garden decor?
- Which of these three would you try first?
If you are inspired by this or any of my other DIY projects, I would love to see them and add you to the Reader’s Spotlight gallery. I’m always hunting for new junk-to-jewel ideas! Send a photo to me at jennifer@cottageonbunkerhill.com
Happy planting (and happy treasure hunting!),
xo, Jennifer
more succulents!
Indoor Succulent Planters
Pin for Later!


Ok Jennifer…you and Rachel are making me be a hoarder of wood, anything mossy and mostly anything that is rusty,crusty..lol! I love gardening and have a potting bench so anything is game… thank you for your inspirations..
Lorri, that made me laugh out loud!!!!
Cute ideas for found treasures! I love your potting bench, as well! I’d love an area outside to pot up plants. I use a small table that my father in law built years ago but it’s really not ideal. I’m going to go searching my basement and garage, see what kind of containers I can find! Thank for always inspiring us, Jennifer!
It’s so helpful to have a spot when I working out there. Even when I was planting all my seeds I spread all the packets out on the bench to keep track of what the heck I was doing!!
Love these. Where did you find that wonderful chunky grapevine orb? Most online are made from the more flexible vines.
As with 80% of my house…the thrift store!!!