

Let me show you how to personalize your garden with these DIY plant markers made out of air-dry clay.
DIY Plant Markers: Crafting Custom Clay Plant Markers
Do your herb seedlings all look the same once they sprout? Have you ever brought home a gorgeous succulent, only to forget its name a week later? If you love gardening but struggle to keep track of your plants, these handmade clay plant markers are the perfect solution!
Not only are they adorably rustic, but they’re also durable, customizable, and surprisingly easy to make. Forget flimsy plastic tags—these clay markers add a touch of cottagecore charm to potted herbs, vegetable gardens, or even houseplants. Plus, they make thoughtful gifts for fellow plant lovers!

In this tutorial, I’ll walk you through how to create your own custom clay plant labels using simple air-dry clay and a few basic tools. No fancy equipment required—just a little creativity!
This post may contain affiliate links, which means we receive a small commission if you purchase through our links. See our disclaimer page for more information.
How To Make Clay Plant Markers

Materials for this Project
DIY Rustic Clay Plant Markers: Step-by-Step Guide
Step 1: Roll & Cut Your Clay Markers
Materials For This Step
- Terra cotta air-dry clay (or white—both work!)
- Silicone baking mat (or parchment paper)
- Rolling pin (or smooth wine bottle)
- Circular cutter (cup, cookie cutter, or jar lid)

Instructions:
- Prep Your Workspace: Lay a silicone baking mat on your counter (this prevents sticking and makes cleanup a breeze!). No mat? Parchment paper works too.
- Roll the Clay:
- Knead the clay briefly to soften it.
- Roll it to ¼-inch thickness (slightly thicker than 1/8” to prevent cracks).
- Pro Tip: Use two wooden dowels as “guide rails” on either side of the clay to ensure even thickness.
- Cut Out Circles:
- Press a 2.5-inch-wide cup rim (or cookie cutter) into the clay. Twist slightly for clean edges.
- No cup? Try a mason jar lid or cut freehand into rectangles! Rustic shapes add charm.
Pro Tip: Smoothing & Perfecting Your Clay Disks

The Secret to Polished Markers:
After cutting your clay circles, don’t skip this game-changing step!
- Dip your fingertip in water (or use a damp paintbrush for precision).
- Gently glide along the edges to erase cracks or rough spots.
- Smooth the surface in circular motions—this prevents flaking after drying!

Why it matters: Water acts like a “clay eraser,” blending seams and creating a professional finish. For extra-smooth markers, repeat after the clay firms up slightly (10-15 minutes).
Step 2: Stamp & Personalize Your Markers
Now for the fun part! Using a set of small alphabet stamps to stamp out the names of the plants onto the clay markers.

Materials For This Step
- Alphabet stamps (or a toothpick for hand-carving)
- Straw or Chopstick (for hanging holes)
- Damp paintbrush or fingertip

- Plan Your Layout:
- For longer names (like “Broccoli”), arrange stamps on the clay without pressing first to test spacing. (I didn’t do this on the first try of stamping “broccoli” and ended up rolling up the clay and starting over…gotta have the “i” at the end!)
- Stamp in Batches:
- Press 3 letters at a time max to maintain control. You can also do one letter at a time if that is easier for you.
- Use firm, even pressure—but don’t push too deep or the clay may warp.

Poke Hanging Hole

- Poke a hole near the top center with a straw or chopstick.
- Avoid the edge: Leave at least ¼” space to prevent cracking.
- Smooth out the marks made by the corners of the stamps on the clay with a wet finger or paintbrush.
Step 3: Drying Your Clay Markers (The Right Way!)

Drying Time & Conditions:
- Typical drying: 24-48 hours (though warm days can speed this up)
- Ideal conditions: Warm, dry area with good air circulation
- Avoid direct sunlight (can cause cracking or warping!)
What Worked For Me:
I placed my markers on a wire cooling rack (not shown) on a warm patio table. The airflow from below helped them dry evenly in about 4 hours. You’ll know they’re ready when:
- Color lightens significantly
- Surface feels cool to the touch
- No give when gently pressed
Step 4: Sealing Your Markers for Outdoor Use
(Because rain shouldn’t ruin your hard work!)
Recommended Sealants:
- Krylon Triple Glaze (your choice – gives that beautiful ceramic-like finish)
- Mod Podge Outdoor (brush-on option for precise control)
- Clear Polyurethane Spray (extra heavy-duty protection)

How to Seal Like a Pro:
- Prep Work:
- Work in a well-ventilated area (garage or outdoors)
- Lay markers on wax paper or cardboard (prevents sticking)
- Wear gloves and mask (safety first!)
- Application (for spray sealant):
- Hold spray 8-10 inches away
- Apply light, even coats – 2-3 thin layers are better than 1 thick coat
- Let dry 15 minutes between coats
- Flip carefully using tweezers for full coverage
- Application (For Mod Podge Outdoors)
- Brush on Mod Podge on top surface, let dry then do back surface
Pro Tips:
• Test spray on one marker first – some clays react differently
• For intricate designs: Use a small brush to apply sealant to stamped letters
• Rainy climate? Add an extra layer on the edges (most vulnerable part)
Drying Time:
- Touch dry: 1 hour
- Fully cured: 24 hours (wait before placing outside in wet conditions)
Step 5: Assembling Your Plant Markers
(The easiest way to display your handmade creations!)

- Slide Smart: Insert stake upward through the hole (no fighting the curly end!).
- Adjust Height: Position marker 2-3″ above soil level for best visibility.
Final Touches: Your Handmade Garden Charmers Are Ready!
And just like that—you’ve transformed simple clay into personalized garden art! Whether you’re labeling herbs, succulents, or veggie seedlings, these markers add that special Cottage on Bunker Hill touch to your green spaces.

Now to get out in the garden and plant a few herbs so I can put the markers to good use.

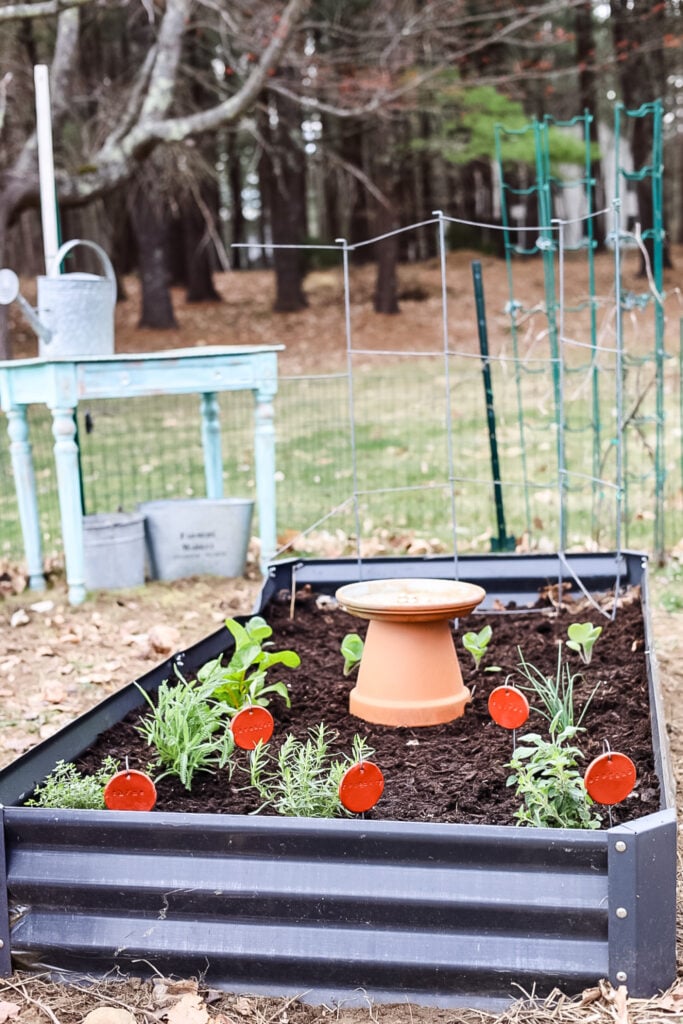
The warmer weather is finally here in New England and it is so nice to be able to get out in the garden again!
To prepare this raised garden bed for new plantings I first added a few small bags of garden soil and compost to start things off right for the new growing season.

This morning I picked up a few herb plants at Home Depot and my local nursery Gardener’s at Rolling Green.

Aren’t the leaves of this French lavender so pretty?
Garden Tips: Create Magic with Mixed Planting
Why I’m Obsessed with Cottage-Style Mixing:
Last year, I tossed the “one crop per bed” rule and mixed herbs, flowers, and veggies together—and oh, the magic that happened! My raised beds became a buzzing, blooming paradise with that dreamy English cottage vibe I adore.

This Year’s Favorite Combo:
In this bed, I’m tucking calendula seeds between the lavender and sage plants. Why? Because these sunshine-y blooms:
- Thrive until frost (the last cheerleaders of fall!)
- Attract pollinators to boost herb/flower production
- Need zero fuss—plant seeds and forget ‘em!
Dive Deeper:
For more mixed-bed secrets (and which plants are BFFs), check out my Cottage-Style Companion Planting Guide.
Bonus Garden Tip: Create a Simple Bee & Butterfly Water Bar
What You’ll Need:
- 1 terra cotta pot (upside down as the base)
- 1 matching saucer (the “water bar” itself)
- Handful of glass beads, marbles, or small stones(so tiny wings stay dry while drinking)

As a pollinator hostess, I make sure my garden offers more than just flowers – every thirsty bee and butterfly deserves a proper drink station! My favorite hack? A 5-minute upcycled waterer that’s both pretty and practical.
Why This Works So Well:
- Budget-friendly (repurposes spare pots!)
- Charming rustic look that blends with garden beds
- Butterfly-approved—last summer I watched a swallowtail linger for 10 minutes!
Pro Tips:
- Place stations in partial shade to slow evaporation
- Place near flowering herbs like lavender or thyme for a pollinator pit-stop
- Refresh water every 2-3 days to prevent mosquitoes

See your projects featured! If you are inspired by this or any of my other DIY projects, I would love to see them and add you to the Reader’s Spotlight gallery. Send a photo to me at jennifer@cottageonbunkerhill.com
xo, Jennifer
Looking for other clay projects?
Other Garden Ideas

Cottage Garden
Favorite Products
Shop my gardening favorites! Raised beds, plant supports, & tools to make your garden grow.

Clay Plant Markers
Are you looking for a fun way to personalize your garden this year? I just made a set of air-dry clay plant markers today and it's such a cute way to label your garden!
Materials
- Terra Cotta Air Dry Clay
- Alphabet Letter Stamps
- Small Plant Stakes
- Spray Glaze
Tools
Instructions
- Roll out air-dry clay to about 1/8 inch in thickness
- Cut out circle shapes using a round cookie cutter or drinking glass rim. These are 2.5-inches
- Use small alphabet stamps to write out the names of herbs, plants, or flowers
- Poke a hole for hanging in the top center (but not too close to the edge)
- Let the clay air dry
- To protect the clay markers seal with spray glaze
- Hang the clay discs on the metal plant stakes.
Notes
I recommend Krylon Triple Spray Glaze to seal the clay markers, it gives a glazed pottery look to the plant markers.
Recommended Products
As an Amazon Associate and member of other affiliate programs, I earn from qualifying purchases.
-
Amazon.com: Temlum Wooden Plant Labels, 25 Pcs Garden Markers with Stake & Marker Pen, Garden Labels Plant Sign Tags for Flowers, Herbs, Potted Plants, Seed : Patio, Lawn & Garden
-
Crayola Air Dry Clay, Terra Cotta, 5 lb. Resealable Bucket, Modeling Clay for Kids
-
Krylon I00500A00 12-Ounce Triple Thick Clear Glaze Aerosol Spray,High-Gloss
-
Amazon.com: Alphabet Stamps Set, KMIKE 70pcs Letter/Number/Symbol Vintage DIY Craft Card Making Wood Rubber Stamp : Arts, Crafts & Sewing


Jennifer, I love these! I’ll get my order ready for you when my garden is planted! 😂😂
They would be fun to make with Brookie
Great minds think alike girl, I just made these too 😉
We are always on the same vibe!!! Can’t wait to see yours!!
This is such a cute idea. I love it. I would love to share this on my newsletter this week.
Fantastic, thanks Renae!!
What a cute idea!
Thanks, Stacy!!