

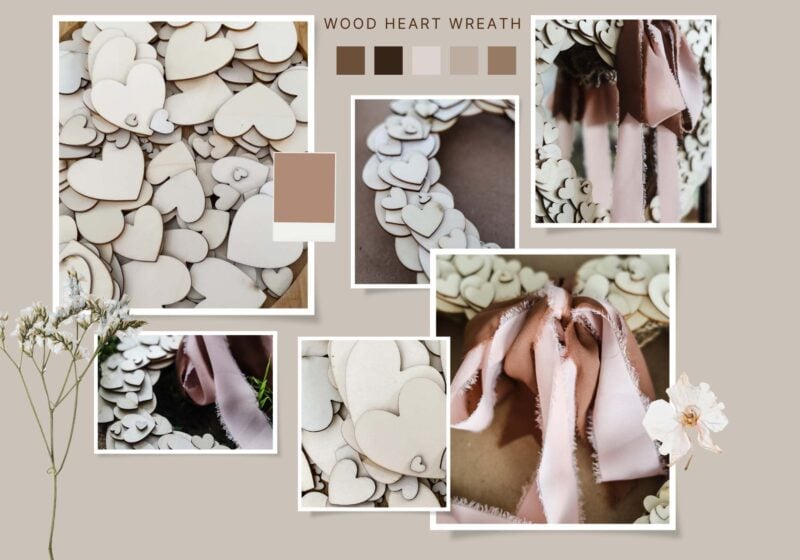
Here is a different idea to make a heart-shaped wreath! Grab a wire heart wire wreath form and a bag of wooden heart cut-outs to make a Valentine’s Day wreath with a more natural look. Perfect if you don’t like the traditional reds & pinks on most Valentine’s Day wreaths!
How to Make a Wreath with Heart-Shaped Wooden Cutouts
This Valentine’s Day, skip the complicated crafts and opt for this effortlessly chic wooden heart wreath. With a short supply list and a straightforward technique, this project is perfect for crafters of all skill levels. You’ll be surprised at how quickly you can create a beautiful and unique piece for your home.
This post may contain affiliate links, which means I may earn a small commission if you make a purchase through my links, at no extra cost to you. Read my disclosure policy here.
Supplies:
- Unfinished Wood Heart Cutouts
- If that set of heart cutouts isn’t in stock you can use these 3 in hearts & this mixed set
- Heart Wreath Frame
- Hot Glue Gun
- Wide Burlap Ribbon (fill in the backside of wreath)
- Fringe Chiffon Ribbon for Bow
Getting Started: Gather Your Supplies

The base for this 3D wood heart wreath is a 12 inch metal heart-shaped wreath frame. Flip it upside down so the flat part is facing you.

To create the 3D look of this wreath I used a set of wooden hearts. The set of wood hearts has 6 different sizes in a bag of 200 pieces. I found all the biggest hearts (almost 2.5 inches) to use for the base layer of this wreath.
Step 1: Glue Base Layer of Hearts
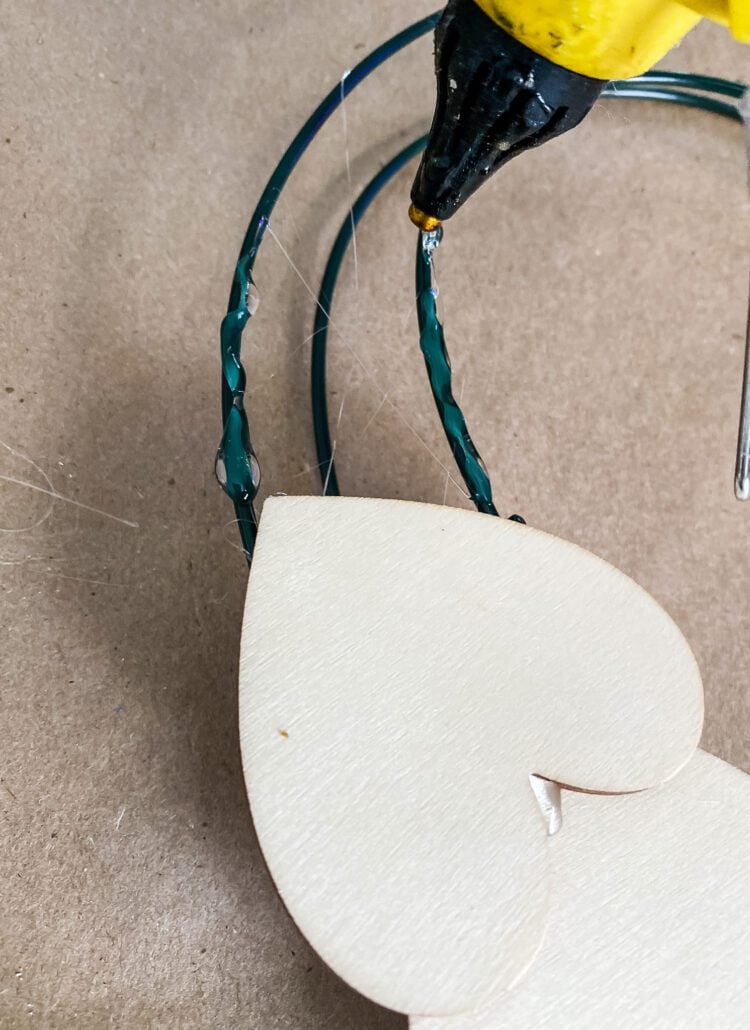
To ensure a sturdy foundation for the wreath, I paid close attention to the placement of the initial few wooden hearts. I began by applying a bead of hot glue to both sides of the wire wreath frame. Then, I carefully positioned the first heart and held it firmly in place until the glue had completely dried and secured it to the frame

For the next few hearts, I applied hot glue in two places:
- To the wreath frame: This ensured a secure attachment to the base.
- To the back of the heart: This created an overlap with the previously placed heart, further strengthening the structure and preventing gaps
Continue Gluing Large Hearts To Frame

After securing the initial few hearts, I streamlined the process. Instead of applying glue to both the frame and the heart, I simply applied glue to the back of each subsequent wooden heart cutout. This proved to be sufficient to adhere the hearts securely to the wreath while also simplifying the gluing process.
Tip: For the initial layer of hearts, I wasn’t overly concerned about excess glue showing through, as subsequent layers would effectively conceal any visible glue.

As you can see I started on the left side and placed the base layer all going in the same direction around the wreath frame. (I’m left-handed so I always start on the left but starting on the right is fine too!!)
Step 2: Layering Smaller Hearts

Now for the fun part!! I started layering in the other sizes of hearts. I didn’t use any particular pattern, just kind of random.

Next, I concentrated on the mid-sized wooden hearts, adhering them to the wreath at various angles. I applied a small drop of glue to the back of each heart, being cautious to prevent any glue from oozing out from underneath. If glue did seep out, I promptly wiped it away with a paper towel before it hardened. Alternatively, I strategically placed another heart over the glue spill to conceal it.

Finally, I added the smallest hearts to the wreath. For these, the simplest approach was to apply a minuscule dot of glue directly to the wreath frame and then carefully position the heart on top.

Step 3: Hiding the Ugly Back

To conceal the green metal backing of the wreath (and any visible glue), I threaded a piece of thick burlap ribbon through the metal openings on the back. I gently fanned out the burlap to effectively hide the green when the wreath is hanging. The neutral color of the burlap complements the unfinished wood of the wreath.
Step 4: Add a Decorative Ribbon

To complete the wooden heart wreath, a decorative bow is essential! Select a ribbon that complements your home decor or simply choose one that you personally find appealing. In my case, I opted for this fringed chiffon ribbon. I’ve incorporated it into numerous wreaths and other projects, and I particularly appreciate its feminine and delicate appearance while remaining neutral

Valentine’s Day Wooden Heart Wreath

Seriously, how pretty is this one?? Like I have said before…sometimes I am not sure how something I imagine in my head will actually translate into reality! This time is worked out just like I had hoped it would!!

Making this wreath was such a fun and relaxing experience. I hope you enjoyed the process as much as I did! This little project is a perfect way to spread some love and add a touch of handmade charm to your home.
Happy Valentine’s Day!
Loved this craft project? Check out these 25 Valentine’s DIY’s!
See your projects featured! If you were inspired by this or any of my other DIY projects I would love to see them and add you to the Reader’s Spotlight gallery. Send a photo to me at jennifer@cottageonbunkerhill.com
xo, Jennifer
More Heart Projects


Grab my free e-book!
Pin for Later


Hi Jennifer
This was a fun bunch of projects. The wreaths!!!!!! Every one so sweet and beautiful. I will definitely be trying a few of those. I have a couple of 9yr. old girls who come to my home each week to craft and bake. Wreaths are the craft this week!!! All those great ideas will be put to use. Thank You!!
I love this project! ❤️
Thanks Kimmy!!
LOVE the wood heart wreath! I’ve ordered the supplies and can’t wait to make one! Thanks for sharing.
I can’t wait to see it!!
Love this wreath so much Jen! Planning to share it in my weekend newsletter 🖤
Thanks so much, Cindy!!
Jennifer,
This turned out so cute. You are crazy talented my friend. Now I’m heading out to find wooden hearts. LOL
Thanks, Rachel!! Amazon…it’s always Amazon!!
Oh my gosh. I love it! I never really decorate much for Valentine’s day, but I love the neutral look of this with just the subtle pop of pink. That ribbon totally makes it and is the perfect finishing touch!
Me either! I actually had said to Amy a couple of weeks ago I didn’t think I was going to do any VDay projects…and here I am with this wreath and I’m writing up a clay heart project and have a stack of grapevine hearts waiting for me for 1 last project!!
This is so pretty Jennifer! I am in love with how it turned out.
Thanks! I didn’t think I was going to do much for VDay and here I am just writing up another project and I have one more for tomorrow!
Me too, Kim! Thanks for sharing it on your blog or I would’ve missed it. Even I can make this beauty.
This turned out amazing!!! I love it!
I think it’s cute without being too “cutesy”!!