
Looking for an idea to make some original wall art with a natural vibe? Well, I have the perfect project! Today I am going to show you how to make pressed flower clay plaques.
Steps to Make Pressed Flower Clay Plaques
The inspiration for this project came from something I saw in the Magnolia Spring line. It’s no secret that I love the look and style of everything Joanna Gaines!! If you don’t believe me…well take a look through my Visiting Magnolia posts from when I stayed at one of their rental homes!!
The Magnolia pressed flower plaques are $48 each!! They are lovely but pricey…so I did what I love to do…take an expensive idea and make it budget-friendly!!
This post may contain affiliate links, which means I may earn a small commission if you make a purchase through my links, at no extra cost to you. Read my disclosure policy here.

This post may contain affiliate links, which means I may earn a small commission if you make a purchase through my links, at no extra cost to you. Read my disclosure policy here.
Supplies:
For my flower plaques, I am using DAS air-dry modeling clay in the Terracotta color and a couple of wood frames from a Hobby Lobby set.
Later in the project, I will be using acrylic craft paint & pens, and a hot glue gun.


01. Roll out the clay

The first step is to roll out the clay. I’m using my pastry rolling pin for this…no special tools are needed!
02. Measure & Cut The Clay


After I had the clay rolled out to around 1/8 inch in thickness (eyeball measurement) the next step was to take the piece of clay and lay it over one of the wood frames.
Then I used my fingertips to push the clay down against the edges of the frame to make an outline of the space. After that, it was easy to take a knife and run it down the sides of the wood frame.
Then I wet my fingertips and smoothed out the rough edges of the clay.
For this project, I wanted to make 2 frames so I repeated the steps to make a second clay piece.
03. Choose The Flowers to Press

Since the plaques that I’m making are on the smaller side, I am going to use small but detailed flowers to press. Well, I am using dried flowers and one artificial piece of greenery.
For the dried options, I have a piece of seeded eucalyptus that I have leftover from my Flower Keepsake Shadowbox project, a sprig of white waxflower that I had from my last Trader Joe’s flower run, and another dried plant from my garden. I pulled off a small piece of artificial greenery from a larger stem to press too.
04. Press the Flowers in the Clay

Now the fun part..figuring out how I wanted to lay down the flowers on the clay for the prettiest outcome. I did play around with the arrangement a bit before deciding. I wanted some of the pieces to run off the edges of the clay and made sure that the stem part of each one made it onto the clay.

Once I had my arrangement finalized I took my wood rolling pin and slowly went over the clay and flowers.
I pressed down hard enough to press the flowers into the clay without going through the clay. You don’t need to use much pressure at all!


After the flowers were pressed I pulled the stem out gently from the bottom. Some of the little pieces of the flowers and seeded eucalyptus fell off in the process so I used a soft paintbrush to gently prod them out of the clay.
Once I lifted the ends out of the clay I could grab them and remove them without messing up the project.

Now, a very important step!! Once I had pressed the flowers into the clay I picked up the clay and put it inside the frame to make adjustments so that it would fit.
The top of the clay needed to be trimmed again (and I wet my fingertips to smooth the clay edges a bit afterward)
If you wanted a perfectly straight piece of clay then use a small X-Acto blade, I wanted an organic look to the edges.
After I was finished with both plaques I put them on a drying rack (one of my baking ones) to let the clay dry. It took a little more than a day for the clay to be completely dry.
05. Paint the Frames

While the clay was drying I painted the frames. If I ever make this project again I think I will stain the frames for sure! It was about 6° out in my garage and way too cold to work or stain anything out there!
The frames were painted with a coat of dark brown acrylic craft paint and once they dried I went over the frames with the Waverly Antique Wax. For the wax, I brushed it onto the frames and then used a paper towel to wipe it off after a minute. This wax has the consistency of thick paint and is super easy to work with…plus you can get a small bottle for under 2 bucks at Walmart (over in the craft paint aisle).
06. Paint the Pressed Flower Clay Plaques

Now, this would be an optional step. The clay plaques look beautiful just the way they are but I wanted to add a little color to my set,
For this part, I grabbed some leftover paint from a kit and a few paint pens. You could definitely personalize the paint to fit with your surroundings or the colors that you love!

I used a teeny paintbrush to add small amounts of paint to the impressions left by the leaves. I wasn’t trying to fill in every part of the leaves with paint…just a light touch.

When I was using the paint pen, I added a little paint from the pen and then used the tiny paintbrush to spread it through the flower impressions.

07. Putting the Plaques Together

Once I had both pieces of clay painted it was time to put this project together!
If you want to hang your plaques this is when you would add sawtooth hangers to the backs of the frames for hanging, you would want to make sure that you attached the hangers to the thickest part of the wood at the top of the frames.
Using my hot glue gun (I use the Gorilla brand of glue sticks and they are worth the slightly more expensive price!! ) I put a zigzag of glue on the back of the clay and pushed it down onto the wood frame.

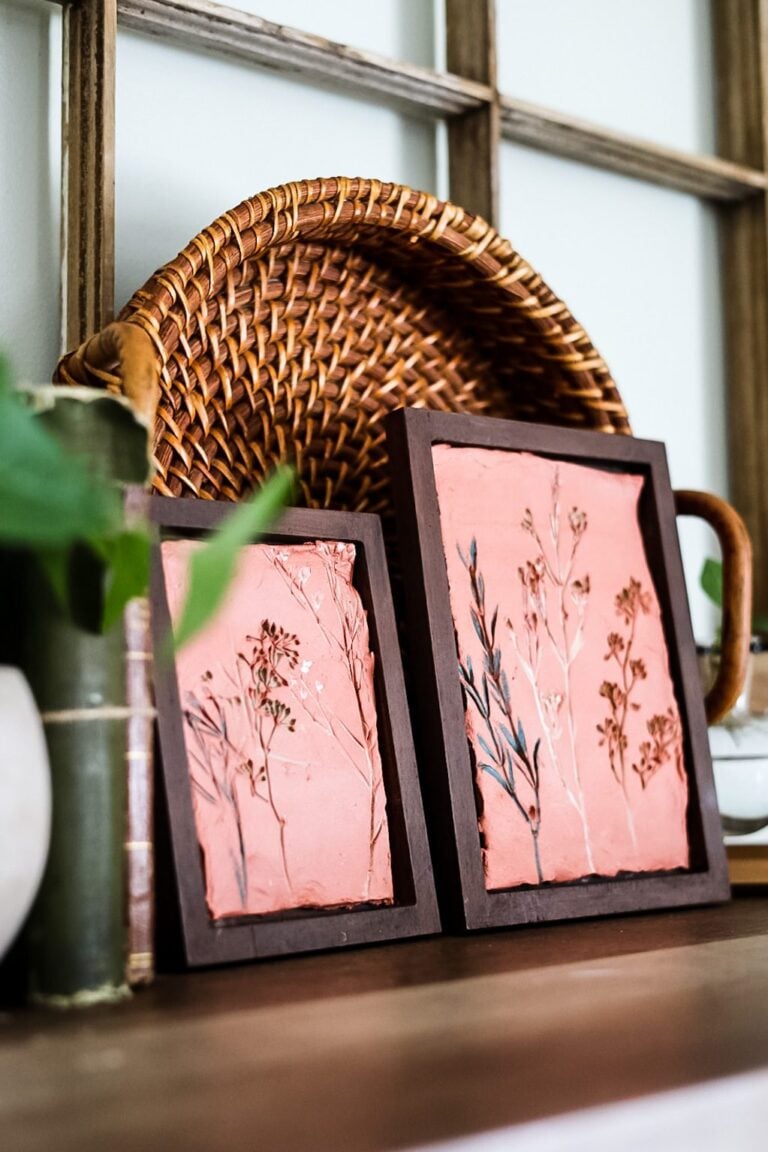
Finished Pressed Flower Clay Plaques

And here are the finished plaques!! Just in time to use in my Spring decorating…but they are really an all-season craft project.

This Spring my entire vibe is natural elements and using lots of plants and greens along with organic colors… I might need a houseplant intervention soon!!!

…And isn’t this Better Homes & Gardens propagation station just adorable??!! It was under $15 from Walmart.com. It will look so sweet with small flowers later in the Spring too.
xo, Jennifer


do you seal these after you apply paint to these clay pieces.
I didn’t seal these but you could with a coat of matte Mod Podge to keep the clay look or glossy Mod Podge if you want a glazed pottery look.
Jennifer I absolutely love this idea! Pinning this for later! Thank you for the inspo.
Thanks, Nicolle!!
Thanks for sharing at the Friday with Friends link party, Jennifer.
Your craft will be one of the features this week!
hugs,
Rachelle
Oh, thanks so much, Rachelle!!
These are amazing!! I love the organic look of these plaques! I am excited to feature your post at the Tuesday Turn About link party. Thank you for sharing!!
Thank you, Lynne!! That’s exciting!!
Your pressed-flower plaques are lovely. They look as pretty as the expensive ones from Magnolia.
Carol
http://www.scribblingboomer.com
Thanks, Carol!! Next up I want to make some just like the Magnolia ones…it’s on my ever-growing project list!!
I love projects that are like this one. Simple, inexpensive, and beautiful! I would love it if you would share this at my Friday With Friends link party: https://myhubbardhome.com/friday-with-friends-advancing-into-spring-link-party/
Thanks,
Rachelle
Thank you so much…I’m going to do it right now!! Sometimes I completely zone on adding to link parties (there are so many things to remember!!)
How fun, Jennifer. This is a great tutorial. I love these projects that don’t bust the budget. So great!
Thanks, sweet friend!!
Hi Jennifer I am really impressed you are very talented!!! I don’t know if you can help me? My sister lost her husband of 38 yrs to brain cancer. I am trying to figure out something special to do with her wedding picture. Any help would be greatly appreciated. Have a Blessed day
Sue, I’m going to think on it!! I’ll see what I can come up with for your sister. I’m so sorry for your family’s loss.
This is such a pretty project. I love the handmade look and the organic feel of it. Thanks for the tutorial!!
Thanks, Angie!!
Love that you made this tutorial for us – thank you.
Do have a question: If I wanted to make the plaques in white clay exactly like the Magnolia plaques, how do I do that?
I want to do lavender on white plaques.
Thank you again
I want to try it too! I would definitely make them thicker than these. The only thing I haven’t worked out is how to hang them. I was figuring I could make an indent in the back of the clay with something…I’m still thinking about what and how though!!
Jennifer
Such a cute idea.
Thanks, Rachel!! It’s only been on my “want to make” list for 4 months!!!
LOVE. LOVE. LOVE the stems pressed in clay!!!! Can’t wait to try it!!! Thank you for sharing!!!❤️
Thank you so much, Kathy!!!