Imagine stepping into a garden where vibrant flowers mingle with lush vegetables, and fragrant herbs spill over the edges of charming raised beds. This isn’t just a dream—it’s the magic of cottage-style gardening in raised beds! By mixing veggies, flowers, and herbs, you can create a space that’s as beautiful as it is productive.
Raised Bed Gardening with Cottage Charm: Mixing Veggies, Flowers, and Herbs
There’s something magical about a garden that’s both productive and picturesque. In my vegetable garden, I’ve found the perfect balance by mixing veggies, flowers, and herbs in raised beds, complete with charming willow teepees and towers for climbing plants. Using raised bed kits makes the process even easier, allowing me to focus on the fun part—planting and designing!
In this post, I’ll share how you can create your own cottage-style raised beds, from assembling your kits to choosing the right plants and adding rustic willow structures. Whether you’re a garden pro or just getting into gardening, this method is a game-changer for anyone looking to blend beauty and practicality in their garden.
Why Mix Veggies, Flowers, and Herbs?
Combining vegetables, flowers, and herbs in raised beds offers so many benefits:
- Pest Control: Flowers like marigolds and nasturtiums naturally repel pests.
- Pollinator Attraction: Flowers attract bees and butterflies, which help pollinate your veggies.
- Space Efficiency: Mixing plants allows you to grow more in less space.
- Aesthetic Appeal: The combination of colors, textures, and heights creates a visually stunning garden.
This post may contain affiliate links, which means we receive a small commission if you purchase through our links. See our disclaimer page for more information.
How to Create Cottage-Style Raised Beds
1. Choose and Assemble Your Raised Bed Kits

My garden has been a work in progress since I first put it in, expanding it a little (or a lot) each year. It started out as a 16 x 16-ft garden and is now a 20 x 55-ft space! The front portion is dedicated to growing flowers for cutting and drying, while the back half is for everything else. When I expanded my vegetable garden last season, I decided to add more raised beds to what I already had in this section of my large garden.
Using raised beds it an efficient way to utilize every inch of this garden while creating a welcoming cottage garden feel when you walk in the gate.
I prefer to buy raised bed kits. They are a great choice for their durability, ease of assembly, and sleek look. These kits are perfect for creating a structured yet charming garden space, and they come in a variety of sizes to fit your needs.
- Why Kits? Raised bed kits are great for starting a garden. They’re easy to assemble, durable, and come in a range of materials (like metal, wood, or composite) to match your style. For my garden, I have a combo of metal, wood, and heavy-duty plastic (because they’re long-lasting and will endure the cold, snowy winters here).
- Assembly Tips: Most kits are pretty easy to assemble, so be sure to follow the directions carefully. I found that having a helper made the process even easier, especially when moving the beds into place in the garden.
- Placement: I arranged my five raised beds in the center of my vegetable garden, creating a focal point that’s both functional and beautiful. Make sure to choose a sunny spot (at least 6 hours of sunlight per day) and leave a wide enough path between the beds for walking and easy access.

2. Filling Your Raised Beds
Filling your raised beds with the right mix of materials is key to creating a healthy, productive garden. Here’s how I fill mine, using a combination of mulched leaves, compost, and raised bed soil to create the perfect growing environment.
1. Start with Mulched Leaves and Leaf Mold
At the bottom of my new raised beds, I dump in mulched leaves and leaf mold from my yard. Living in New Hampshire, we’re surrounded by maple trees, so we have an abundance of leaves to work with. I compost them throughout the year, and they break down into rich, crumbly leaf mold.

- Why Use Leaves? Mulched leaves and leaf mold are excellent for improving soil structure, retaining moisture, and adding organic matter. They’re also a cost-effective way to fill the bottom of your beds.
- How to Do It: Simply spread a layer of mulched leaves or leaf mold (about 4-6 inches thick) at the bottom of your raised beds. Over time, they’ll continue to break down and enrich the soil.
2. Add Compost
Next, I add a generous layer of compost on top of the leaves. Compost is like gold for your garden—it adds nutrients, improves soil health, and encourages beneficial microbes.
- Where to Get Compost: If you don’t have access to homemade compost, you can buy bagged compost from your local garden center. Look for a high-quality, organic option.
- How Much to Use: Aim for a layer that’s about 4-6 inches thick. This will give your plants a nutrient-rich foundation to grow in.
3. Top with Raised Bed Soil
Finally, I fill the rest of the bed with soil specifically formulated for raised beds. It’s important to avoid using garden soil meant for in-ground gardening, as it can be too dense and may not drain well in raised beds.

- Why Raised Bed Soil? This type of soil is lightweight, well-draining, and designed to provide the perfect balance of nutrients for container and raised bed gardening.
- How Much to Use: Fill the bed to within 1-2 inches of the top to allow room for mulch or additional compost later in the season.
If you live in the New England area, I highly recommend all of the Coast of Maine organic garden products. They are pricier than the box store brands, but the quality is amazing!
Why This Method Works
By layering mulched leaves, compost, and raised bed soil, you’re creating a rich, well-draining environment that’s perfect for growing healthy plants. Plus, using materials like leaves and homemade compost cuts down on costs and makes your garden more sustainable.
Tips for Success:
- Refresh Annually: Each year, top off your beds with fresh compost and soil to replenish nutrients.
- Mulch the Top: Add a layer of mulch (like straw) to retain moisture and suppress weeds.
- Rotate Crops: To prevent soil depletion, rotate your crops each season.
Grow-Up: Vertical Gardening Ideas
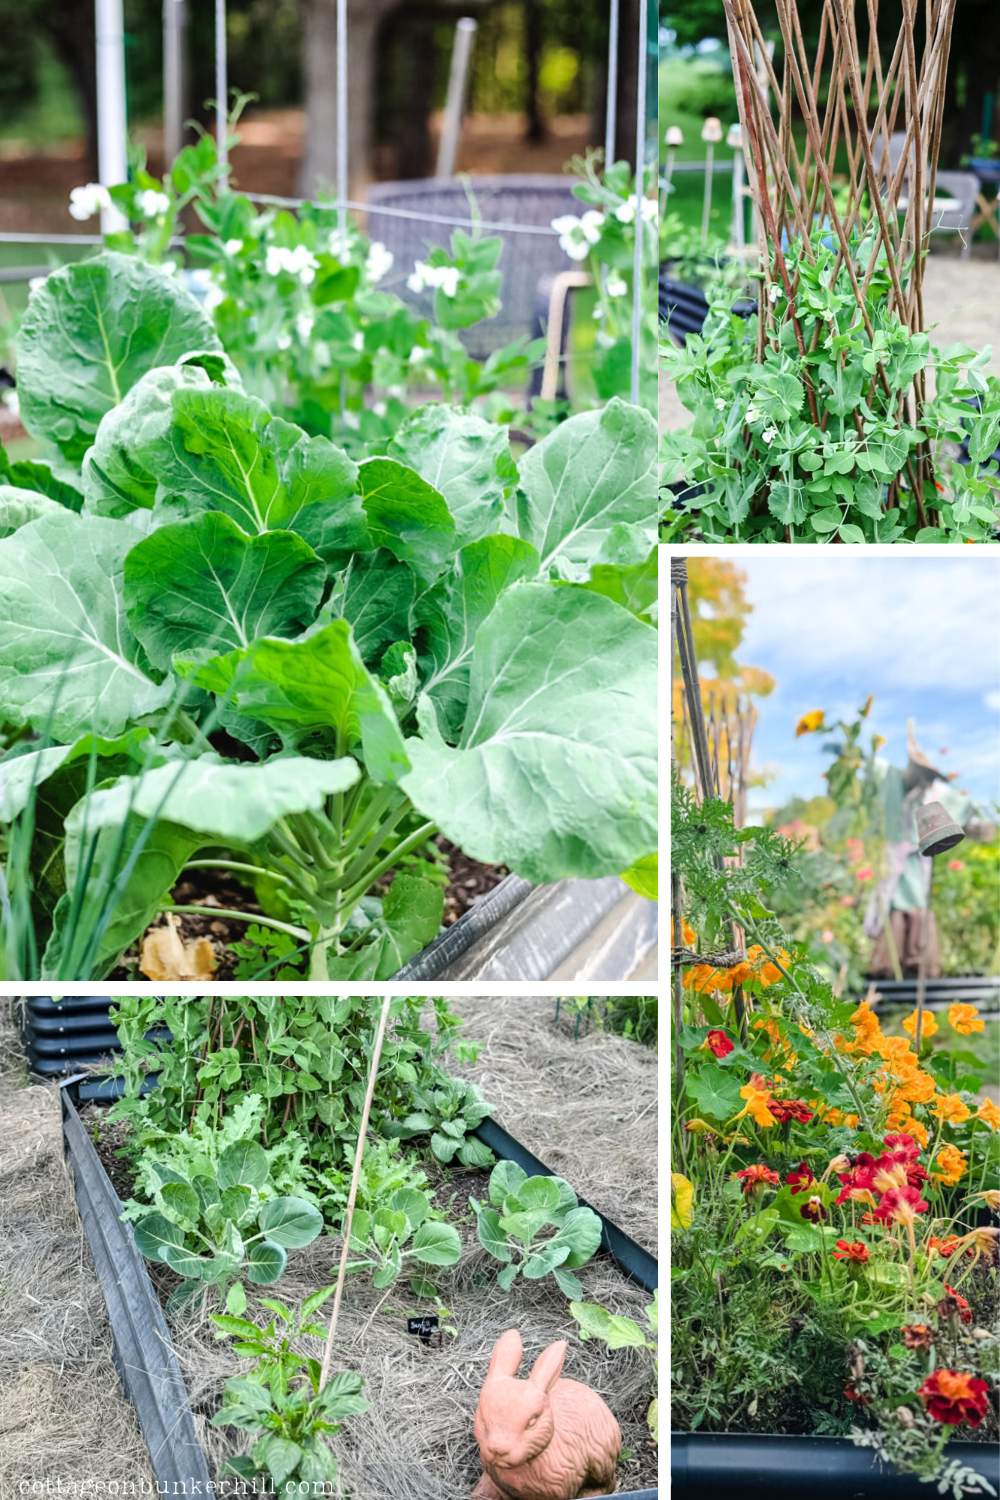
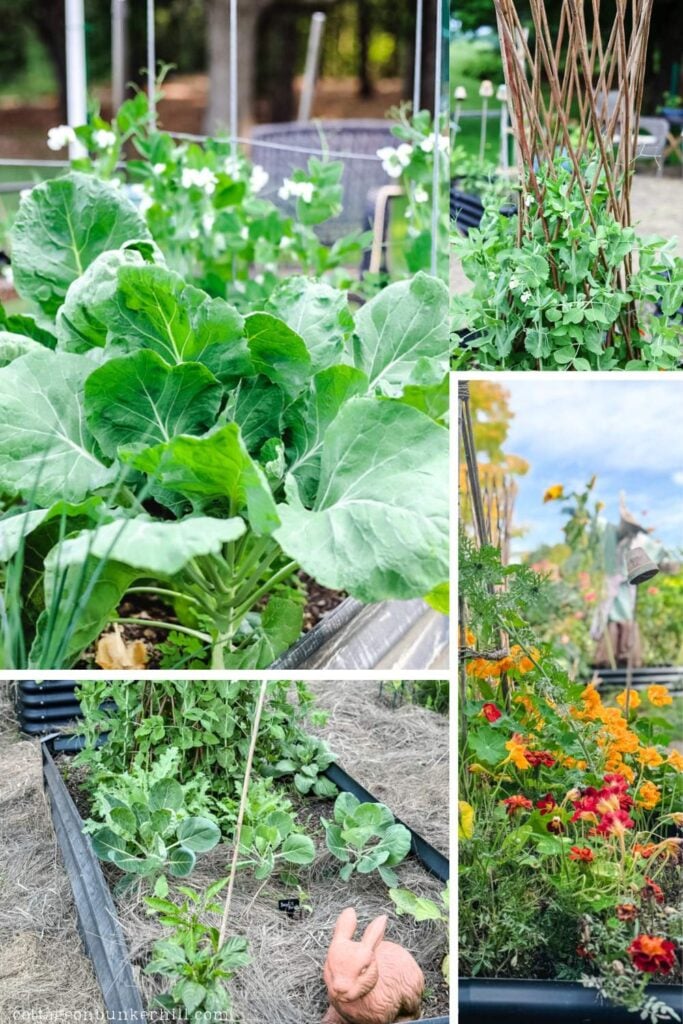
When gardening in raised beds, it’s important to make the most of every square inch. One of the easiest ways to maximize space is by growing plants vertically. Climbing plants like cucumbers thrive when given support, and it’s much easier to spot and harvest them when they’re hanging neatly rather than sprawling across the ground.
Add A Trellis
To maximize space and add vertical interest, I set up trellises in some of my raised beds. These are perfect for climbing plants like snow peas, beans, flowers, climbing spinach, and even mini pumpkins.

I’ve had this folding trellis for years (originally from Lowe’s), and I also have a DIY tutorial to make your own folding trellis. Here is the only wooden folding trellis that I could find that I would recommend (but it’s a bit pricey).
Many metal folding trellises are perfect for popping in a raised bed to save space and grow your vegetables vertically.
- Why Trellises? Trellises not only save space but also keep plants off the ground, reducing the risk of pests and diseases. Plus, they add height and structure to your garden.
- Placement Tips: Position trellises on the north or east side of your beds to avoid shading shorter plants. I love how mine creates a natural border around the vegetable garden, adding both function and charm.
Add Willow Teepees and Towers
One of my favorite ways to add charm and functionality to my raised beds is by incorporating willow teepees and towers. These rustic structures not only support climbing plants but also add a touch of cottage-style magic to the garden.

Last season I added willow funnel towers to the center of a couple of my raised garden beds- instant cottage charm! I encourage all of you new gardeners to try growing snow peas & sugar snaps. These are both cool-season vegetables that you can start in early Spring. Since they are one of the first vegetables to grow, you will feel accomplished from the get-go!

Another popular look for a cottage garden is a willow teepee-shaped trellis. Inexpensive and readily available online. If you are wondering how it will stay in place, the answer is with garden staples.
DIY A Little Cottage Charm!
Do you like to make things yourself, or are you looking for a thrifty way to add that cottage charm to your raised beds? Here are my DIY ideas to try:

- Create a charming DIY cottage garden tower for climbing flowers or vegetables! Learn how to build one with a tomato cage, bamboo, and seagrass rush. Perfect for small spaces and can be added to a container planter.
Pro Tip:To create an affordable garden tower, gather 5 to 7 tall bamboo stakes and tie them together at the top with jute. For extra support, wrap thin string or clear fishing line around the outside to help your plants climb as they grow


Choose Your Plants: Top Choices for a Cottage-Style Vegetable Garden
One of the most exciting parts of creating a raised bed cottage garden is choosing what to grow! By mixing vegetables, flowers, and herbs, you’ll not only create a visually stunning space but also boost the health and productivity of your garden. Here are some of my favorite plants to include:
Vegetables For Your Raised Beds
Vegetables are the backbone of any productive garden, and they can be just as beautiful as they are delicious. Here are some easy-to-grow options that thrive in raised beds:

- Tomatoes: Choose ‘patio’ varieties that are more compact to add to your raised beds.
- Peppers: Sweet bell peppers or spicy chili peppers add both flavor and vibrant hues.
- Beans and Peas: These climbing plants are perfect for vertical structures like willow trellises or garden towers. Bush beans work great in beds, too.
- Broccoli: This nutrient-packed veggie adds height and structure to your garden, and its large, leafy greens are surprisingly ornamental.
- Lettuce: Plant loose-leaf varieties in shades of green and red for a pretty, edible border.
- Carrots: Their feathery tops add texture, and they’re a fun surprise to harvest!
Cottage Garden Flowers
Flowers are the heart of a cottage garden, bringing color, charm, and even pest control. These blooms are perfect for mixing in with your veggies:

- Marigolds: Their bright orange and yellow flowers repel pests like aphids and nematodes.
- Nasturtiums: These edible flowers add a peppery flavor to salads and deter pests like whiteflies.
- Calendula: This cheerful flower is great for pollinators and has medicinal uses. One of my personal favorites to grow!
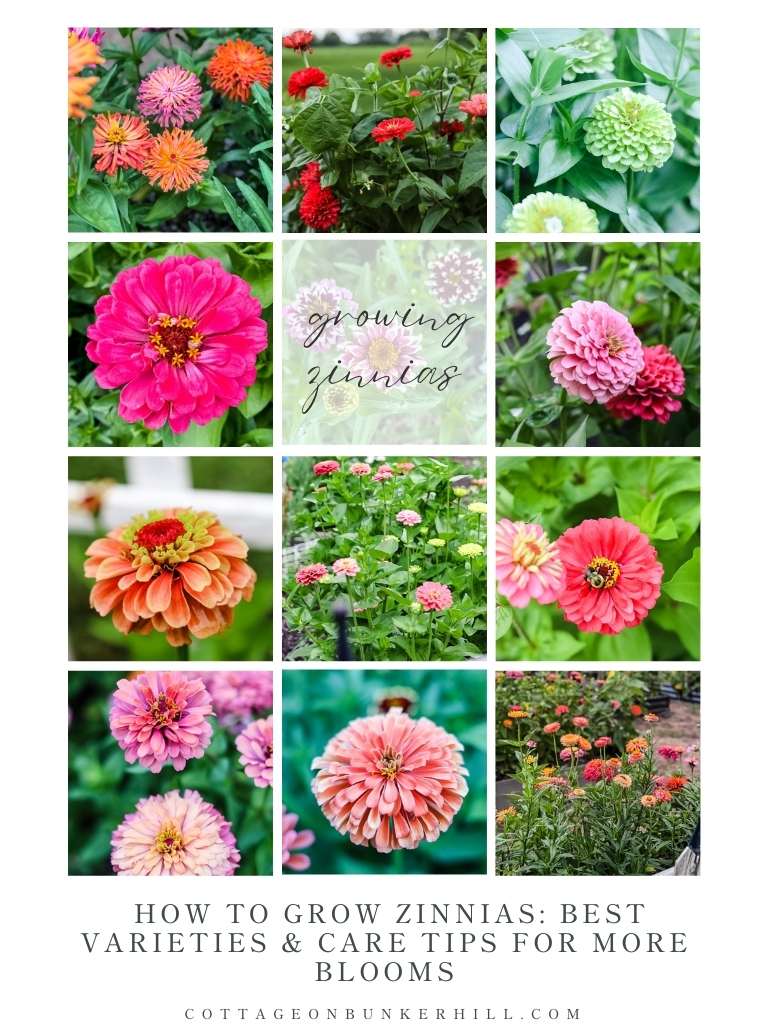
- Zinnias: These bold, colorful blooms attract butterflies and make excellent cut flowers for bouquets.
Herbs That Thrive In Raised Bed Gardens
Herbs are the perfect finishing touch for a cottage garden, filling gaps with fragrance and flavor. Plant them along the edges or tuck them between vegetables and flowers:

- Basil: Its lush green leaves pair beautifully with tomatoes and repel mosquitoes.
- Thyme: This low-growing herb is perfect for edging and attracts pollinators.
- Rosemary: Its woody stems and fragrant leaves add structure and aroma.
- Oregano: A hardy herb that spreads beautifully and adds a Mediterranean flair to your garden (and your cooking!)
Pro Tip: I’ve learned so much about gardening through books. Read about my favorite gardening books that I own & use.
Design Tips for Your Raised Bed Cottage Garden
Creating a beautiful and functional cottage garden in raised beds is all about thoughtful design. Here are a few tips to help you arrange your plants for maximum impact:
1. Layer Heights
Place taller plants, like tomatoes or climbing beans, in the center or back of your raised beds. This ensures they don’t shade out smaller plants and creates a natural backdrop for your garden. Surround them with medium-height plants, such as peppers or broccoli, and finish with low-growing options like lettuce or carrots in the front. This layered approach adds depth and makes every plant visible and accessible.

In this 6 x 3-foot raised bed, I’ve planted a mix of herbs, flowers, and veggies for a charming cottage garden look. Along the front edge, I’ve tucked in oregano, chives, onions, and calendula, while snow peas climb up a willow funnel trellis in the back. On the other side of the bed, I’ve added marigolds and a few small sunflowers.
My favorite sunflower variety for raised beds is SunFill Purple or Green—they’re compact, single-stem sunflowers that are perfect for cutting and look stunning in vases. I also dry them to use in wreaths for a touch of garden charm indoors!
2. Mix Colors and Textures
Cottage gardens are known for their lush, eclectic beauty. Combine leafy greens like kale or Swiss chard with vibrant flowers such as zinnias and marigolds. Add fragrant herbs like thyme or oregano to weave in texture and scent. The mix of colors, shapes, and textures will create a visually stunning tapestry that feels both wild and intentional.

One of my favorite garden beds that I planted was this one that was heavy on herbs in the front, I planted kitchen herbs (sage, oregano, thyme, & rosemary), lavender, chives, Swiss chard, Brussels sprouts, calendula, and marigolds.
3. Edge with Herbs or Flowers
Softening the edges of your raised beds is the perfect finishing touch. Use low-growing herbs like thyme or oregano, or tuck in trailing flowers like nasturtiums or calendula. These plants spill over the sides, adding a romantic, cottage-style charm to your garden beds.

Calendula is one of my favorite flowers to add to vegetable beds. Not only are they stunning, but they’re also amazing pollinator magnets and keep blooming right up until the first frost.
In this bed, I’ve paired them with tall marigolds, basil, eggplant, sunflowers, and a climbing spinach in the back. You might also spot a volunteer cherry tomato plant that popped up—I didn’t have the heart to pull it, so I let it grow! (A volunteer plant is one you didn’t intentionally plant; this little tomato likely sprouted from a seed dropped by a chipmunk last year.)
- Layer Heights: Place taller plants (like tomatoes or climbing beans) in the center or back, with medium and low-growing plants in front.
- Mix Colors and Textures: Combine leafy greens with bright flowers and fragrant herbs for a visually appealing mix.
- Edge with Herbs or Flowers: Use low-growing herbs or flowers to soften the edges of your raised beds.
Tips for Maintaining Your Cottage-Style Raised Beds

- Rotate Crops: Change the location of your veggies each year to prevent soil depletion and pests.
- Mulch: Use straw or even grass clippings to retain moisture and suppress weeds.
- Water Wisely: Use drip irrigation, soaker hoses, or a watering can to target the roots and avoid overwatering.
- Deadhead Flowers: Remove spent blooms to encourage new growth and keep your garden looking tidy.
Cottage Garden
Favorite Products
Shop my gardening favorites! Raised beds, plant supports, & tools to make your garden grow.
Ready to Create Your Cottage Garden?

Cottage-style raised bed gardening is the perfect way to blend beauty and functionality in your garden. By mixing veggies, flowers, and herbs, you’ll create a space that’s not only productive but also a joy to spend time in. And with the addition of willow teepees and towers, your garden will have that charming, rustic feel that’s quintessentially cottage-style.
So grab your gardening gloves, pick your favorite plants, and get growing! I’d love to see your cottage-style raised beds—share your progress with me! I would love to see your garden and add you to the Reader’s Spotlight gallery. Send a photo to me at jennifer@cottageonbunkerhill.com
xo, Jennifer

Grow With Me Gardening Series

This is part of the Grow With Me Gardening Series here at Cottage On Bunker Hill. I want to teach you ways of starting, maintaining, and enjoying gardening. I will share all the tips & tricks that I have learned over the years growing both vegetable and flower gardens here in the Northeast.