

Looking for a whimsical touch to welcome Spring? This DIY moss-covered bunny head wreath is the perfect project! We’ll guide you through creating this adorable and easy-to-make decoration that’s sure to charm your neighbors and brighten your doorway.
Making A Moss Covered Bunny Head Wreath
Are asking yourself what can I do with a Dollar Tree bunny head wreath form? Well, I came up with such a pretty idea that you can make with it!! It only took me about 20 minutes to make too.

What You Will Need
To create this whimsical wreath, you’ll need a bunny-shaped wreath from your local Dollar Tree and a length of grapevine garland. I can’t emphasize enough how versatile grapevine garland is – it’s a true crafting staple! I’ve used it for countless things over the years from using it around my front door for Fall, adding small pieces to my Christmas tree, making a heart wreath, and my Spring flower crate.


supplies needed
- Dollar Tree Bunny Wreath Form
- Grapevine Garland
- Floral Wire
- Preserved Moss
- Dried or Artificial Small Flowers
- Raffia or Ribbon
This post may contain affiliate links, which means I may earn a small commission if you make a purchase through my links, at no extra cost to you. Read my disclosure policy here.
Step 1. Cover The Head With Grapevine

Starting with the round portion of the bunny head. I carefully wrapped the grapevine garland around the circle, simultaneously securing it with floral wire.
The grapevine garland contains small wire pieces, which I snipped away after wrapping. I then gently fanned out the grapevine to cover more of the underlying black metal wreath.
Note: I only applied this technique to the round head portion. The bunny ears, being single wire pieces, were easily concealed and did not require this step
Step 2. Cover Bunny Ears in Grapevine
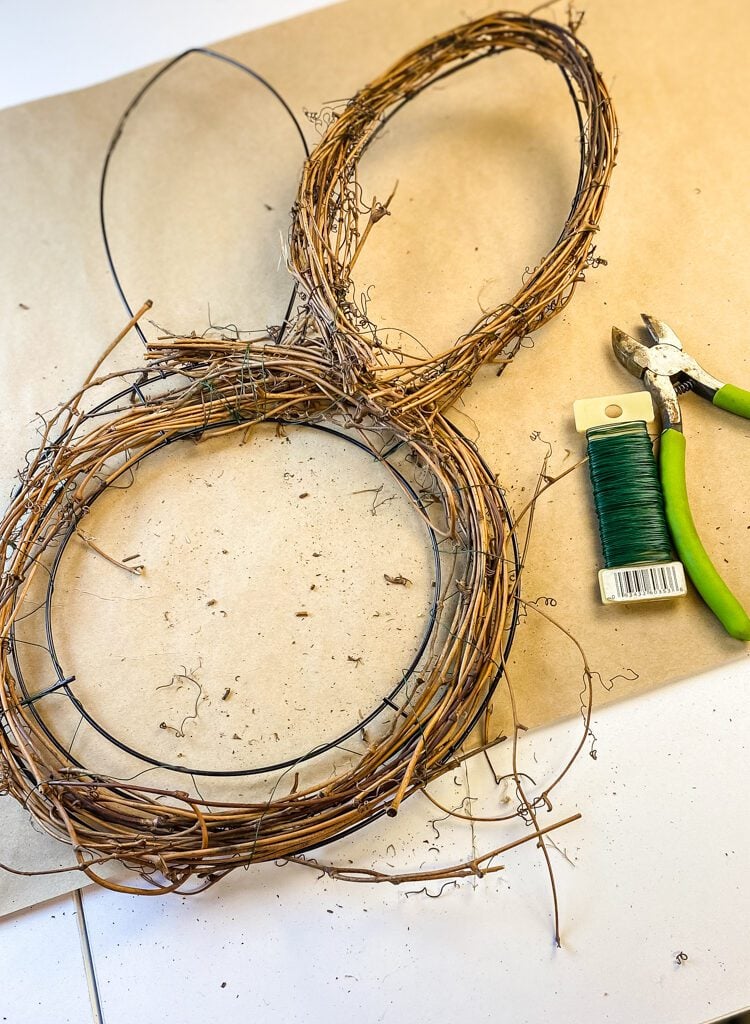
For the ears, I measured and cut the necessary length of grapevine garland using my floral wire cutters. I then secured the grapevine to the ears using floral wire.

Step 3. Add Moss to the Bunny Head WreathWreath
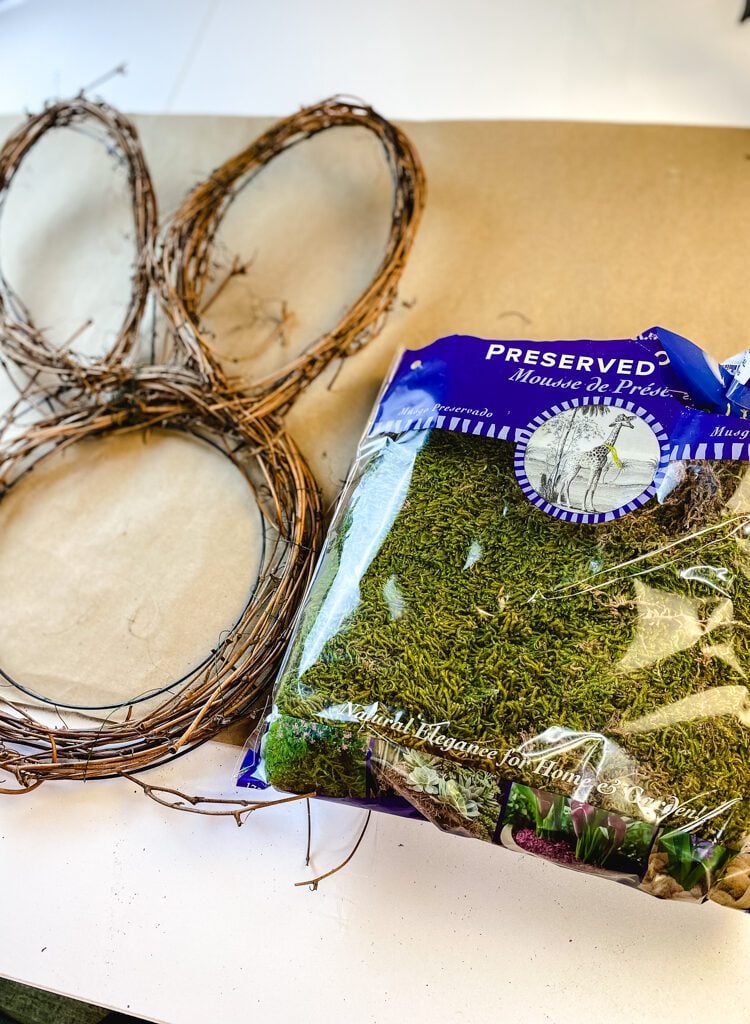
The next step is to conceal the metal frame and give the wreath a more natural, organic appearance.
For this, I used a bag of preserved moss. However, any type of moss you have on hand can be used to achieve a similar look.
Step-by-Step Photos
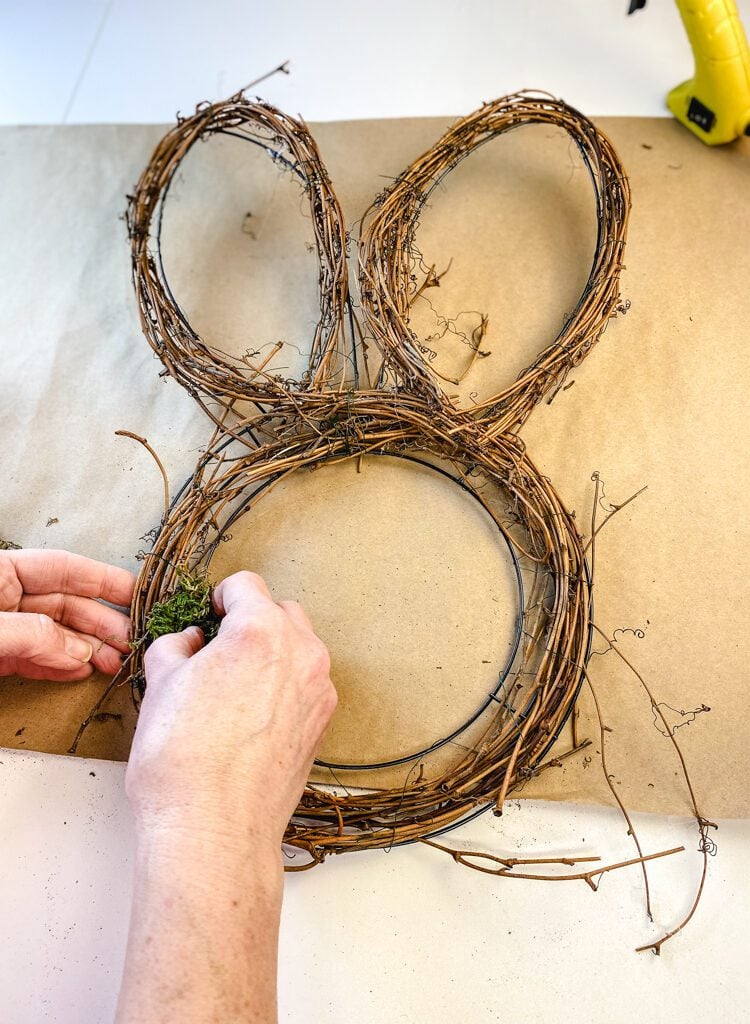
I began by strategically placing chunks of moss between the grapevine pieces, focusing on areas where the metal frame was most visible, particularly near the center of the wreath

I alternated between simply inserting the moss into the grapevine and securing it with hot glue. You’ll quickly discern which pieces will stay in place on their own and which require the added security of glue.

I concentrated on adding moss to the inside of the ears. Since pulling apart moss can be a bit messy, I recommend working in an area that’s easy to clean up afterward
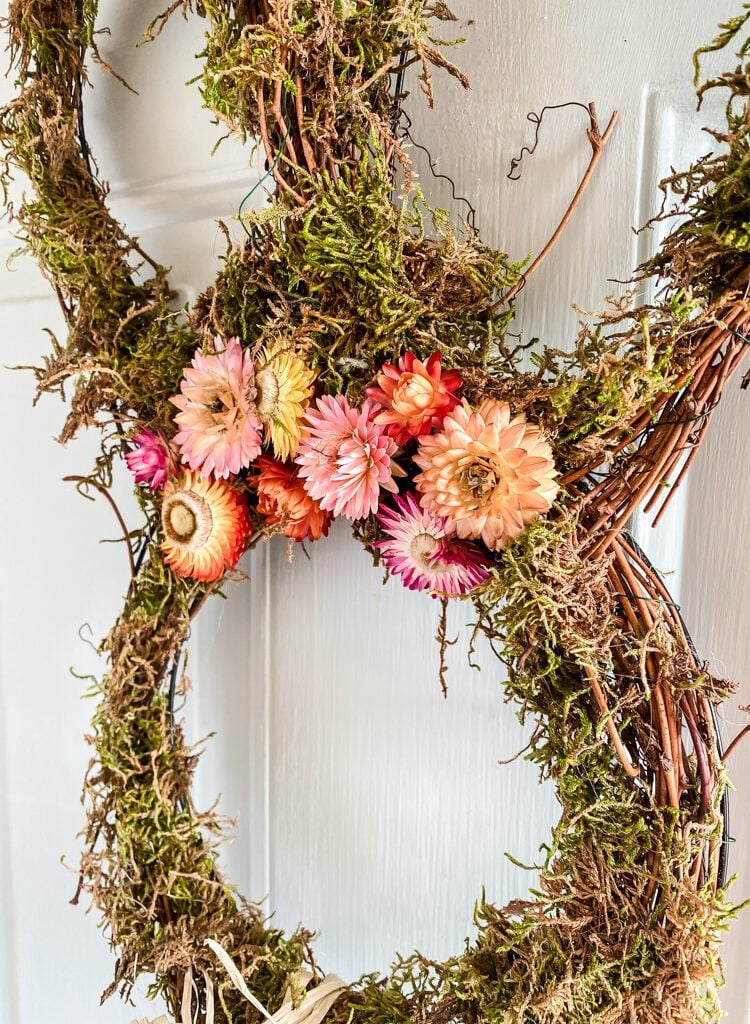
Step 4. Finishing Details For The Wreath

To add a few pretty details to my bunny head, I hot glued a few of my dried strawflowers onto the wreath. The dried flowers are from my cutting garden (they were one of my favorite flowers to grow!) but small artificial flowers will look great too!

To finish off this cute bunny head wreath I added a simple raffia bow to keep the natural look of my wreath.

Finished Moss Covered Bunny Head Wreath

Seriously, how cute did this moss bunny head turn out??!! Sometimes the vision I have in my head turns out exactly as I had pictured it (sometimes…not so much!!)
And there you have it! A charming and easy-to-make moss-covered bunny head wreath to welcome Spring. I hope you enjoyed this tutorial and are inspired to create your own unique version. Happy crafting!
See your projects featured! If you were inspired by this or any of my other DIY projects I would love to see them and add you to the Reader’s Spotlight gallery. Send a photo to me at jennifer@cottageonbunkerhill.com
xo, Jennifer
my crafting must-haves
shop my amazon store
Fresh Flower Wreath Collection

Looking for more pretty ideas?See all of our wreath tutorials using fresh flowers & natural materials
More spring ideas for you
Ready to see some more of my Spring DIYs?? Boy, I have a ton of them!

10 Reasons We Love Bunnies For Spring
Today I am joining a few of my blogging friends to bring you all some fun ideas for Spring. They all came up with such cute ideas!! You will find the links to see their projects below.
Click the links below the images to go straight to their posts. ENJOY!

Chalking Up Success // Cloches & Lavender // Simple Nature Decor

A Life of Balance // Sweet Valley Acres // Bluesky at Home // This Dear Casa

Cottage in the Mitten // Saved from Salvage // Cottage on Bunker Hill


more ideas for lantern in the foyer or table top?
Jennifer
Such a cute idea.
Hi Jennifer
Thank you for all of these wonderful Spring ideas!!! Love every one and will definitely try the bunny wreath!! Ahhhh….Spring! New England is “waking up” again!!!!🐰🐰🌷🌷🍅🍌
I was so excited to move some of the leaves in my flower beds and see the dafs and hyacinths popping through!! But it hasn’t been warm enough to decorate my porch yet, it’s been a little too cold at night and I’m afraid my flowers will die so I just keep looking at them out in my garage!!
Jennifer, I love your bunny wreath. There something about a moss wreath that I love. Probably the organic nature of it. It is beautiful!
Jennifer, this is so creative. You’ve used two of my favorite craft materials ~ grapevine and moss. I can’t believe I’ve never seen the wreath form with bunny ears. Adding the moss and the flowers gives the bunny head a natural, warm, and springy look. Great job.
This year was the first time I saw it at the Dollar Tree. Thanks so much Carol!!
I love this bunny it’s so cute Jennifer🐰
Thanks Ann!!
The bunny wreath is adorable! I wasn’t sure until I saw it finished. It’s bright and cheery and just perfect! Very nicely done!
Thanks so much, Shirley!!
It turned out so cute. Love it.
This is just the cutest bunny, Jennifer! I can’t wait to feature it in my wrap-up post on Sunday. You are so creative my friend.
Oh, thank you Kim!! I am so glad I saved so many of my strawflowers and dried them out last year!
Dollar Tree has some gems! Love that you used dried flowers from your garden- such a sweet touch. I would love to hang this on my door!!
Thanks so much, Marie! Yes, I was lucky enough to find it at my Dollar Tree…it’s usually pretty bare and behind all the big states.
What a unique Easter Wreath, its so prefect for Spring and I love the size of it perfect for any door or wall.
Thanks so much, Maria!!
Jennifer this project turned out so beautiful. I love how you gave it a garden feel with the moss and flowers. It was wonderful to hop along with you!
Thanks so much, Crystal! I’m dreaming of gardening….
Jennifer, your wreaths are always so pretty and this Easter bunny wreath is the bee’s knees! Looks like we had the same idea with the flowers too haha! So great to hop with you this week!
Jennifer this is a fantastic wreath. You know how much I love moss.
Pinned
Giiiirrrlll, don’t I know it!!
Oh, I loved your project today!! It was just adorable!!
Jennifer, this is such a great wreath! The straw flowers look so pretty and add the perfect touch! If we lived close, you can bet I would be raiding your craft supplies! lol Nice job, friend!
LOL, yup you and Al would be!!!
Great project! I’ve never tried making my own grapevine wreath form. Your tutorial makes it seem simple. I’ll have to try it. Thanks for hopping with us.
One grapevine garland can be used for so many cute little projects!! Thanks for organizing this, Janet!