

Pumpkins are a classic Fall decoration, but have you ever thought of using one to create a whimsical fresh flower arrangement? It’s a fun and easy way to add a touch of elegance to your home décor, and it’s sure to impress your guests.
In this step-by-step guide, I’ll show you how to make a whimsical fresh flower pumpkin arrangement that’s sure to turn heads. With just a few simple supplies, you can create a beautiful and unique arrangement that will be the perfect centerpiece for your Thanksgiving table or Fall party.
Fresh Flower Pumpkin Arrangement: A Step-by-Step Guide
This post may contain affiliate links, which means I may earn a small commission if you make a purchase through my links, at no extra cost to you. Read my disclosure policy here.
Gather Your Supplies:
- Pumpkin
- Fresh Flowers
- Floral Foam (soak ahead of time)
- A Knife
- A Spoon
- Wooden Plant Stakes or Skewers
What To Do: Find a Pumpkin

To make a flower arrangement using a pumpkin you need to find an interesting pumpkin to use. Look for a medium-sized pumpkin that sits nicely on a flat surface…no wobbly bottoms!
I found this terracotta-colored warty pumpkin at my local farmstand. The fantasy pumpkins that you see in pretty colors and shapes would be fantastic to use for this project. Trader Joe’s usually has the best prices around on those.
Preparing the Pumpkin
Once you’ve gathered your materials and found an interesting pumpkin it’s time to get to work. The first part of the project is to prepare the pumpkin so it can be used to house the flower arrangement. Be careful when using your knife.
Cut Off The Top of The Pumpkin

This is the hardest part of this entire project, cutting off the top of the pumpkin.
We will be using the top again as a hat on our flower arrangement so it needs to be cut off in one piece.
Make sure to be doing this on a flat surface using a sharp knife. Dull knives can be dangerous. Keep the blade facing away from you as you cut around the pumpkin.
Clean Out The Pumpkin


Use a big spoon to scrape the sides of the pumpkin and remove the seeds. You might have to use your hands a little bit.
To prolong the life of the cut pumpkin before it starts to get moldy you can squirt it with white vinegar or even a bleach solution and then coat the inside with veggie oil or petroleum jelly.
An untreated pumpkin will last around 5 days depending on your climate.
Preparing the Pumpkin For Flowers
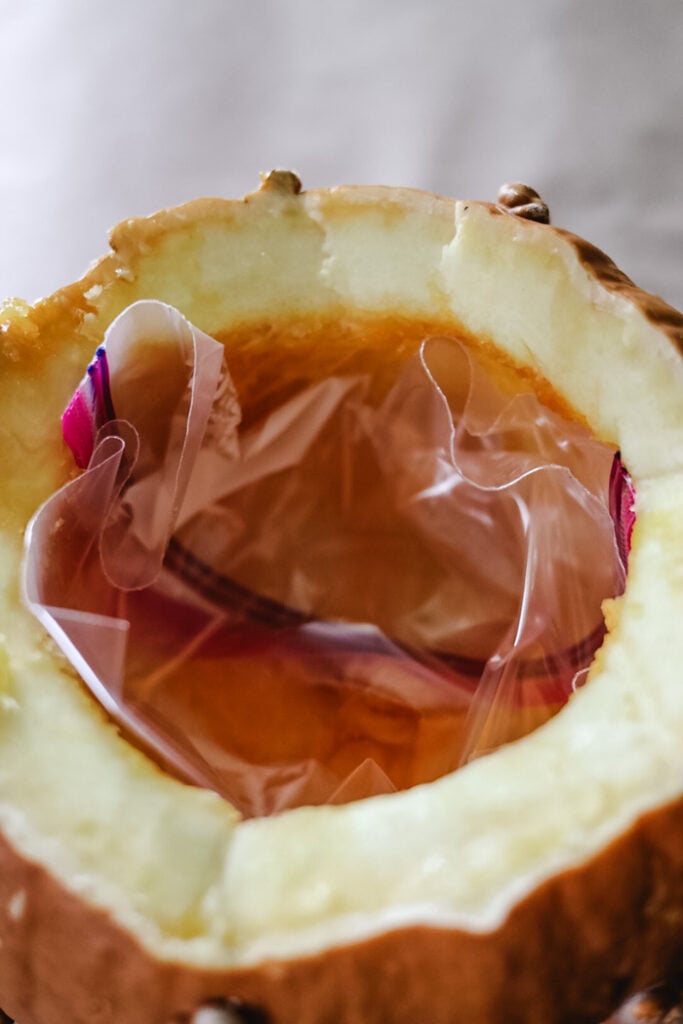
Line the inside of your pumpkin with a plastic bag or plastic wrap before adding the block of floral foam. This is to keep the floral foam from drying out.

For the size of the pumpkin that I am using for my flower arrangement, I only needed 1/2 a block of floral foam. Make sure to soak your foam for a couple of minutes beforehand so you are ready to go when you get to this step.
Creating The Flower Arrangement
Now it’s time to get creative! Find a variety of colorful flowers, and have a pair of garden shears handy to trim down your stems.
Choose Flowers & Greenery

Now that the hard, messy work is over it’s time for the fun part of this project: making the flower arrangement!!
My September garden is bursting with colorful blooms right now. I grabbed my garden shears and a basket and headed outside to cut fresh flowers for this project.
I also cut greenery and herbs. There was oregano with the prettiest tiny white flowers that were perfect for a filler plant.
No garden, no worries friends! If you have a Trader Joe’s nearby grab a mixed bouquet and some filler. Or hit your grocery store and find a big mixed bouquet of pretty flowers.
Any color palette of flowers will work for this fun arrangement. Traditional Fall colors would be just gorgeous too and perfect for your Thanksgiving table centerpiece.
Adding the Pumpkin Top

To make this pumpkin arrangement have a whimsical feel I am going to balance the pumpkin top on plant stakes but regular wooden skewers are fine too. I had the green stakes left over from my DIY edible fruit arrangement .
It will look like the flowers are bursting from the middle of the pumpkin.
It only took 2 wooden skewers to hold up the pumpkin top. Do this part beforehand so you can figure out how long your skewers need to be.
This will depend on how tall your pumpkin is, just break the end of the skewer to the height that works for you and stick the end into the bottom of the pumpkin or into the floral foam.
Time to Add The Flowers
I just strolled my gardens and clipped anything that was flowering! It’s a long list but don’t feel like you would need this many different flowers to achieve a gorgeous arrangement of your own, I’m a “use what you already have” gal.

Fresh Flower List for Pumpkin Arrangement:
- Dahlias
- Hydrangeas
- Cosmos
- Zinnias
- Celosia
- Amaranth
- Borage
- Flowering Oregano
- Bells of Ireland
- Lavender
- Sedum
- Boston Fern
- Eucalyptus (grocery store)

Adding the flowers to the pumpkin is fairly easy. Just trim the end of your flower stems short enough that the flowers overhang the edge of the pumpkin.
Cut the stems at an angle to allow them to absorb more water.

To create a more whimsical look stagger the lengths of the flower stems. This magenta-colored celosia (Asian Garden) has small fuzzy spires that add a pop of color and texture.

As I was adding flowers I tucked some of the shorter filler (I’m using bunches of oregano that is flowering) inside the pumpkin to fill in the empty space inside.

There was only one rose left in my garden, this soft yellow one that I surrounded with bright-colored zinnias. purple lavender, and celosia.

If you have a flower garden or want to start one, I highly recommend you add a pack of Queeny zinnia seeds next Spring! This variety of zinnia has bright lime, yellow, and pink flowers that almost don’t look real!
This zinnia is the perfect contrast to your pink and red garden flowers.

To finish up my pumpkin flower arrangement I added a few pheasant feathers. It’s an unexpected touch but feathers are a perfect accent for Fall and I love to use them in my wreaths as well.
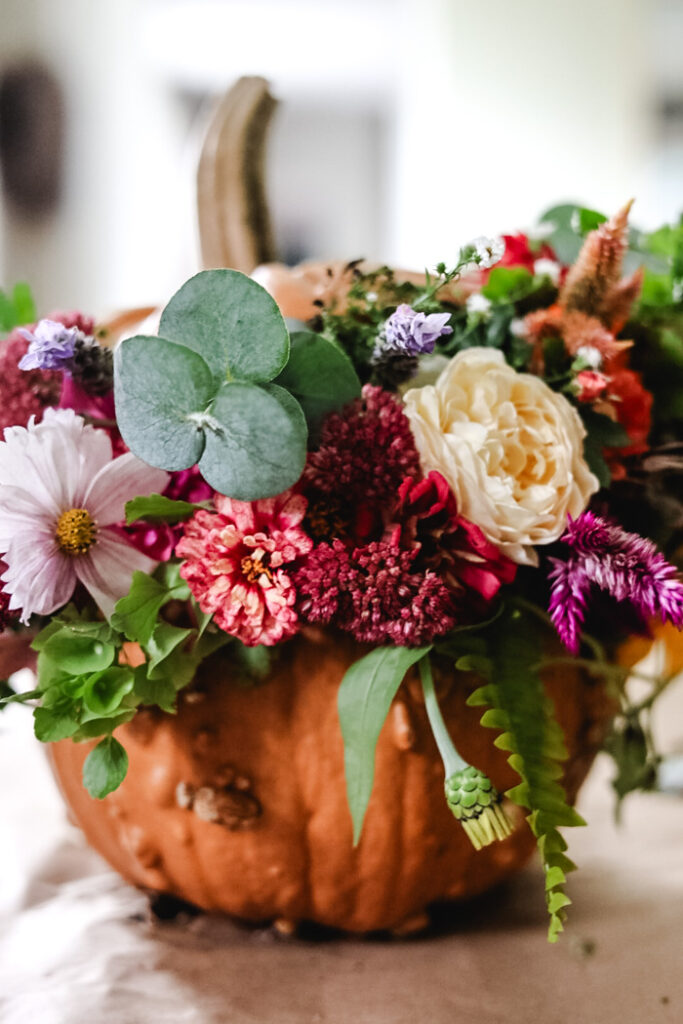
The only thing that I added that wasn’t grown by me is the eucalyptus which I grabbed at the grocery store. If you have ever grown eucalyptus in your garden, my hats off to you…I’ve tried twice and that is my limit before I cross it off the list!!

Finished Fresh Flower Pumpkin Arrangement

What do you think? Isn’t this a whimsical take on the pumpkin filled with flowers trend? You have to cut the top off your pumpkin anyway to fill it with flowers so why not give your arrangement a little pumpkin cap??

Just like with any bouquet of flowers, some will last longer than others so keep that in mind if you are making this ahead of time for Thanksgiving or a party centerpiece. It’s also pretty easy to pop out a wilted flower and replace it without disturbing the rest of the pumpkin arrangement.

You don’t need to be a floral designer or super crafty to create this pumpkin flower arrangement! It was actually easier than trying to make a vase of flowers look good.
If you make your own flower pumpkin please send me a picture, I would love to feature it! Just send me an email at jennifer@cottageonbunkerhill.com or tag me on your social media!
Did this make you want to start your own cut flower garden? Follow along with my Grow With Me series to learn the basics!
xo, Jennifer

Fall Inspiration
for decorating your porch:
25 DIY Projects Using
flowers & botanicals


I made one years ago and the bottom of the pumpkin rotted. At that time I did not know to treat the inside with bleach. How long does the pumpkin last? I know it varies according to the environment but just an estimate? I would love to do this again. It is lovely!
I think 5 days is prob the max, I just (sadly) tossed my pumpkin on the compost pile for the squirrels to snack on.
GORGEOUS
Thanks so much, Rebecca!!
Jennifer
This is so stunning. I’ve never attempted this before. Now I think I need to make one. Thanks for all the tips.
I see a white pumpkin w/ flowers on your table!!
This flower arrangement is so beautiful. Great job, Jennifer.
Thanks, Carol!
Absolutely beautiful! I’m definitely doing this. I’m hosting a wedding on the farm and this will be the perfect addition. Hugs to you.
It would be perfect wedding centerpiece!!
I absolutely love this arrangement! Such a brilliant idea to keep the top of the pumpkin on; love it!
Thanks, Lora!!
I love this! What a great idea!
Thanks, Stacy!!
What a pretty project, friend! The perfect table centerpiece for fall guests!
Thanks, Kimmy!!!
Such a gorgeous floral arrangement. I love the photo of the arrangement on the old chair.
Love my $2 chair!!