

Create a floral witch broom (sometimes called a besom) to add to your Halloween decorations this Fall. I will cover everything from gathering the materials to adding the finishing touches for this whimsical take on a witch broom. This project is perfect for anyone who wants to add a touch of magic to their home.
Crafting a Whimsical Floral Broom
Last fall, I created a spooky witch broom for my porch using twigs and branches. This year, I wanted to try something a little different. Inspired by the vibrant colors and textures of my garden, I decided to craft a floral witch broom. This DIY project is not only visually stunning but also a fun way to showcase the beauty of nature.
In this blog post, I’ll guide you through the step-by-step process of creating your own floral witch broom. From gathering the materials to adding the finishing touches, this project is perfect for anyone looking to add a touch of magic to their home or garden. This is an easy DIY project to try if you are a beginner level crafter.

This post includes affiliate links; you can read my disclosure policy here.
Materials I Am Using:
- Branch for the handle
- Fresh greenery (oregano, tarragon)
- Fresh flowers (celosia,calendula)
- Dried flowers (Gomphrena)
- Pheasant feathers
- Dried wheat
- Dried orange slices
- Jute twine
- Velvet ribbon
- Small bell
- Moss
- Floral Wire
- Scissors
- Hot glue gun
Gather Your Materials
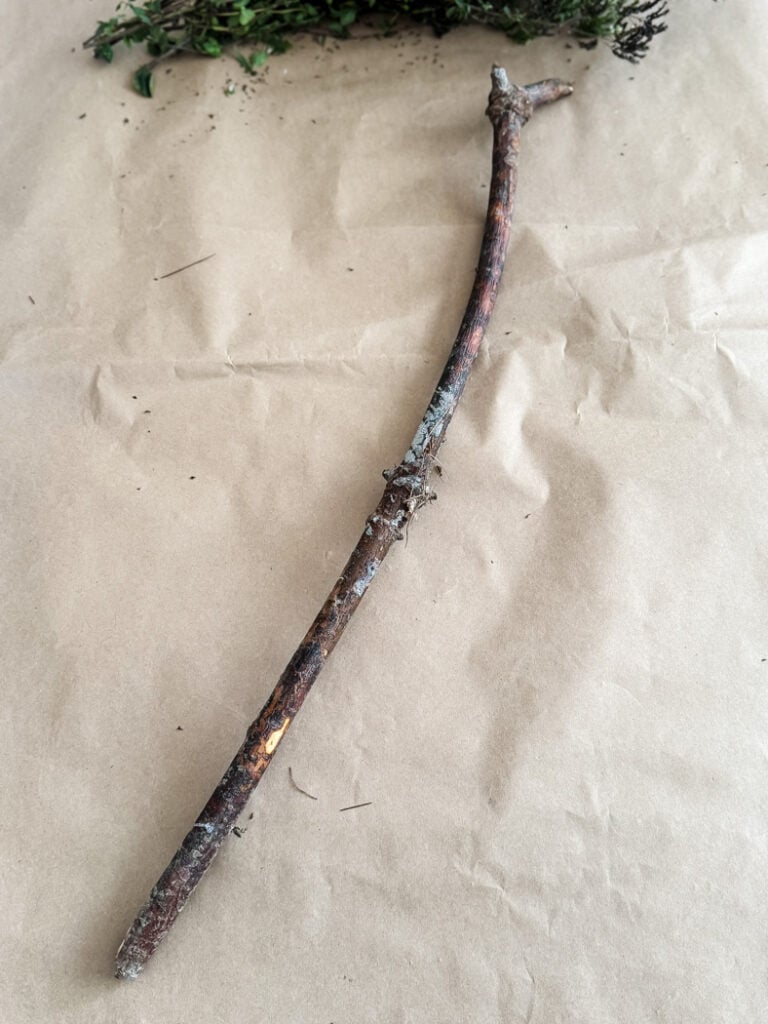
One of the most important steps in creating a witch broom is finding the perfect handle. I headed into the woods behind my house and carefully selected a branch that had a slight crook at the top. This crook will add a touch of character and whimsy to your broom. The branch should be sturdy enough to support the weight of the greenery and flowers, but not too heavy to be difficult to hang. The branch I picked is about 3 feet long and it was the perfect length for this decorative witch broom.
Once you have your broom handle ready, it’s time to gather the greenery and flowers for the base of your broom. I love the idea of using plants from my own garden, as it adds a personal touch to the project.
In my garden, I found woody branches of oregano that had gone to flower and tarragon. These herbs not only add a beautiful fragrance to the broom but also will dry out nicely. However, you can use any type of greenery that you have available, such as rosemary, lavender, or eucalyptus.

For the flowers, I chose bright-colored celosia in shades of yellow, purple, and pink. These flowers add a burst of color and fuzzy texture to the broom and a few yellow calendula blooms. You can also use other flowers, such as daisies, small sunflowers, or zinnias.

If you don’t have many flowering plants in your garden, don’t worry! You can purchase fresh flowers from a local florist, farmers market or my go-to spot Trader Joe’s.
Step By Step Instructions
This is a fairly easy DIY to make and the fun part is that you can add your own spin to it using flowers and colors that you love. Here is what you will need to make a flowery witch broom like mine but you don’t need all the extras to make a beautiful version for your own home (I’m the “go big or go home” type!)
- A sturdy branch for the broom handle.
- Fresh greenery from your garden or a local florist. I used oregano and tarragon, but other herbs or leafy plants would work well.
- A variety of fresh flowers in your favorite colors. I used celosia, but other options include daisies, small sunflowers, or zinnias.
- Dried flowers for added texture and interest. I used dried Gomphrena (globe amaranth), but other options include lavender or dried hydrangeas.
- Pheasant feathers or other decorative feathers.
- 3 pieces dried wheat or other dried grasses.
- 3 Dried orange slices or other dried fruits.
- Jute twine for tying the broom together.
- Velvet ribbon for a touch of elegance.
- A small bell for a whimsical sound.
- Moss for decoration.
- Garden snips and scissors for cutting the materials.
- Floral wire to secure everything
- A hot glue gun for adding the moss to the handle.
Create the Broom Base

- Lay the stick down on a flat surface. This will make it easier to work with. I suggest that you protect your work surface with paper for easy clean-up.
- Gather the oregano branches around the bottom of the stick. Arrange them evenly to create a full base.
- Use floral wire to secure the oregano branches to the branch. Wrap the wire around the base of the branches and the stick to hold them in place.
- Add a bunch of tarragon the same way. This will add another layer of greenery to the base.
You can continue adding more greenery to the base until it reaches the desired fullness (as the herbs dry they won’t be as full). Experiment with different combinations of herbs and plants to create your own unique look.
Adding The Flowers To The Broom
Now that you have a sturdy base for your broom, it’s time to add the floral elements. This is where you can really let your creativity shine!

1. Add the colorful celosia stems. Tuck them under the floral wire that is holding the herbs on the handle. This will secure the celosia in place. If you need more wire, simply wrap it around the celosia stems.

2. Add the dried globe amaranth flowers. These flowers will add texture and visual interest to your broom. Tuck them into the greenery, varying the lengths to create a more dynamic look.

3. Add a few yellow calendula flowers. These bright flowers will complement the other colors in your broom.

You can experiment with different types of flowers and colors to create your own unique style. The goal is to create a visually appealing and harmonious arrangement.
Decorate The Broom: Final Touches
Once you’ve added all of the flowers, it’s time to add some finishing touches to your broom. These elements will add a touch of whimsy and natural beauty to your broom.
- Add a few pheasant feathers and pieces (3) of dried wheat. This will add a different texture and visual interest to your broom. Tuck the dried wheat and feathers into the greenery under the floral wire to hold in place.

2. Then I wired a few dried orange slices onto the broom in various spots. I ran a small length of floral wire through the orange and then twisted the wire around the greenery branches to hold in place.

To make your own dried orange slices:
- Slice oranges between 1/8 to 1/4 inch thick
- Blot w/ paper towel to remove excess juice
- Arrange orange slices on a baker’s cooling rack over a sheet pan
- Place in 200° oven for 3-4 hrs until dried. Flipping every 30 minutes
3. Wrap a thick jute twine around the broom where the floral wire is holding everything in place for a rustic besom broom look. Tie a velvet ribbon around the handle for a decorative touch. I also tucked in a small metal bell to the ribbon.

4. One last natural touch I added to the broom was to hot glue a couple small clumps of moss to the handle. I also added one small flower.

5. If you would like to hang your broom then just wrap the jute twine tightly around the top of the broom handle and create a hanging loop. Really easy to do!


A Bit of Halloween Magic!
Your floral witch broom is a beautiful and unique addition to your home for Fall. This DIY project is a fun and rewarding way to keep enjoying flowers right through Halloween.

I encourage you to experiment with different colors, textures, and materials to create your own personalized broom. There’s no right or wrong combination!

See your projects featured! If you are inspired by this or any of my other DIY projects, I would love to see them and add you to the Reader’s Spotlight gallery. Send a photo to me at jennifer@cottageonbunkerhill.com
xo, Jennifer

Looking to learn how to make a witch broom for your porch this Fall? Check out my easy tutorial!
Pin For Later!

all my favorites!
Shop My Craft Supplies
Fresh Flower Wreath Collection

Looking for more pretty ideas?See all of our wreath tutorials using fresh flowers & natural materials


If these are live flowers are you drying them first? Won’t they just die and rot? Do you do something after assembled to preserve the flowers or is it just once they wilt ditch the broom? Thanks, looks beautiful
Hey Nicole, all the flowers that I used dry natually. I grow most of them to be used as dried flowers. After the season I actually used most of the flowers in my winter door basket https://www.cottageonbunkerhill.com/a-greener-christmas-sustainable-decor-ideas/ . There are some flowers like celosia, amaranth, strawflowers, & globe amaranth that you really don’t need to do anything special to (not even hang upside down) to get them to dry & look the same. Check your local flower stands or farmer’s market soon, they may have bouquets of some of them.
Would wildflowers work? I see tons of those around. Thanks
Love your little besom…I had no idea it was called that!
Thanks friend!!