

There’s something magical about early spring gardening—the crisp air, the first green shoots breaking through the soil, and the promise of fresh, homegrown vegetables just weeks away. If you’re as eager as I am to get your hands in the dirt, here are my top picks for early spring vegetables that thrive in cooler weather.
Cool-Weather Crops: A Guide to Early Spring Vegetables
In this post, you’ll discover:
- The best early spring vegetables to grow, from leafy greens like spinach and kale to crunchy favorites like radishes and peas.
- Tips for preparing your garden, whether you’re using raised beds or planting directly in the ground.
- How to care for your cool-weather crops, including watering, fertilizing, and protecting them from late frosts.
- Why raised beds are a game-changer for early spring gardening and how to get yours ready for planting.
By the end, you’ll have everything you need to start your own early spring garden and enjoy a delicious, homegrown harvest in no time!

This post may contain affiliate links, which means we receive a small commission if you purchase through our links. See our disclaimer page for more information.
What I Do To Prepare For Planting
Early spring gardening in New England (where I live on the Zone 5b/6a line) requires a bit of patience and preparation. The ground—or raised beds—needs to be thawed before you can start planting. Some years, the soil is ready in March; other years, it’s not until April. That’s the unpredictable nature of winters up here!
Know Your Planting Zone
The first step in planning any garden is knowing your planting zone. This helps you determine the best time to plant and which crops will thrive in your climate. If you’re unsure of your zone, check the USDA Plant Hardiness Zone Map to find yours.
Why Raised Beds Are a Game-Changer

One of the best things about using raised beds is that the soil thaws and warms up faster than the ground. This gives you a head start on the growing season, which is especially helpful in cooler climates like mine. Plus, raised beds offer better drainage and soil control, making them ideal for early spring vegetables. I’ve have these raised beds for my veggie garden, they are metal and look great year after year.
Preparing My Raised Beds for Spring
This year, I’m using existing raised beds for my early vegetables. Here’s how I get them ready for another growing season:
- Add Fresh Compost:
I start by adding a layer of fresh compost to the soil. Compost enriches the soil with nutrients and improves its structure, giving my plants a healthy foundation. If you don’t have access to homemade compost, bagged compost from your local nursery or garden center works just as well. - Incorporate Organic Fertilizer:
After adding compost, I mix in my favorite organic fertilizer. This gives the soil an extra boost of nutrients to support strong, healthy growth. Look for a balanced fertilizer (with equal parts nitrogen, phosphorus, and potassium) or one tailored to the specific needs of your plants. - Loosen the Soil:
Before planting, I gently loosen the soil with a garden fork or tiller. This helps aerate the soil, making it easier for roots to grow and water to penetrate.

This post may contain affiliate links, which means I may earn a small commission if you make a purchase through my links, at no extra cost to you. Read my disclosure policy here.
What Are Some Early Spring Vegetables?

- Spinach:
- Spinach is a cool-weather superstar, packed with nutrients and quick to grow. Plant it as soon as the soil can be worked, and you’ll be harvesting tender leaves in just 4-6 weeks. Try varieties like ‘Bloomsdale’ or ‘Baby’s Leaf Hybrid’ for a continuous harvest.
- Peas:
- Sweet, crunchy peas are a spring favorite. Sow them directly in the garden as soon as the soil is workable. Provide a trellis for climbing varieties, and you’ll be rewarded with a bumper crop in no time. Don’t forget to snack on the tender pea shoots while you wait!
- Radishes:
- Radishes are one of the fastest-growing vegetables, ready to harvest in as little as 3-4 weeks. They’re perfect for impatient gardeners (like me!) and add a peppery crunch to salads. Try ‘French Breakfast’ or ‘Easter Egg’ varieties for a colorful harvest.
- Kale:
- Kale is a hardy green that thrives in cool weather and even improves in flavor after a light frost. Plant it early for tender leaves that are perfect for salads, smoothies, or sautéing. Varieties like ‘Lacinato’ (also known as dinosaur kale) are both beautiful and delicious.
- Lettuce:
- Lettuce is a must-have for early spring gardens. Plant a mix of leaf lettuce varieties for a colorful salad bowl. Keep the soil moist and harvest outer leaves as needed for a ‘cut-and-come-again’ crop.
- Carrots:
- Carrots can be sown early in spring for a sweet, crunchy harvest. Choose shorter varieties like ‘Paris Market’ or ‘Nantes’ for heavy or rocky soils. Thin seedlings to ensure proper root development.
- Broccoli:
- Broccoli is a cool-weather crop that can be started indoors and transplanted early in spring. Harvest the main head, and you’ll often get smaller side shoots for weeks afterward.
Snow Peas and Sugar Snap Peas: A Spring Favorite
Snow peas and sugar snap peas are two of my absolute favorite crops to grow in the spring. There’s nothing quite like the sweet, crunchy taste of freshly picked peas straight from the garden. Plus, they’re so versatile—I love adding them to stir-fries, salads, or simply snacking on them right off the vine. And the best part? You can plant them again in late summer for a second harvest in the fall!

Why Peas Love Cool Weather
Peas thrive in cooler temperatures and don’t do well in the heat. That’s why it’s important to get an early start in the spring, as soon as the soil can be worked. Planting early ensures a bountiful harvest before the summer heat sets in. If you miss the spring window, don’t worry—you can sow them again in late summer for a fall crop.
Supporting Your Peas
Peas are natural climbers, so they grow best with some kind of support structure. A trellis, netting, or even a simple DIY teepee made from bamboo stakes will work perfectly. Not only does this keep the plants off the ground, but it also makes harvesting easier and helps prevent diseases by improving air circulation.
How to Plant Peas
Both snow peas and sugar snap peas are incredibly easy to grow by direct sowing. Direct sowing simply means planting the seeds directly in the garden—no need to start them indoors or buy seedlings from the nursery. Here’s how to do it:
- Prepare the Soil: Loosen the soil and mix in some compost for added nutrients.
- Sow the Seeds: Plant the seeds about 1 inch deep and 2 inches apart. If you’re planting in rows, space the rows about 18-24 inches apart.
- Water Gently: Keep the soil moist but not waterlogged until the seeds germinate.
- Provide Support: Set up your trellis or support structure shortly after planting to avoid disturbing the roots later.
With just a little care, you’ll be rewarded with a plentiful harvest of crisp, delicious peas in no time!

DIY Pea Trellis
One Spring I built a new trellis for my snow peas and sugar snaps to trail up on. You can see how I built one it was pretty easy too!
I planted snow peas on one side and sugar snaps on the other side of the folding trellis. This still produces plenty of pods. You don’t need a ton of room to grow these…and they are so yummy to snap off and eat right in the garden.

The weather has been extremely cold around here this Spring so they are taking longer than usual to really get growing. Usually, it’s about 6-8 weeks until you have peas to harvest.

Garden Tip: This is a wonderful vegetable to grow with your kids! They will love planting the seeds and watching them grow…plus they will love to be able to pick the pods off the stems and eat them!

Planting Broccoli and Cauliflower: Tips for Success
Broccoli and cauliflower are two of my favorite early spring vegetables to grow. Not only do they thrive in cooler weather, but they’re also surprisingly easy to care for. Whether you’re a seasoned gardener or just starting out, these tips will help you grow healthy, delicious broccoli and cauliflower plants.
Why Broccoli and Cauliflower Love Cool Weather
Both broccoli and cauliflower are cool-weather crops, meaning they grow best in the mild temperatures of early spring and fall. They can tolerate light frosts, making them perfect for planting as soon as the soil can be worked. However, once the hot summer weather arrives, these plants will start to bolt (produce flowers and go to seed), so timing is key!

How to Plant Broccoli and Cauliflower

I usually buy my broccoli and cauliflower plants in flats from the nursery, but you can also find them at big-box stores like Lowe’s, Home Depot, or Walmart if you don’t have a local garden center. Here’s how I plant them for the best results:
- Dig the Right Hole:
- Dig a hole that’s deeper and twice as wide as the plant’s root ball. This gives the roots plenty of room to spread out and establish themselves.
- Straighten the Stem:
- Sometimes, the stems can grow a little wonky from being in starter trays. When planting, bury the stem deep enough so that only the straight, stronger part is above the soil. This helps the plant grow upright and sturdy.
- Remove Bottom Leaves:
- Gently remove any small, lower leaves that might end up buried in the soil. This prevents them from rotting and encourages healthier growth.
- Backfill and Space Properly:
- Place the plant in the hole and backfill with soil, gently firming it around the base. Be sure to leave adequate space between plants (about 18-24 inches for broccoli and 24-30 inches for cauliflower) to give them room to grow.
- Protect from Pests:
- To keep pests like cabbage worms and aphids at bay, I cover the bed with garden netting propped up on hoops. This creates a physical barrier without blocking sunlight or airflow.
- To keep pests like cabbage worms and aphids at bay, I cover the bed with garden netting propped up on hoops. This creates a physical barrier without blocking sunlight or airflow.
Caring for Broccoli and Cauliflower
- Watering: Keep the soil consistently moist but not waterlogged. Water at the base of the plants to avoid wetting the leaves, which can lead to disease.
- Fertilizing: Apply a balanced organic fertilizer or compost tea every 3-4 weeks to support healthy growth.
- Mulching: Add a layer of mulch around the plants to retain moisture, regulate soil temperature, and suppress weeds.

Dealing with Bolting
As the weather heats up in summer, broccoli and cauliflower plants will start to bolt. Bolting is when the plant begins to produce a flower stalk and go to seed—it’s a natural process, but it signals the end of the harvest. Here’s how I handle it:
- Harvest Promptly: Once you notice the plants starting to bolt, harvest the heads immediately. The flavor may become bitter if you wait too long.
- Pull and Replant: After harvesting, I pull out the plants and compost them. Then, I replant the bed with a warm-weather crop like beans, cucumbers, or zucchini to make the most of the growing season.

After you plant anything you should give it a nice drink of water! Now what we do most of the time as gardeners…we wait for our plants to grow!

Broccoli is a fun plant to watch go from seedling to full-grown vegetable!
Other Easy Spring Vegetables To Grow
Here are 3 other easy and early Spring crops to grow this season:
Growing Radishes: Quick and Easy

Radishes are one of the fastest and easiest vegetables to grow, making them perfect for beginners and impatient gardeners alike. Here’s how to grow them successfully:
- Planting: Direct sow seeds in early spring as soon as the soil can be worked. Plant them ½ inch deep and 1-2 inches apart in rows spaced 6-12 inches apart.
- Care: Keep the soil consistently moist for quick growth. Thin seedlings to prevent overcrowding.
- Harvest: Radishes mature in just 3-4 weeks! Pull them when the roots are about 1 inch in diameter for the best flavor.
- Tip: Plant a new batch every 2 weeks for a continuous harvest.
Growing Carrots: Sweet and Crunchy
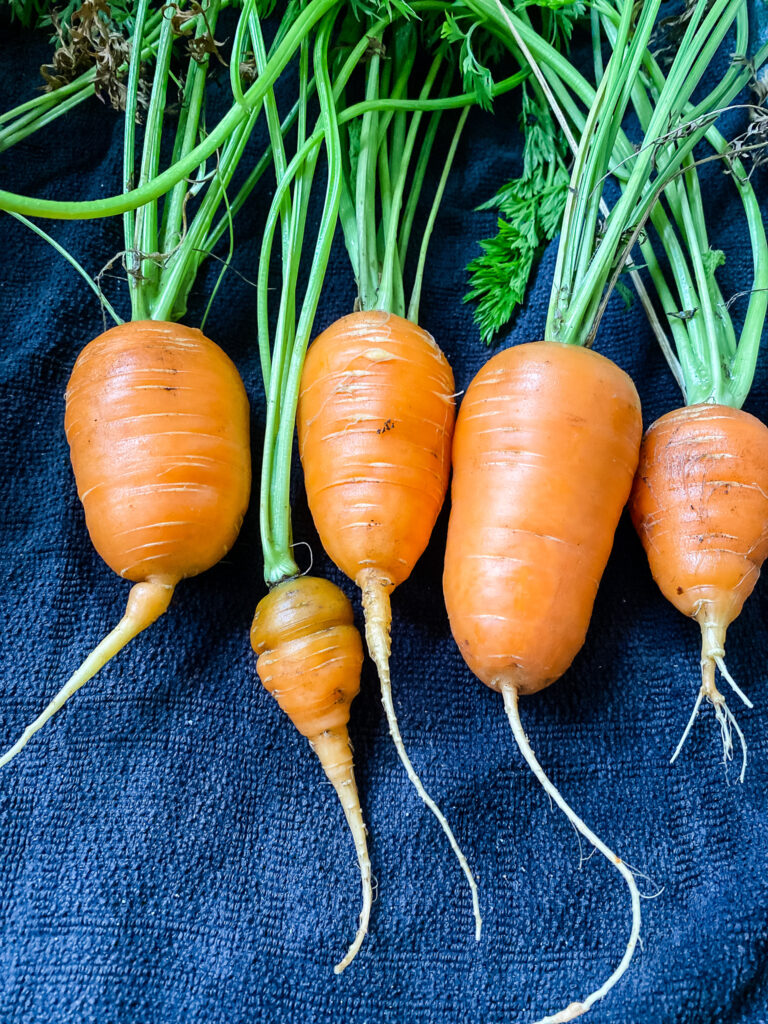
Carrots are a cool-weather favorite, but they require a bit of patience and care. Here’s how to grow them:
- Planting: Direct sow seeds in loose, well-draining soil. Plant them ¼ inch deep and thin seedlings to 2-3 inches apart once they’re a few inches tall.
- Care: Keep the soil moist but not waterlogged. Mulch to retain moisture and prevent weeds.
- Harvest: Carrots are ready in 60-80 days, depending on the variety. Gently pull them when the tops are about ¾ inch in diameter.
- Tip: Choose shorter varieties like ‘Paris Market’ or ‘Nantes’ if you have heavy or rocky soil.
Growing Lettuce: Fresh and Versatile

Lettuce is a must-have for any early spring garden. It’s quick to grow and perfect for salads, sandwiches, and more. Here’s how to grow it:
- Planting: Direct sow seeds or transplant seedlings. Plant seeds ¼ inch deep and thin seedlings to 6-12 inches apart, depending on the variety.
- Care: Keep the soil consistently moist and provide partial shade if temperatures rise.
- Harvest: For leaf lettuce, pick outer leaves as needed. For head lettuce, harvest the entire plant when the head feels firm.
- Tip: Practice succession planting by sowing new seeds every 2-3 weeks for a continuous harvest.
Have you ever wanted to learn about starting seeds? Read my Seed Starting Basics guide.
early Spring Vegetables to add to your garden

- All Lettuces
- Spinach
- Broccoli
- Cauliflower
- Brussels Sprouts
- Green Onions
- Snow Peas
- Sugar Snaps
Growing Tips for Early Spring Vegetables
Growing vegetables in early spring can be incredibly rewarding, but it does come with its own set of challenges. Cool weather, unpredictable frosts, and soggy soil can all affect your garden’s success. Here are my top tips to help you grow a thriving early spring garden:

1. Prepare Your Soil
- Test and Amend: Early spring soil can be cold and compacted after winter. Test your soil’s pH and nutrient levels, and amend it with compost or well-rotted manure to improve fertility and drainage.
- Loosen the Soil: Use a garden fork or tiller to aerate the soil, making it easier for roots to grow and water to penetrate.
2. Start with Cool-Weather Crops
- Choose the Right Vegetables: Focus on vegetables that thrive in cooler temperatures, such as spinach, lettuce, peas, radishes, and kale. These crops are more tolerant of frost and will give you a head start on the growing season.
- Check Seed Packets: Pay attention to the “days to maturity” listed on seed packets. Early spring is the perfect time to plant quick-growing crops that will be ready to harvest before the heat of summer.
3. Protect Against Late Freeze
- Monitor the Weather: Keep an eye on the forecast and be prepared to protect your plants if a late freeze is predicted.
- Use Row Covers: Lightweight row covers or frost blankets can shield young plants from frost while still allowing sunlight and water to reach them.
4. Water Wisely
- Avoid Overwatering: Early spring soil can stay wet for longer, so be careful not to overwater. Check the soil moisture by sticking your finger about an inch into the ground—if it feels dry, it’s time to water.
- Water in the Morning: Watering early in the day allows the soil to absorb moisture before temperatures drop at night, reducing the risk of frost damage.

5. Practice Succession Planting
- Stagger Your Planting: To extend your harvest, sow seeds every 2-3 weeks. This ensures a continuous supply of fresh vegetables throughout the season.
- Mix Fast and Slow Growers: Plant quick-growing crops like radishes and lettuce alongside slower-growing ones like broccoli or carrots. By the time the slower crops need more space, the faster ones will already be harvested.
6. Mulch for Moisture and Warmth
- Apply Mulch: Spread a layer of mulch (such as straw, shredded leaves, or grass clippings) around your plants to retain soil moisture, regulate temperature, and suppress weeds.
- Wait for Warmth: Avoid mulching too early in the season, as it can keep the soil cold. Wait until the soil has warmed up a bit before applying mulch.
7. Keep an Eye on Pests
- Early Detection: Cool weather doesn’t mean pests are gone. Watch for slugs, aphids, and other early spring pests.
- Natural Solutions: Use organic pest control methods like neem oil or row covers to keep them off your plants.
8. Fertilize for Healthy Growth
- Use Organic Fertilizers: Early spring vegetables benefit from a nutrient boost. Apply an organic fertilizer or compost tea to encourage strong, healthy growth.
- Follow Instructions: Be sure to follow the recommended application rates on the fertilizer package to avoid overfeeding.
9. Thin Seedlings for Success
- Give Them Space: Once your seedlings have sprouted, thin them to the recommended spacing on the seed packet. Crowded plants compete for nutrients and are more prone to disease.
- Use Thinnings: Don’t toss those thinnings! Many, like lettuce and radish greens, can be added to salads or used as microgreens.
10. Enjoy the Process
- Celebrate Small Wins: Early spring gardening is all about patience and perseverance. Celebrate each new sprout and harvest, no matter how small.
- Learn as You Go: Every garden is a learning experience. Take notes on what works (and what doesn’t) to improve your skills each season.

Early spring gardening is such a rewarding way to shake off the winter blues and reconnect with nature. Whether you’re planting crisp lettuce, sweet peas, vibrant radishes, or hearty broccoli, there’s nothing quite like the taste of homegrown vegetables straight from your garden.
Remember, gardening is a journey—it’s okay to start small and learn as you go. With a little preparation, the right plants, and a bit of patience, you’ll be amazed at what you can grow, even in cooler weather.
So grab your gloves, get out there, and start planting! Your garden (and your taste buds) will thank you. And don’t forget to share your early spring garden progress with me. I’d love to see what you’re growing!
Happy Gardening, Friends!!
xo, Jennifer
Cottage Garden
Favorite Products
Shop my gardening favorites! Raised beds, plant supports, & tools to make your garden grow.
Grow With Me
Grow With Me Gardening Series

This is part of the Grow With Me Gardening Series here at Cottage On Bunker Hill. I want to teach you ways of starting, maintaining, and enjoying gardening. I will share all the tips & tricks that I have learned over the years growing both vegetable and flower gardens here in the Northeast.


So many great tips. I’m sharing a link on Sunday.
Slim pickins’ here this week, Rachel!!
Oh boy! Planting your own seeds brings such joy as they grow! My Grandpa always said not to plant before Memorial Day but we hit record breaking temps here on Cape Cod today. Time to play in the dirt!!! Thanks Jennifer. I will think of you when we start harvesting all that healthy stuff!!
This weather is so incredible! Oh, I won’t put the tomatoes, etc in until Memorial Day either unless it’s a warm May. It was so nice to wake up to a warm house this morning!
Fresh veggies are the best!
So many great tips. I love fresh veggies.