
I have been gardening since I was a little girl in my Mom’s garden, so after all these years most of it comes as second nature to me. It’s one of the most relaxing hobbies and I find it so rewarding. There’s nothing better than watching a seed you planted sprout through the soil and grow!
I know it can be intimidating to make that first dig in your yard, but I want to give you an easy plan to start a flower garden this year that you can enjoy for years to come!
1. Picking a location

The very first step to making a flower garden is to decide where you want to put it and how much sunlight the spot gets. More than 6 hours is full sun and under 3 is shady. The spot I picked for my new flower garden is somewhere in between so it’s considered part sun. It’s important to figure out how much sun your garden is going to get so you can buy the right kind of plants that will thrive in your conditions.
I am putting my new flower garden bed in to help disguise an ugly well pump; here in New Hampshire there aren’t many towns that have a public water supply and most of us have a well for water. I honestly don’t know why I haven’t done this before now! This is my third Spring living here and I can’t stand looking out my windows and looking at the rusty ‘ole thing!
2. Clearing The Area

After you figure out where you want to start a new flower garden, you need to decide what shape you want to make it. I’m opting for a circular design for mine for now; I say “for now” because us gardeners have a way of always making our gardens just a little bit bigger every year!
**Two of the easiest ways I know for you to mark your area are: lay down a garden hose into the shape you want your garden bed to be or use white spray paint and make the outline on the grass. Then take an edger tool and work your way around the outline.**
Now, for the hardest part of this entire project…clearing the area! You want to remove all the grass down to the root. I used a cultivator hoe (it has a hoe on one side and a 3 tine cultivator on the other), to get under the grass and peel it away from the dirt.
3. Add Edging

Almost done…I think this is when I ran inside to take a couple of Motrin! My flower garden bed is a 7 foot circle; the picture is deceiving.
This is the point I would normally add some plastic edging around the perimeter to prevent the grass from growing into the new flower garden. Right now it is impossible to find edging in stock anywhere near me.
4. Amending The Soil

You want to give your new plants plenty of room to grow healthy roots in your garden bed.
Once I had cleared out all the grass I turned the dirt over and pulled out any thick roots and big rocks that were near the surface. I added 2 big bags of a high quality garden soil blend to the area.
If you are wondering about the cord around the well…well, the pump died on New Year’s Day and had to be replaced and they put the cord around it to hold the piping in place. I should have known that starting the New Year with a big issue like no water was a sign of what 2020 was going to bring! I’m leaving that cord right there because I don’t want anything else to go wrong!
Now for my favorite part; picking the flowers and planting.
5. Picking Your Flowers

My new flower garden is in my front yard near the road so I want to make it extra pretty when people are walking by my house…after all, they have been looking at that ugly well pump for years!
I’m going to plant a mixture of perennials and annuals. Perennials are plants that will return next Spring and annuals will just last until we get a frost in the Fall. It’s nice to mix in annuals because they will flower all Summer and also because the perennials won’t be fully grown the first season.
I love easy, no-fuss gardens and yards. I definitely don’t want to be stuck working on yard chores all weekend long now that it’s finally Summer in New England and there’s so much to do here on the seacoast.
That’s why I was so excited about getting the Worx Landroid Mower. You’ll definitely be the cool kid on the block with one of these mowers cutting your front lawn! I always see people stopping to take a look at my Landroid when it’s buzzing around my yard.
It does a nice job taking care of my front lawn and it saves me so much time not having to add another chore to my weekend list.
I found a nice array of plants at a local store to use for my new flower bed and also a couple of decorative items to add some visual interest.
I was also in the process of dividing some of my perennials and grabbed a couple of hostas and daylilies to use as well. You can see how to divide hostas here and I wrote a tutorial on how to divide daylilies.
6. Planting

Now for the fun part! Let’s make a pretty flower bed!

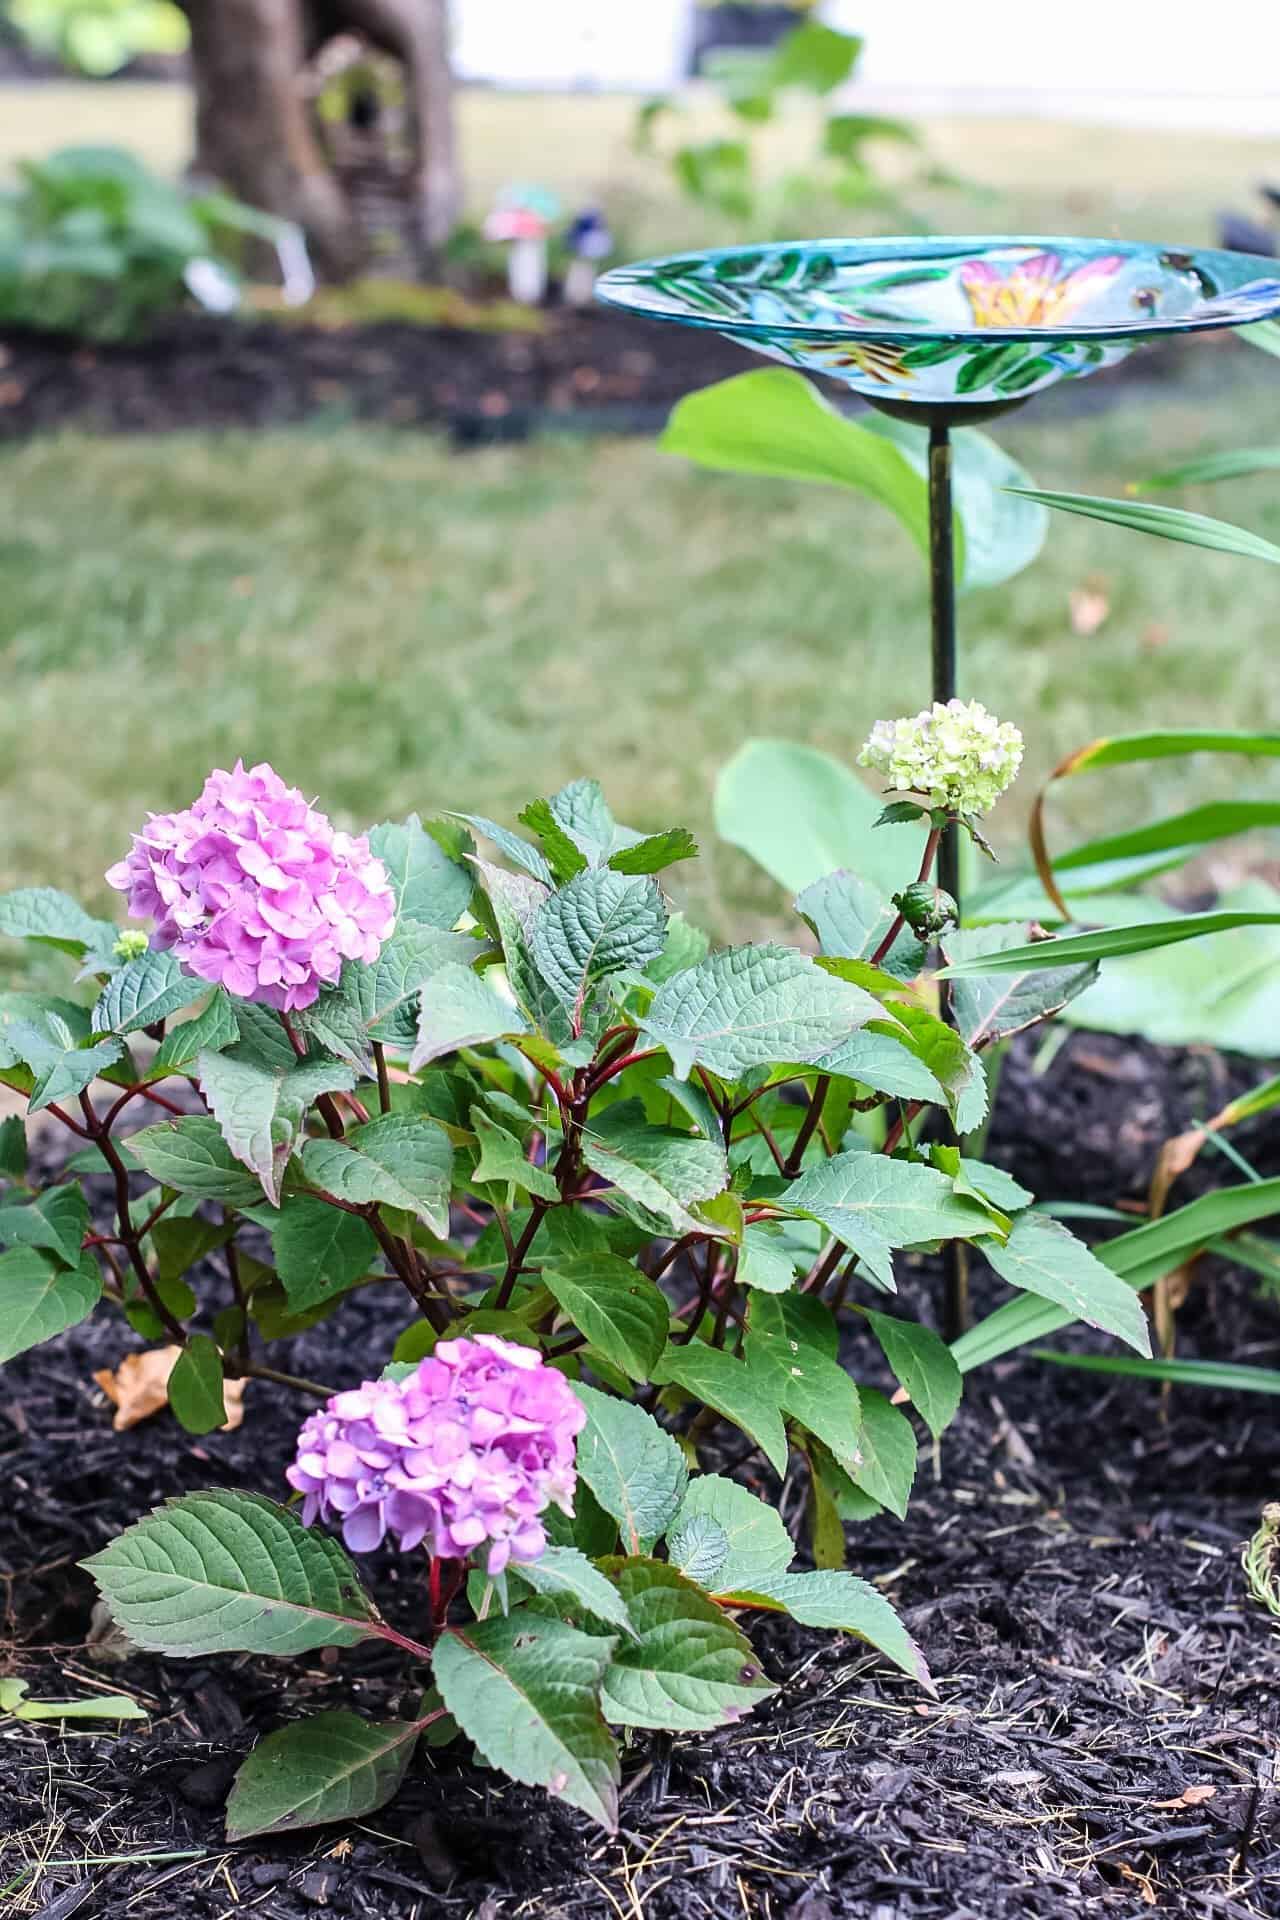
I added a pretty stained glass bird bath in the back for height; it will be the tallest thing in the garden. I planted a small hydrangea next to it and flanked that ugly well with a couple of hostas I had divided from an existing plant.
Hosta is so easy to grow and almost impossible to kill so are a great choice for a newbie gardener.

Daylilies are another hardy perennial and are the perfect height to disguise the well. My garden bed is going to be seen from all directions so I wanted it to look pretty from all sides.

I popped in a small gazing ball in the front part of the bed and finished planting the flowers. My new buddy the Worx Landroid has been busy working on my lawn while I’ve been working on this flower bed- it’s the ultimate getting two things done at once!

The Landroid was easy to set up; I had to put out the boundary wire and stakes around my front lawn and set up the base up by my house so it could be plugged in to charge. I installed the anti-collision system to the top of the Landroid; this thing is amazing, it will avoid trees, flower beds, and any other obstacles that are in it’s way! It even senses when it’s rained and will delay mowing until the grass is dry.
7. Add Mulch

Mulch not only looks nice in your garden, it has an important job. Mulch will help keep weeds down in your flower beds and also helps maintain the moisture in the soil. I personally love the look of black mulch; it looks nice and helps the colors of your garden really pop!

Now it’s time to give your garden a good drink of water; with any new plantings, you want to water them daily for a few days. It’s common for plants to go into shock from being planted and may look sad for a few days afterward but they will perk up!
You can see that I didn’t overplant this area; you have to remember that your plants will really start filling in your garden in no time.
8. Enjoy!

My favorite step is to sit back and enjoy your garden! Gardening is one of the most relaxing hobbies you can have; there’s something so therapeutic about getting your hands dirty! I swear one of the only things that gets me through the long, cold winters here in New England is dreaming and planning my garden!

It’s been a couple of weeks since I planted this flower garden and it’s already starting to fill in so beautifully.
The hydrangea ( Bloomstruck by Endless Summer Hydrangeas) has the happiest purple blooms and I always see the little chickadees stopping by for a drink from the bird bath in the mornings.
Thanks again to Worx for giving me more time to enjoy my garden this summer! It’s so much fun watching it do the work this year instead of me!
Disclosure: This post was sponsored by Worx Tools. All opinions are my own.


Hello there! You shared great flower gardening tips! As you said, “Picking up the best place where more than 6 hours is full sun and under 3 is shady”, I will definitely follow these tips to prepare a flower garden. Thanks for the tips!
I will definitely miss my garden in the winter!! Everything is already starting to fade…