Have you tried starting flower seeds indoors before? Well, I did for the first time and I’ll share with you what I learned and what I won’t do again.
What I Learned My First Year Starting Seeds Indoors
Although I’ve gardened for a million years, I’ve never started seeds indoors until this year. I got so caught up in all the beautiful Instagram photos of all these amazing cutting flowers that I wanted some for my flower garden this season.
Here are all my seed starting basics that I’ve learned and what you need if you want to try it too.
This post includes affiliate links; you can read my disclosure policy here.
Pick A Spot To Start Your Seeds
The first thing I had to figure out is exactly where I was going to set up my seed-growing operation. I have a home daycare and a smallish house so I didn’t have an area upstairs that would work…I could imagine tiny hands throwing dirt everywhere!!!
My basement is huge, and that’s where I have my studio set up anyway, so I felt this was the best spot. It also has so many electrical outlets because the family that built this house ran an upholstery business out of there.
I had originally planned on getting a large shelving unit but decided to use a work table and a folding table that I already had (saved a few bucks too!!)
Seed Starting Supplies
Since I was starting from scratch I needed everything!

1.lights
After doing a bit of research I decided to go with LED light panels instead of the long bulb workshop lights that have been around forever.
The LED’s came in a 2 pack and were under $40 but will outlast traditional lights or at least they are supposed to!!)
The LED lights are also super lightweight. All I needed to do was screw an eye hook into my support beam and thread lightweight wire through; I twisted a loop at the end and hung the LED’s S- hook onto it.
**I was really pleased with these lights and would definitely recommend them. They’ve come in handy too…when I was putting out all my Christmas decor I set a couple of the lights up again in the basement and put all my house plants under them for the duration.**
2. heating mats
Seeds like a warm spot to germinate. My basement is unheated and definitely not a cozy spot for my seeds to grow! I used heat mats underneath my seedling trays to keep them toasty and happy. Most seeds like their soil around 75.
Honestly, I was surprised at how thin the heat mats are! The mats that I bought are the unroll and plug-in versions.
I know there are more complicated versions that have thermometers and timers…but being new to all of this I wanted to keep it simple (in case I was a total failure!!!)
I would definitely recommend these heat mats. They worked great and for the price, you can’t go wrong.
3. containers/ seedling trays
You need something for your seeds to grow in! For my first year of seed starting, I planted seeds in 3 different types of containers.
I used the seed starting tray kits (tray, dome, water tray), large empty plastic salad mix containers (Costco Spring mix), and aluminum disposable pans (the Dollar Store ones that come w/ a plastic cover).
** This year I am not going to use the seed starting trays…I had so much more success with the flowers I started in the plastic salad containers and aluminum pans from Dollar Tree!**
4. soil starting mix
For seed starting you need to use a starting mix specially made for starting seeds; it’s much less heavy and dense than potting mix so the seeds have a better shot of germinating and growing.
5. Outlet Strip
There are a bunch of plugs that have to be plugged in; so you need to think about that before you set up! Make sure you have access to an outlet nearby.
I grabbed an outlet strip that had a 10-foot cord which helped so much…I didn’t even know they came that long!! These GE outlet strips also come up to 25 ft long…I had no idea!!
**I use this cord all the time down in my studio to plug in my studio lights when I’m filming and a hot glue gun. It’s been very durable and I’m ordering another one just for my seed starting this year because I use the other one all the time.**
6. Plant Markers
Make sure to mark all your trays with something that won’t fade or get lost!
I used plastic plant markers and popsicle sticks too…I wouldn’t use tape or anything that could fall off and leave you wondering what the heck is growing in the tray!!

What I Learned About Planting The Seeds
Know Your Zone!
The main thing you need to figure out when you are starting seeds indoors is when the date it’s safe to plant outdoors in your grow zone. (USDA Plant Hardiness Zone Map) Your zone is determined by your average annual winter temperature and it will tell you when the average last frost date is in your area…basically, so your plants don’t freeze and croak!!
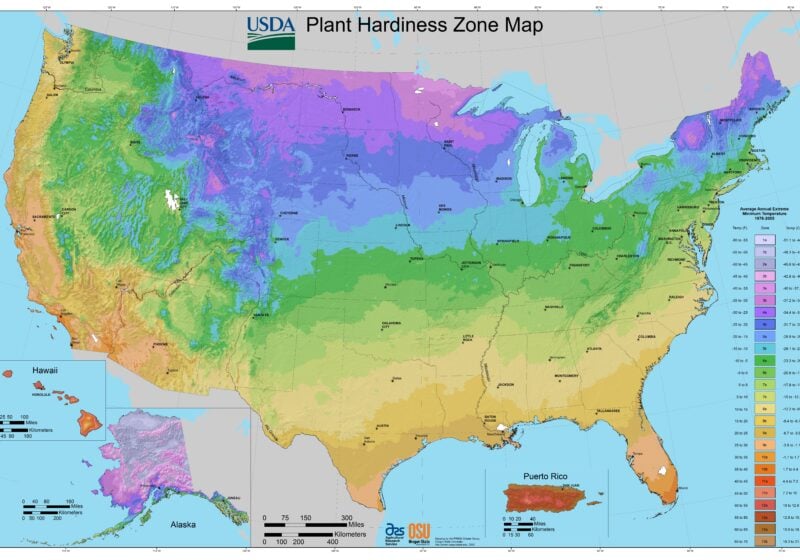
I’m on the Zone 5/6A line and I usually plant my tender annuals and vegetables at the end of May (usually Memorial Day weekend is my gardenpalooza!!)
Read The Packets!
SO, on the back of all seed packets, it will give you info on how to start the seeds. You have to take the time and read ALL the info!!

Some of the flowers I’m growing required 8 weeks grow time before the last frost date some only needed 4-6, and some of the packets I have said they can be direct sowed into the garden (which is a fancy way of saying just plant them where you want them to grow!).
Another thing I learned about was succession planting my flower seeds which means that I started some of the seeds and then saved some to plant in a few weeks. So there will always be new flowers to cut in the Summer.
Also, check to see if the seed requires it to start in the dark or in light… some seeds want to be covered and some do not.
Getting Them Planted!


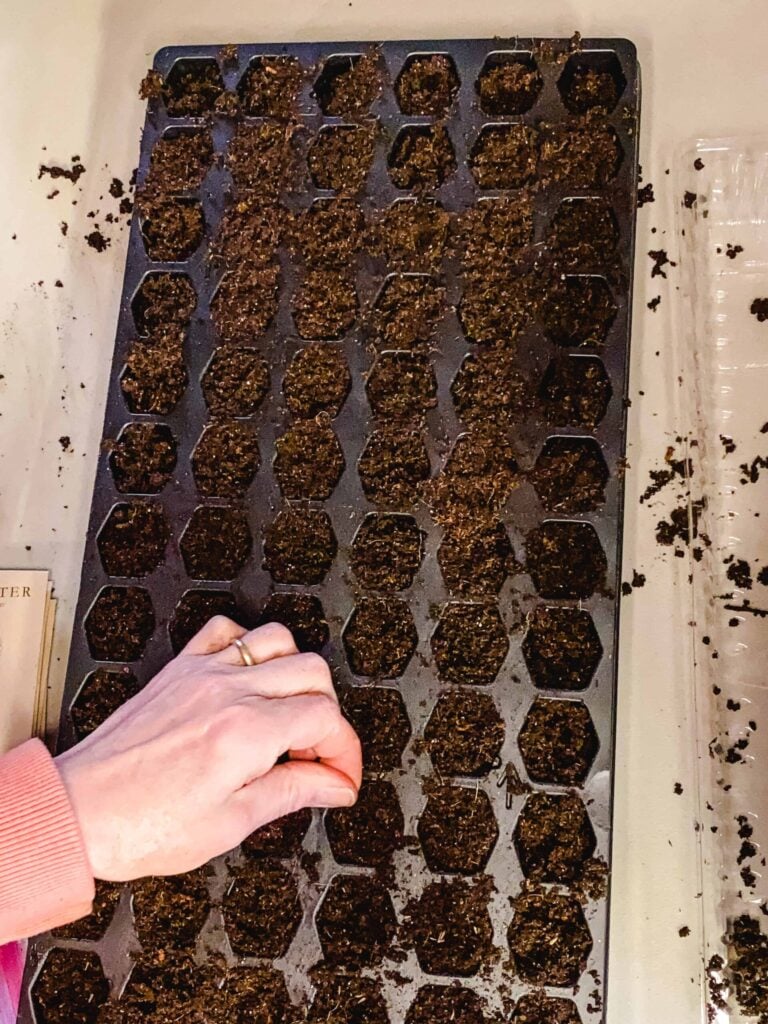
Oh, and some of the seeds are sooooo tiny!!!
When I was filling the seed trays I poured the seed starting mix into a big bucket and added water and mixed it all up so it was moist but not soaked…it stuck together when I squished a handful. After I filled up all the cells with the mix I popped in the seeds. I used a pencil to move them in place.
After you plant your seeds cover the container with a plastic cover or plastic wrap while the seeds germinate. This keeps the moisture in to aid in the process. Once you see signs of life remove the covering…even if it’s just 1 or 2 seedlings.
The plastic containers and aluminum pans I used needed drainage holes poked into them too. I lined the salad containers with a coffee filter to prevent losing the dirt when they were watered.
If I’m being honest, the containers that worked the best for me were not the fancy store-bought special seed ones but my recycled salad containers and the aluminum dollar store trays!
The seeds also need to stay moist and watering them from the bottom is the best way so you don’t disturb the tiny seedlings.
One benefit of the seed starting kits is that they have a built-in tray so you can just fill it partly with water and set your seedling in it until the top of the soil is moist. For my DIY seedling containers, I actually used the lids from the seed starting kits and filled those partially with water, and set the seeds in.
Remove the excess water from the tray after your seedlings are moist…you don’t want to just leave them sitting there drowning

Let there be light!
Seedlings need a lot of light!
From everything that I’ve read, 16 hours is the optimal amount to get them really grooving.
I tried for 16, but I ran out of space because I was a lunatic and had too many seedlings started! So for part of the journey, some were just getting 12 hours and I was rotating trays in and out of the lights.
They still grew and are healthy but would probably be bigger at this point if they had had a consistent 16 hours a day…but I really didn’t want to buy more lights!
Speaking of light….the optimal spot for the lights is 3-4 inches about the seedlings so they can soak it all in. I simply lifted up the lights a little as the seedlings grew.

Room to grow!
A few of my seedlings outgrew the seed trays and needed to be repotted in larger containers; keep your eye out for that as they get larger.
It was a chance to take a look at the root system they were developing…I was psyched that it looked so healthy!!
Also, as painful as it is… your seedlings will do better if you thin them out, which means pluck a seedling out that’s growing too close to another one.
Thinning gives the ones left behind a better chance of thriving because they won’t all be competing for nutrients.

A great tip I got from my garden club friend Patti who is an amazing gardener is to run a fan near your seedlings to circulate the air and also to get the plants acclimated to windy conditions.
Hardening the seedling off
Hardening seedlings means you slowly introduce them to the outside world so they can acclimate before you plant them in your garden. The normal method is starting with an hour and then increasing their sun/weather exposure slowly for three weeks.
That method is tough for people who aren’t home during the day…lugging the trays back and forth outside itself can seem like a daunting task.
The way I am hardening all my seeds off is by relocating them all to a shelf on my front porch that receives dappled sunshine and leaving them there. The weather here right now is unseasonably warm (much warmer than my basement!)

The airflow around the seedlings is great too….you do have to keep an eye on your seedlings because they will dry out quicker being outside.
Final thoughts on Seed Starting For The First Time
I definitely will start seeds again next year! There are so many varieties of flowers that are only available from seed that it’s worth the effort for me. From learning about seed starting I’m now intrigued to try seed saving! I’ve been reading about it and I would love to put the time in to save my own seeds to plant next year.
I’ve learned so much from this book “The New Seed-Starters Handbook” and highly recommend it! It covers seed starting, planting, seed saving, and so much more…such a great resource!!
Check out how my garden expansion is coming along…I need somewhere to plant all those seedlings!!

Grow With Me Gardening Series

This is part of the Grow With Me Gardening Series here at Cottage On Bunker Hill. I want to teach you ways of starting, maintaining, and enjoying gardening. I will share all the tips & tricks that I have learned over the years growing both vegetable and flower gardens here in the Northeast.
-
Gardening Like It’s 1776: My 250-Year-Old Roots

From the herbs to the flowers to the vegetables, my New Hampshire garden has more in common…
-
10 Things I’d Tell a First-Time Gardener (That Nobody Actually Tells You)
Every Spring, a fresh batch of people decides this is the year they’re going to garden. Maybe…
-
The New England Gardener’s April To-Do List (Zone 6a)
There’s something almost comical about gardening in New England. One week you’re watching snow fall on your…