
There’s something really special about receiving a handmade card. Not a mass-produced one grabbed at the checkout counter, and not even a beautiful boutique card that cost $8 and came wrapped in tissue paper.
A handmade card says something different. It says someone sat down, thought of you, and made something with their hands just for you. That doesn’t happen very often anymore, and I think that’s exactly why it means so much when it does.
The best part? You don’t need to be an artist. You don’t need expensive supplies. And you definitely don’t need to spend boutique prices to create something that looks like you did. A few pressed flowers, some interesting paper, a stamp or two, and you have something genuinely beautiful that no card aisle could replicate.
Quick Summary
What: 5 handmade card tutorials using pressed flowers, botanical elements, and simple supplies. Skill level: Beginner-friendly. Time: 20–30 minutes per card.
Key supplies: White watercolor cards, brown natural cardstock, pressed flowers, Mod Podge, small alphabet stamps, hot glue. Flowers used: Amazon pressed flower set, fresh pansies, colorful baby’s breath
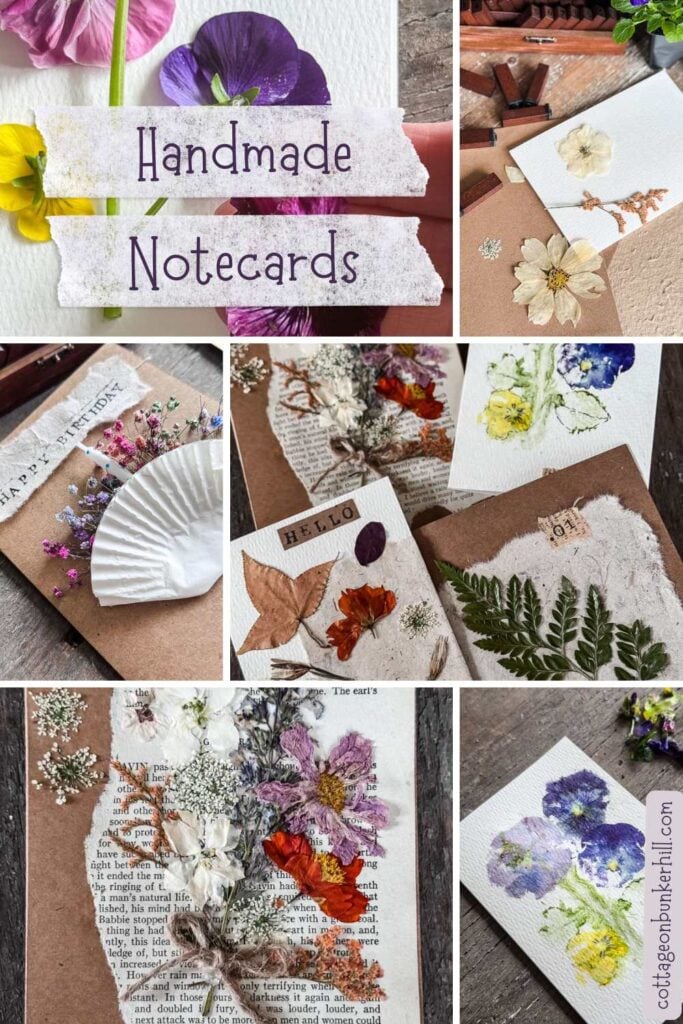
Handmade Cards, 5 Ways: Pressed Flowers, Flower Pounding & More
I’ll be honest, I already have a notecard tutorial. Pressed flower notecards have been one of my most loved projects since I first shared them, and I still make them regularly. But lately I’ve been feeling the pull to push things a little further, to see how many completely different looks I could create starting from the same simple idea.
So yesterday I sat down with a pile of cards, some pressed flowers, a few supplies from around the house, and a $3.99 bunch of baby’s breath from Trader Joe’s, and I made five cards that look like they came from five completely different makers.
One thing I want to mention before we get into it: I used a purchased set of pressed flowers from Amazon for most of these cards. I know not everyone has a flower press or a cutting garden, and I wanted to make sure these projects were fully reproducible for anyone. I tested the quality before recommending them, and I’m happy to say they’re lovely: delicate, well-pressed, and a great range of botanicals. I’ll link to them below. I did use one of my own pressed flowers for the book page card, just because I needed a larger stem than what came in the set.
One more thing, and this is important! I have a confession to make about the stamping. I cannot stamp a straight line to save my life. Left-handed, perpetually optimistic, consistently crooked. I’ve tried pencil guides, rulers, and sheer force of will. It doesn’t matter. So I did try my luck at handstamping a card before messing it up!
I ended up stamping my greeting onto a small strip of contrasting paper and adhering it to the card instead. Brown strip on the white cards, white strip on the brown cards. Honestly? I think it looks better than stamping directly on the card anyway. And it saved me from at least three ruined cards. You’re welcome.
Welcome! I’m Jennifer, and I’ve always believed nature is the most beautiful art supply. For years, I’ve been preserving New England’s blooms and foliage through pressing, drying, and crafting. Let me show you how to capture a little bit of the season and bring it indoors~simply and beautifully.
This post may contain affiliate links, which means we receive a small commission if you purchase through our links. See our disclaimer page for more information.
What You’ll Need To Make These Cards
I’ve made a master list of all the supplies for the 5 different cards that I will teach you to create. In the tutorials for each card, I will give the specific supplies that you will need to make it.
Materials For The 5 Handmade Cards

- Cards:
- Flowers & Botanicals:
- Pressed flower set from Amazon
- Fresh colorful baby’s breath (I grabbed a bunch at Trader Joe’s for $3.99)
- Your own pressed flowers, if you have them, especially useful if you need larger stems
- Adhesives:
- Mod Podge and a small brush
- Hot glue gun and glue sticks (for the birthday card)
- Paper elements:
- Ripped newsprint
- Ripped book pages
- Scraps of natural brown paper and white paper for stamping strips
- Stamping:
- Other:
- Cupcake liner
- Birthday candle
- Scissors
- Jute twine
- Hammer
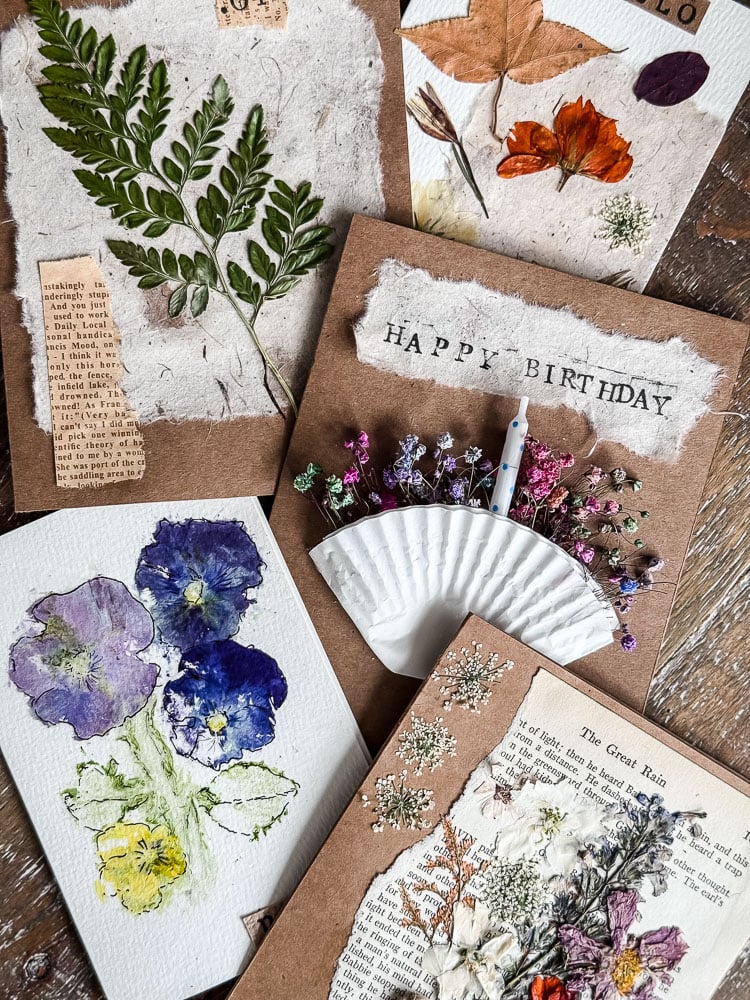
Card #1: Junk Journal Notecard
If you’ve ever fallen down a junk journal rabbit hole on Pinterest, this card will feel very familiar. If you haven’t, welcome to your new obsession! Nothing loud or fussy. Just layers of texture and botanical detail that come together in a way that looks like it took a lot more effort than it did. If you’ve ever fallen down a junk journal rabbit hole on Pinterest, this card will feel very familiar. If you haven’t, welcome to your new obsession.
The base is a white watercolor card, and the design is built up in layers: a torn piece of natural paper first, then pressed flowers and leaves arranged on top, A small torn strip of brown newsprint (it was used to wrap craft supplies I had delivered), finished with a small brown paper strip stamped with HELLO.
What You’ll Need:
- White 4×6 watercolor card
- Handmade paper
- Small piece of ripped newsprint (you could use a small strip of wrapping paper or scrapbooking paper for this)
- Small strip of brown paper for stamping (I cut it from a brown notecard)
- Letter stamps & ink pad
- Mod Podge & small brush
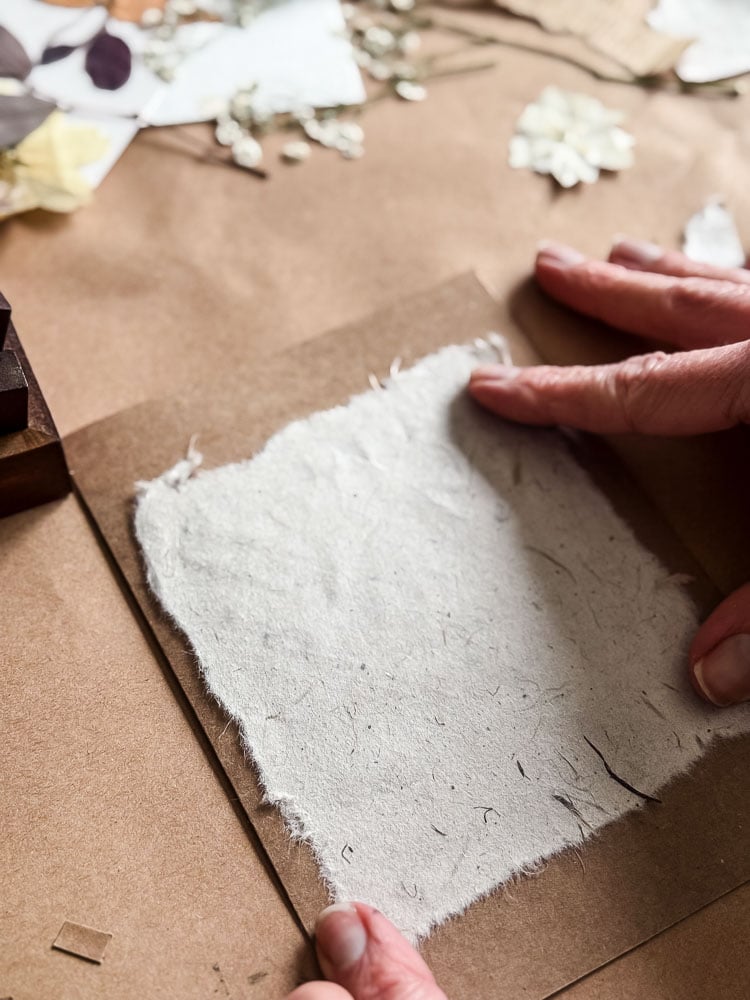
Step 1: Tear The Handmade Paper
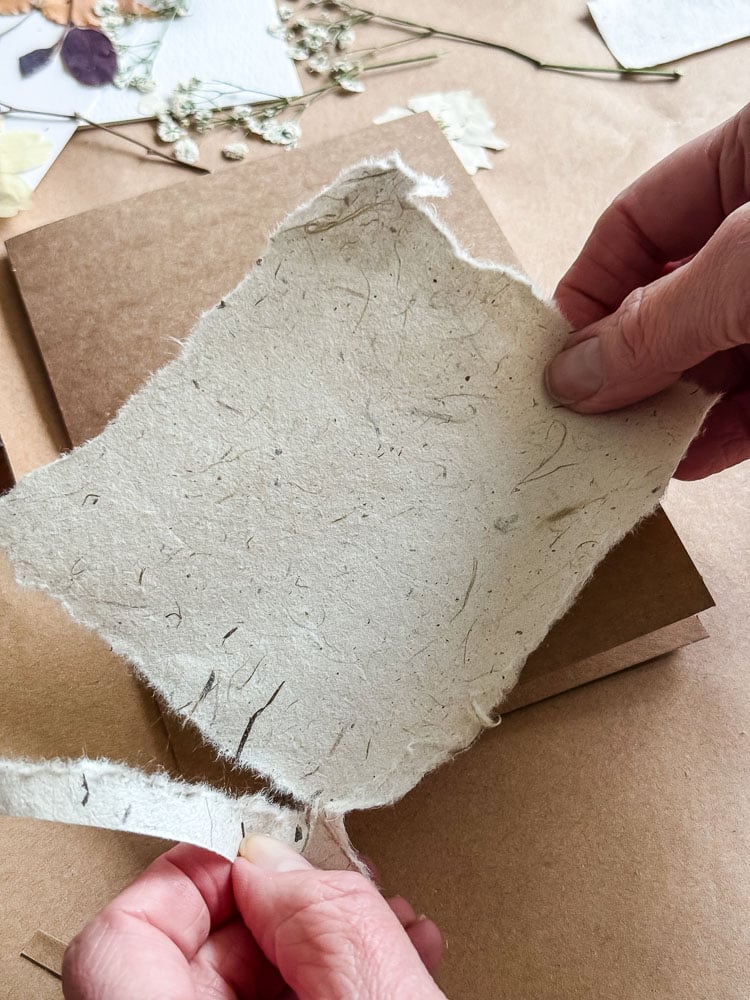
Rip a piece of handmade paper. Don’t cut it; the torn edge is part of the look. Position it along the open side of the card or opposite side (whatever appeals to you!) and adhere it with a thin layer of Mod Podge. Smooth it down gently and let it dry.
Along the spine of the card, I glued a small strip of newsprint.
Step 2: Arrange Your Pressed Flowers
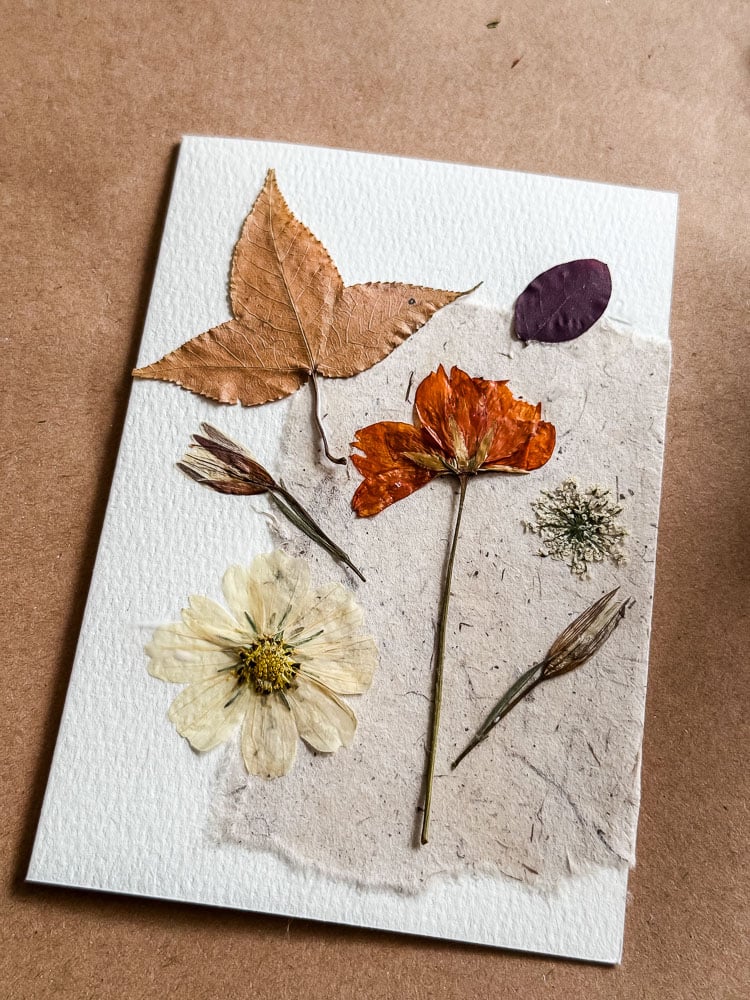
Play with your arrangement before you commit to anything. Lay the flowers on the card and move them around until you’re happy with the placement.
Overlapping the newsprint and the card edge looks especially nice. Once you’re happy, brush a thin layer of Mod Podge onto the back side of the flower, and press it down gently.
I lightly brushed Mod Podge along the edges of the flowers if they needed a little extra glue to stay flat.
Step 3: Stamp Your Greeting.
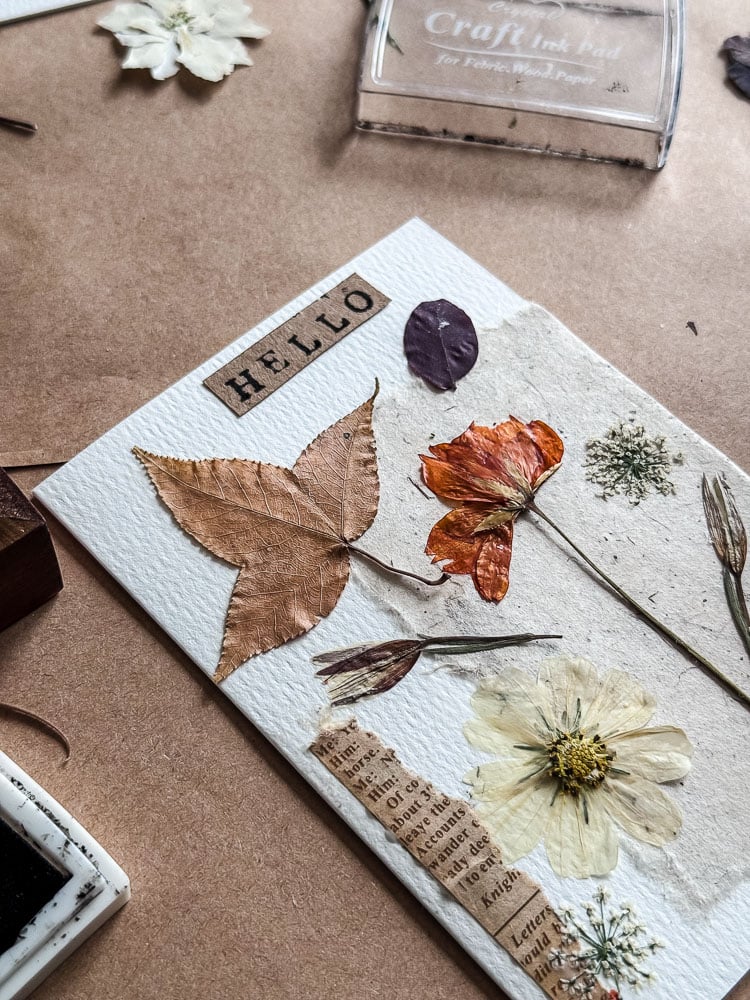
Stamp HELLO onto a small strip of brown paper. Let it dry completely. Trim the edges if needed and adhere it to the card with Mod Podge or a glue stick. I placed it along the top edge of the card.
You could also handwrite a greeting or stamp something directly onto the card (remember earlier when I said I was a disaster at both of these things!!)
Finished Notecard
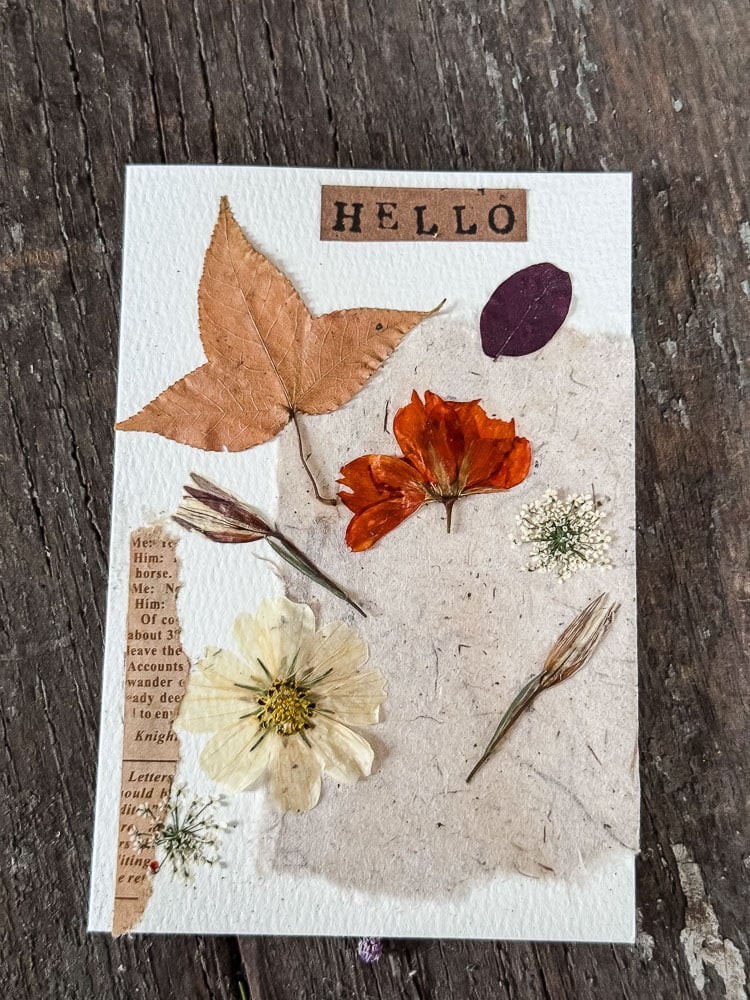
The finished card has such a lovely, organic quality to it. The torn paper, the delicate pressed flowers, that little HELLO peeking out from the layered paper. It’s simple, it’s beautiful, and it looks like something you’d find in a stationery boutique store.
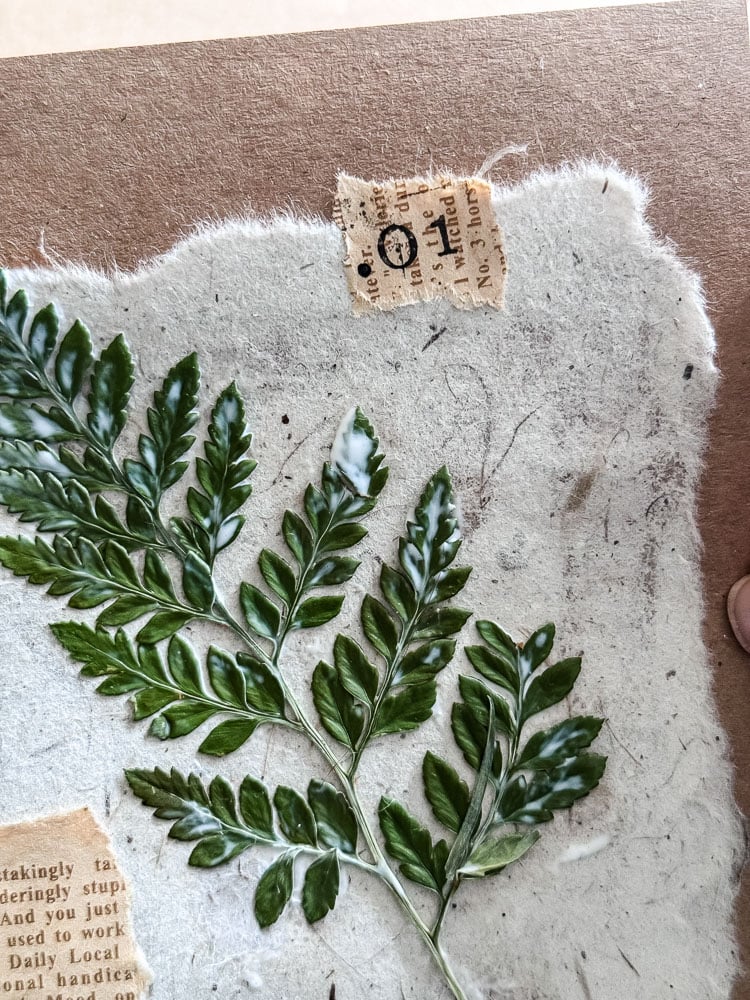
Card #2: Botanical Fern Card
This one is my favorite of the five cards because of its simplicity. It reminds me of a vintage botanical print.
A large pressed fern that I pressed is the star here, sprawling across a ripped piece of natural handmade paper on a brown cardstock card. With a couple of torn paper pieces for more detail. The .01 stamped on a small ripped piece of newspaper adds just the right amount of quirky minimalism.
The whole thing has an earthy, collected quality. Like something precious tucked between the pages of an old book.
Supplies Used For This Card
What You’ll Need:
- Brown 5×7 natural cardstock card
- Large pressed fern (This Amazon set is nice)
- Handmade paper
- Small pieces of ripped newsprint (you could use a small strip of wrapping paper or scrapbooking paper for this)
- Letter stamps & ink pad
- Mod Podge & small brush
Step 1: Tear Your Paper Pieces.
Rip 2-3 small pieces of paper in different sizes. A mix of textures works beautifully here: newsprint, plain white, or any interesting paper you have on hand. Arrange them on the card, overlapping slightly, and adhere with Mod Podge. Let dry.
Step 2: Position Your Fern

This is the moment to take your time. A large fern has a lot of presence, and the way you angle it changes the whole feel of the card. Try it diagonal, slightly off-center, letting one end drift off the edge of the card. Once you love it, adhere with Mod Podge, pressing gently from the center outward, then seal with another thin layer on top. I usually hold the stem part down until it feels secure.
Step 3: Stamp Your Greeting
Stamp .01 onto a small newsprint strip, let it dry, and tuck it into the composition. I placed it to the right of the fern. You could also stamp ‘FERN’ or another simple word to keep the botanical print feel.
Finished Fern Notecard
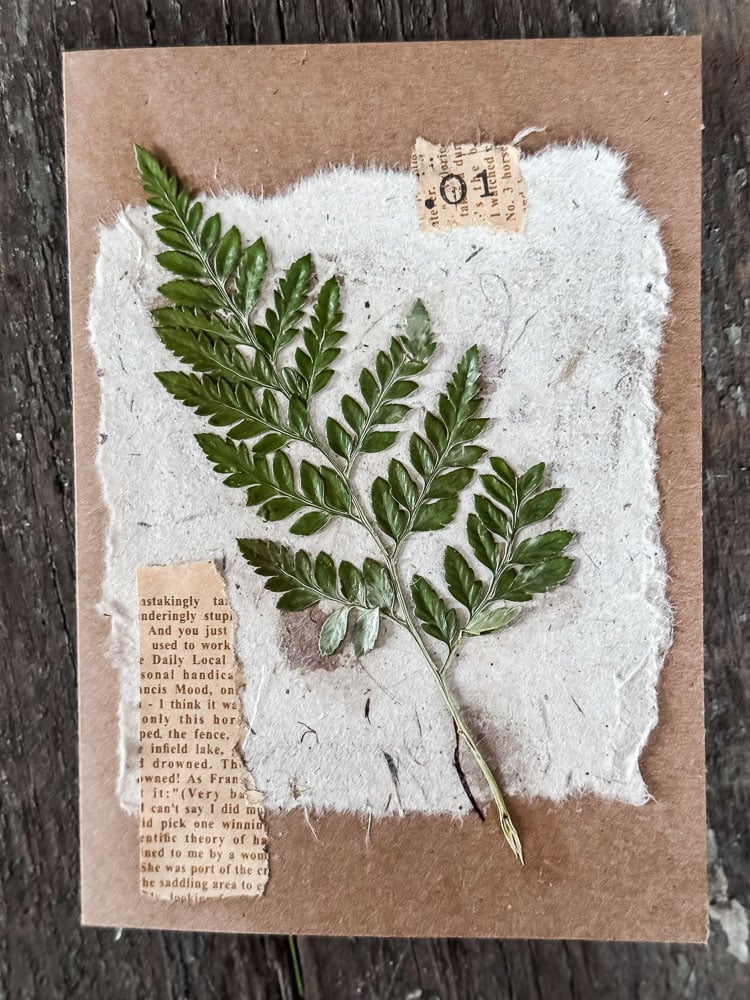
The finished card has a beautiful layered quality that looks far more considered than the time it actually takes. The fern does all the heavy lifting. It’s such a striking botanical that it almost doesn’t need anything else. But those torn paper layers give it depth that makes it truly special.
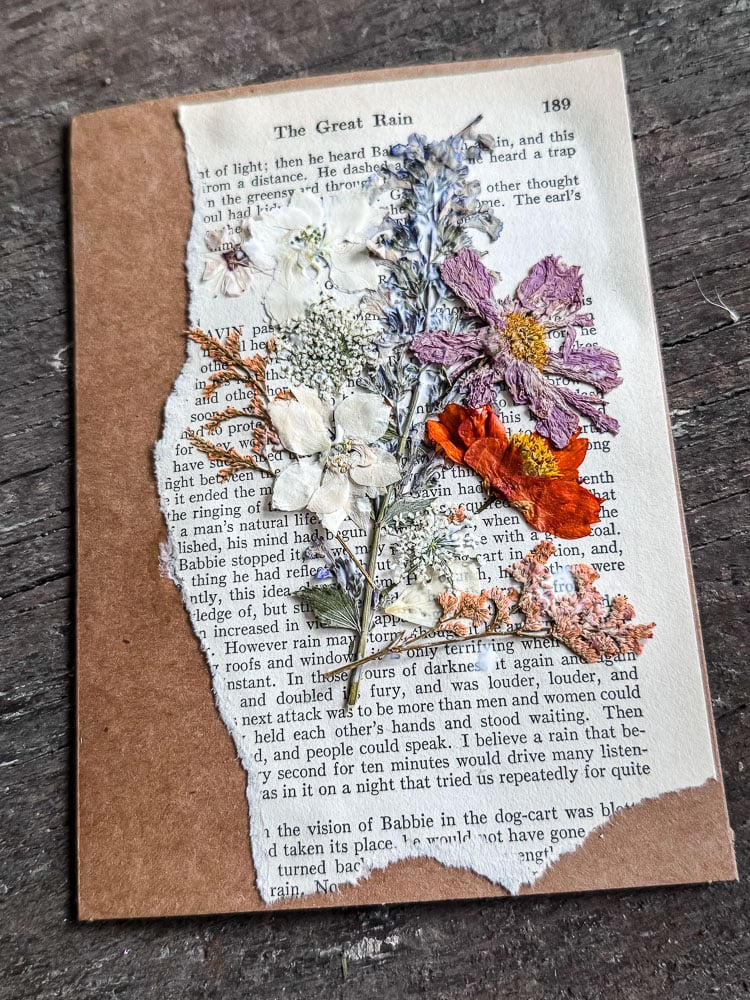
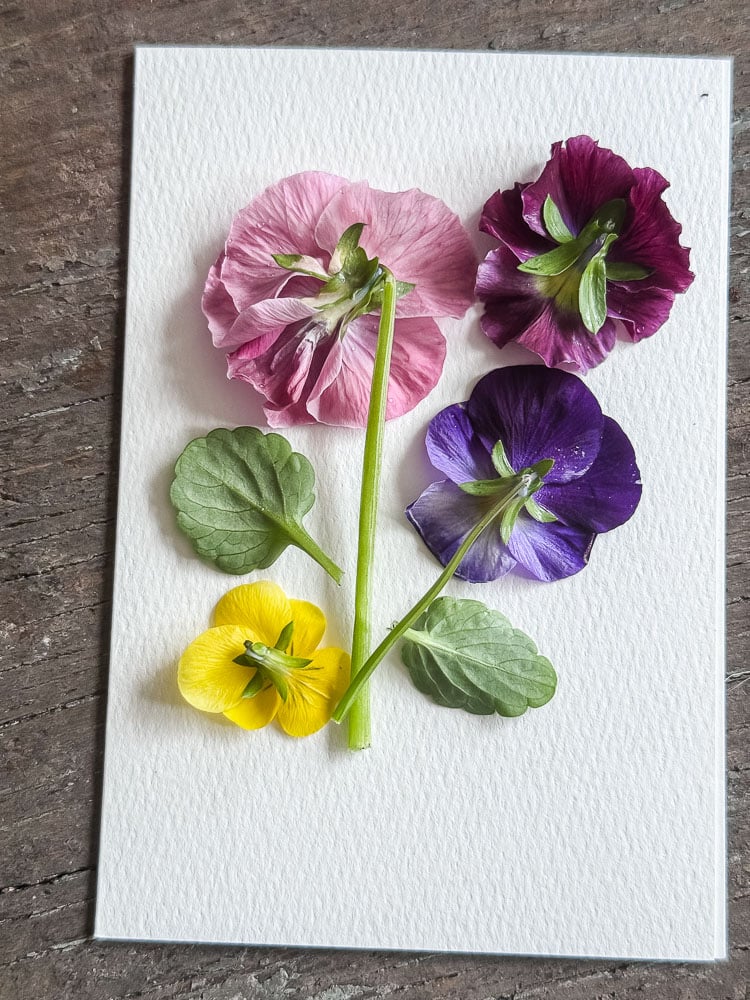
Card #3: Pressed Flower Bouquet
This is the romantic one. If Card #2 is the artisan stationery shop, this one is the little antique bookshop around the corner, the kind with creaky floors and cats sleeping in the windowsills. It’s literary, it’s nostalgic, and it’s genuinely one of the most beautiful cards in the set.
A torn page from an old book becomes the backdrop for a small arrangement of pressed flowers: stems gathered together at the base like a tiny hand-tied bouquet. It’s simple and charming and the kind of card someone will keep long after they’ve read what’s inside.
This is also the one card where I used one of my own pressed flowers along with the Amazon set. I needed a larger stem to give the bouquet its shape and presence. If you have your own pressed flowers with longer stems, this is the card to use them for.
Supplies For This Card
What You’ll Need:
- Brown 5×7 natural cardstock card
- Assorted Pressed Flowers
- Book page
- Letter stamps & ink pad
- Mod Podge & small brush
Step 1: Tear Your Book Page
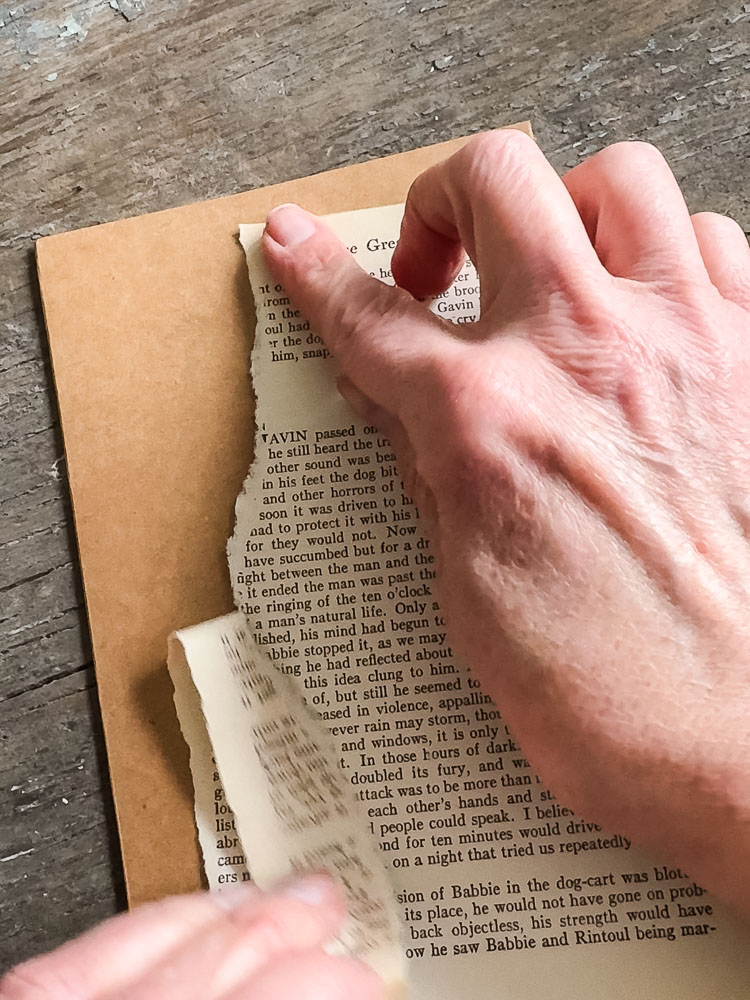
Rip a piece from an old book; paperback pages work beautifully, the aged cream color is perfect against both the white and brown cards.
You don’t want it to cover the whole card, more like two-thirds, positioned slightly off center. Adhere with Mod Podge and let it dry.
Step 2: Arrange your bouquet.
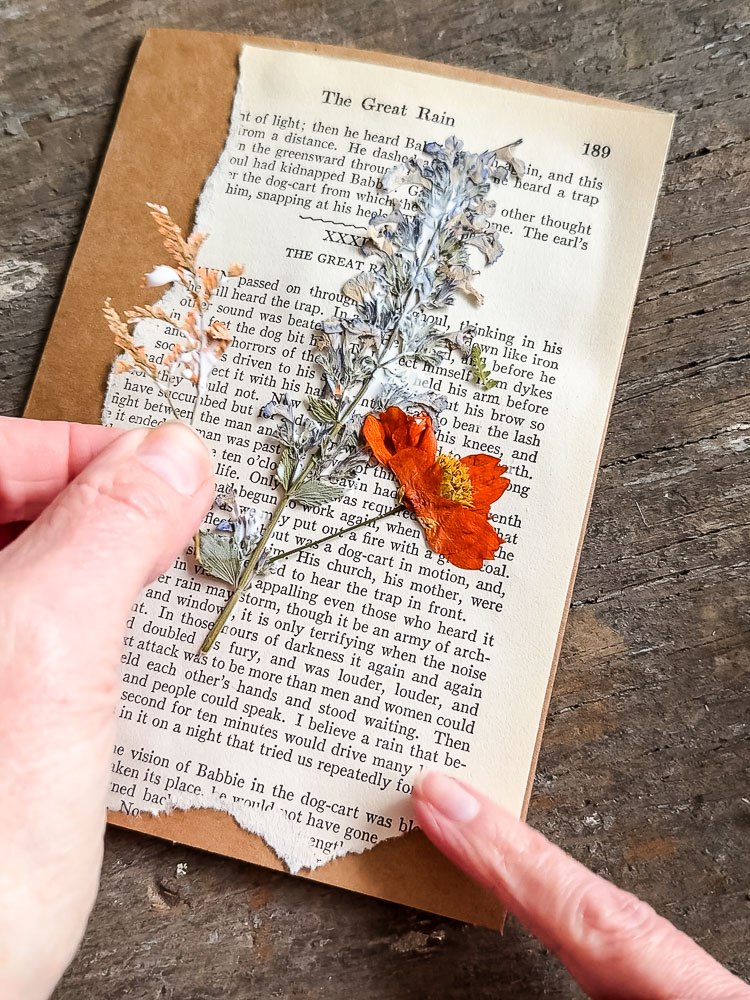
This is the fun part. Gather your pressed flowers with the stems pointing downward, as if someone is holding them: a larger stem in the center with smaller blooms fanned out around it works really well.
Lay them on the book page and play with the arrangement until it looks like a little gathered bouquet.
Once happy, adhere with Mod Podge. Brush the Mod Podge on the back of the flower and press it in place.
Again, if the flower won’t sit flat, brush more Mod Podge over the flower or edges-it will dry clear.
Step 3: Add A Jute Bow
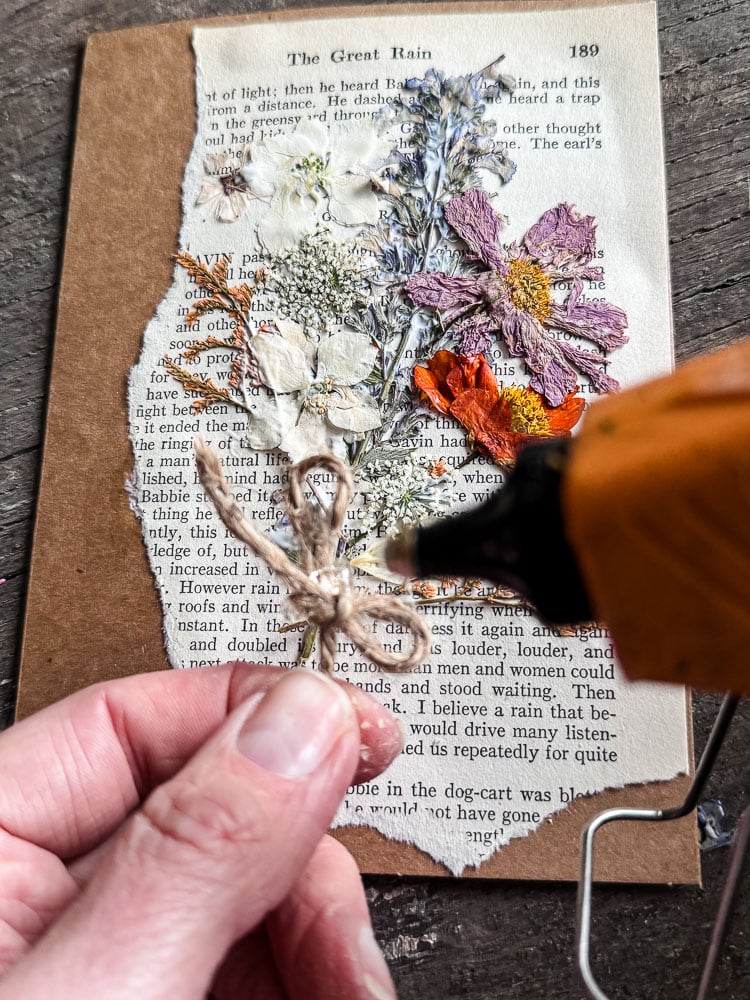
To ‘tie’ the bouquet, I made a small bow out of a piece of jute twine. Alternatively, you could use a small piece of ribbon for a pop of color.
For this, use hot glue to hold the bow in place-it has a stronger hold than trying to use the Mod Podge that you are using for the flowers.
Pro Tip: Look for old books at secondhand stores; they’re usually inexpensive and give you a beautiful supply of aged book pages with interesting text and typography.


Finished Bouquet Notecard
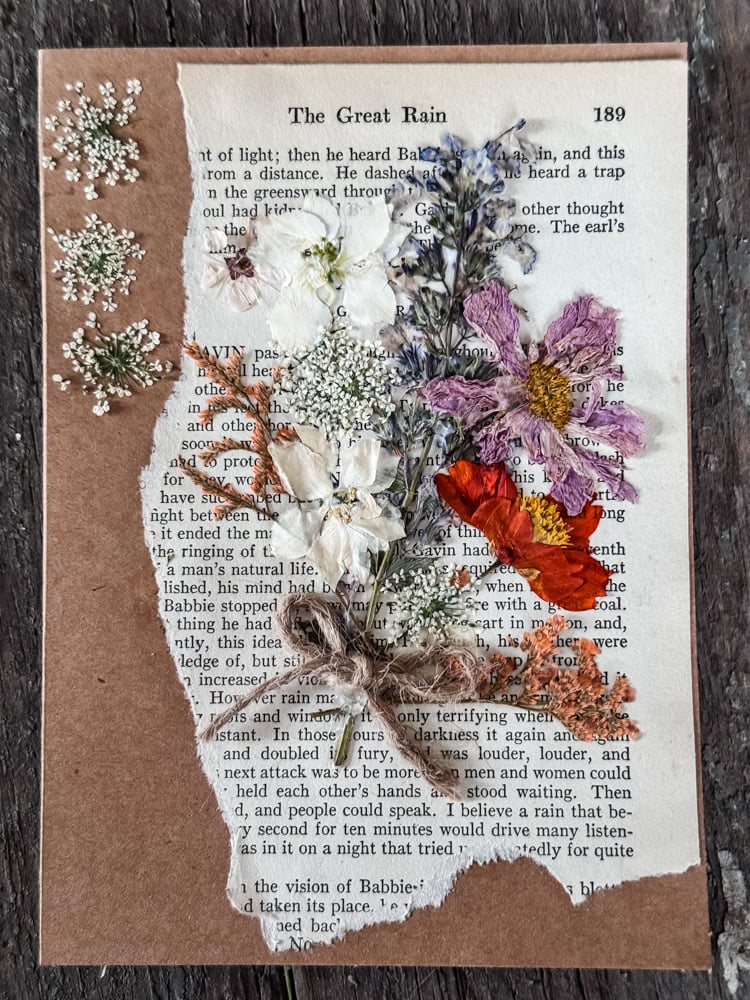
The finished card looks like something a Victorian botanist might have tucked into a love letter. The book page gives it that aged, literary quality, and the little gathered bouquet on top is just completely charming. This one is my pick for a birthday, a thank-you, or, honestly, any occasion where you want someone to feel truly thought of.
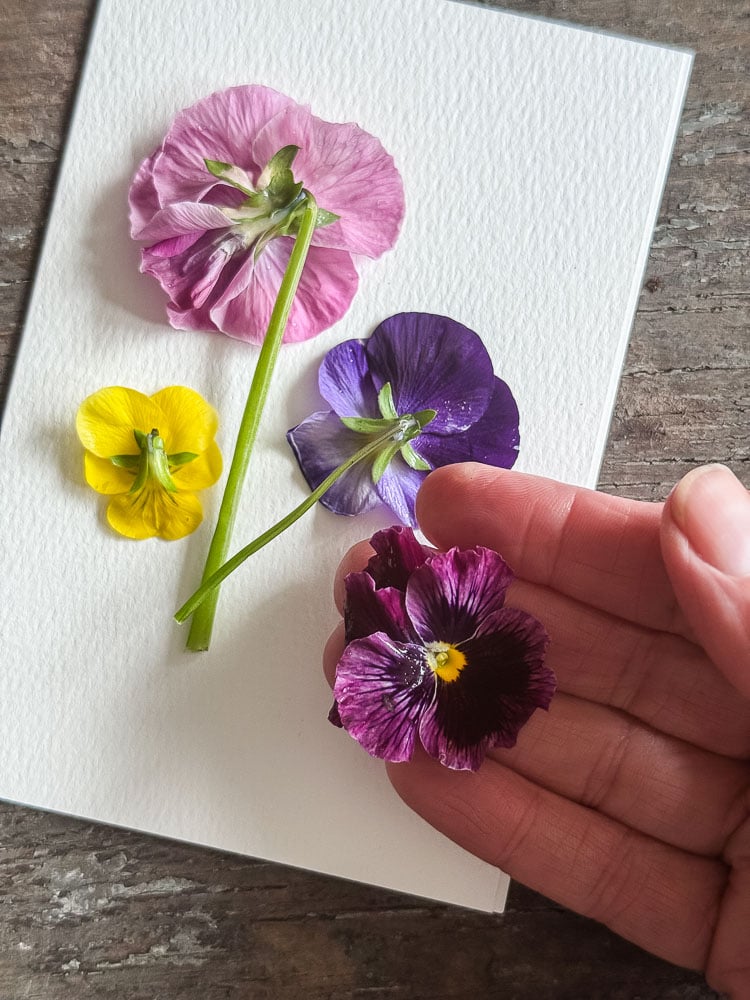
Card #4: Flower Pounded Pansies
This one is the showstopper of the set and the most satisfying to make.
There’s something almost magical about the flower pounding technique: you place a fresh flower face down on paper, cover it, hit it with a hammer, and lift it to find a perfect impression of the bloom transferred directly onto the card. No pressing, no drying time, no waiting. Just immediate, vivid, beautiful results.
Pansies are one of the very best flowers for this technique. Their flat faces and thin petals transfer beautifully, and the pigment in those velvety petals is incredibly rich: you get deep purples, bright yellows, soft lavenders, all transferring onto the paper with stunning clarity.
If you have access to fresh pansies right now, and if you’re in New England in early spring, the nurseries have them! This is the perfect time to try this.
I’ve covered the flower pounding technique in full detail in this post, including all my tips and tricks for getting the best results, so I’ll send you there for the complete tutorial. But here’s exactly how I made this card.
What You’ll Need:
- Watercolor notecard
- Fresh pansies
- Parchment paper
- Hammer/mallet
Step 1: Prepare Your Pansy
Open your card (the ‘ink’ from the flower can bleed through the notecard). Place your pansies face down directly onto the watercolor card in the position you want your design to be. I did a little bouquet look with mine.
Add a few leaves for green contrast. The placement is permanent once you start hammering, so take a moment to get it right.
Step 2: Cover And Pound
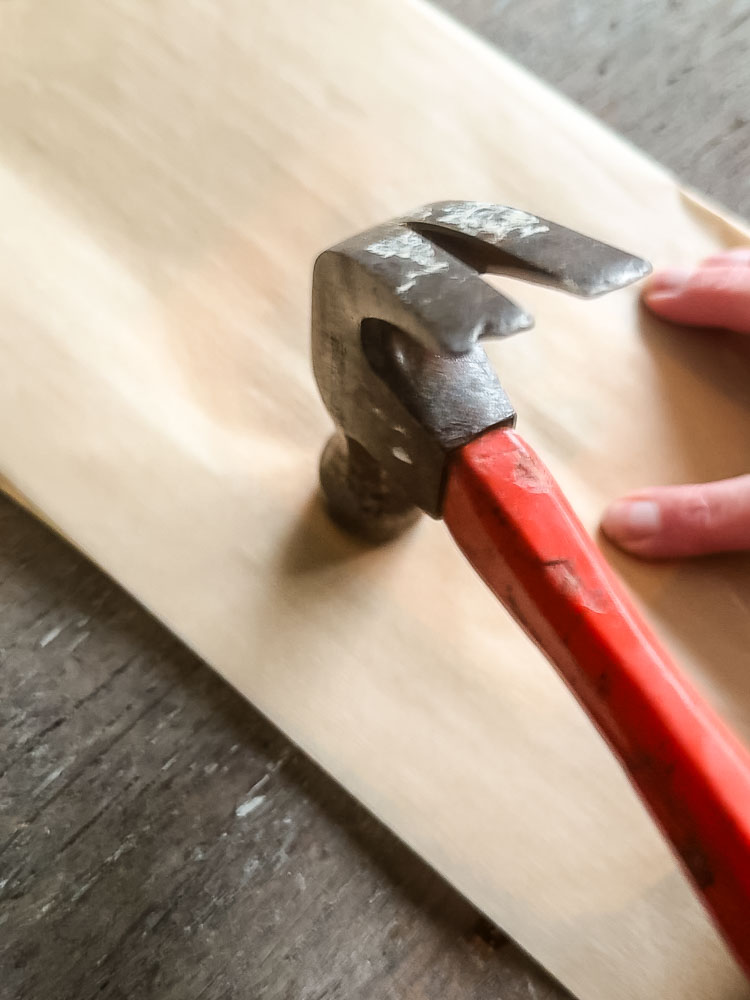
Lay a piece of parchment paper over the flowers to protect them and keep the pigment from spreading too far. Using your hammer, pound firmly and evenly over the entire flower.
Work from the center outward and make sure you hit every petal. I tend to miss some of the edges when I do this technique! Lift the parchment and check your progress, then pound any areas that need more coverage.
I spent 1 minute pounding the flower with the hammer for this step. I lifted the parchment and could tell I had missed the edge of one of the pansies and gave it a few more whacks!
Step 3. Remove The Flower
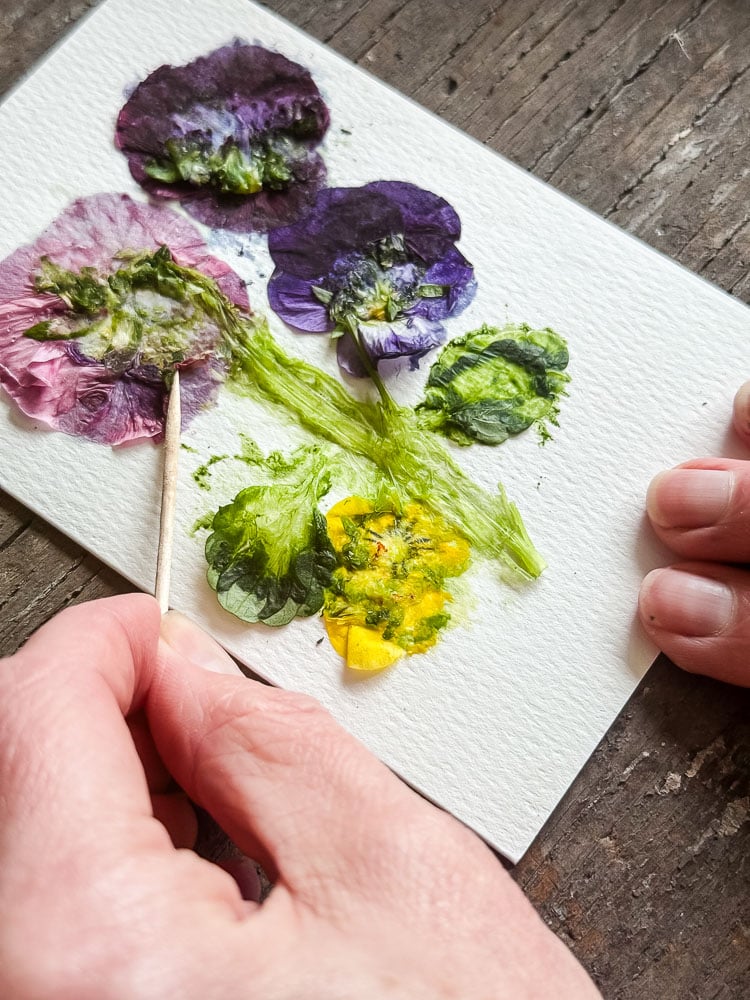
Carefully peel away what remains of the pansy. I find that a toothpick works best; it’s easy to just swipe and lift away the pulverized bits of the pansy.
You’ll be left with a vivid, detailed impression of the bloom transferred directly onto the card. Take a moment to appreciate how cool that is.
Step 4: Add Details (optional)
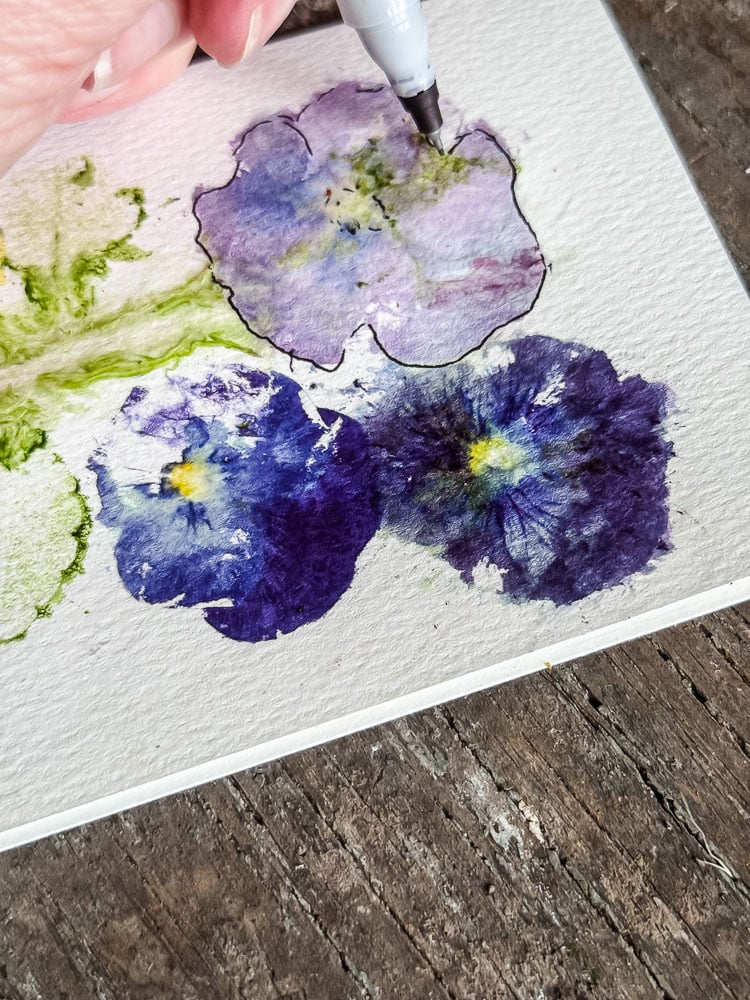
Now this step is completely optional. I took a fine-tipped Sharpie and did a light outline around the pansies and leaves.
Step 5: Stamp A Greeting

Stamp your greeting onto a small brown paper strip and adhere it to the card, tucked along the bottom edge or beside the flower impression, which looks really natural. I decided to do the simple word ‘PANSY.’
Of course, you could handwrite or stamp anything you would like directly onto the card.
Pro Tip: Use the freshest pansies you can find. The fresher the flower, the more pigment it contains, and the more vivid your impression will be.
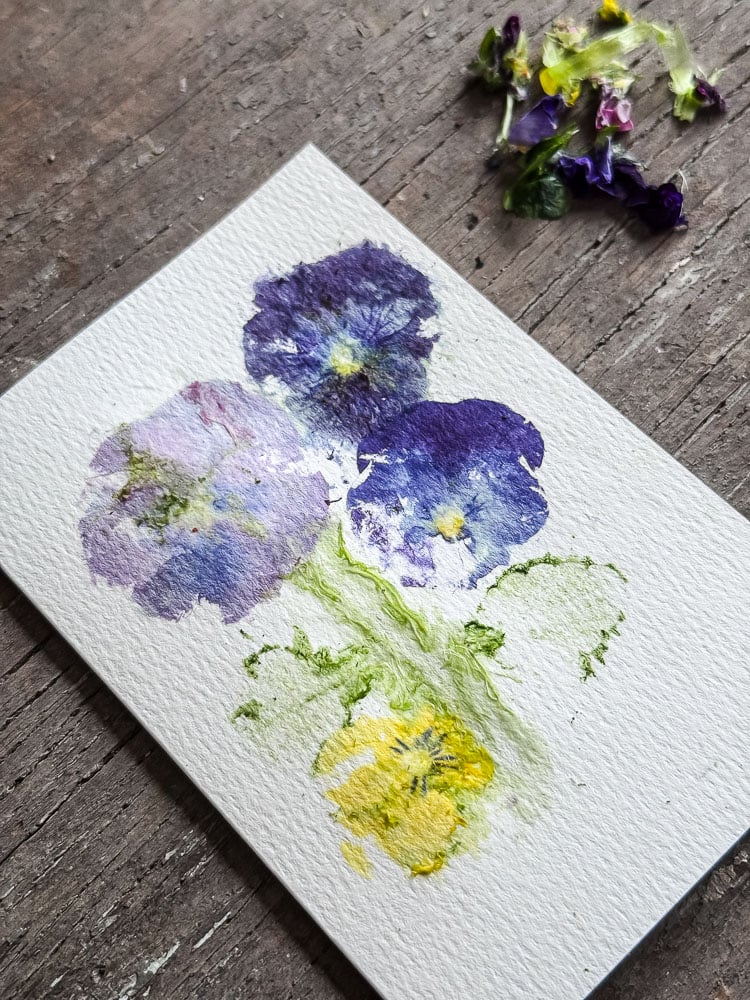
Finished Pansy Notecard
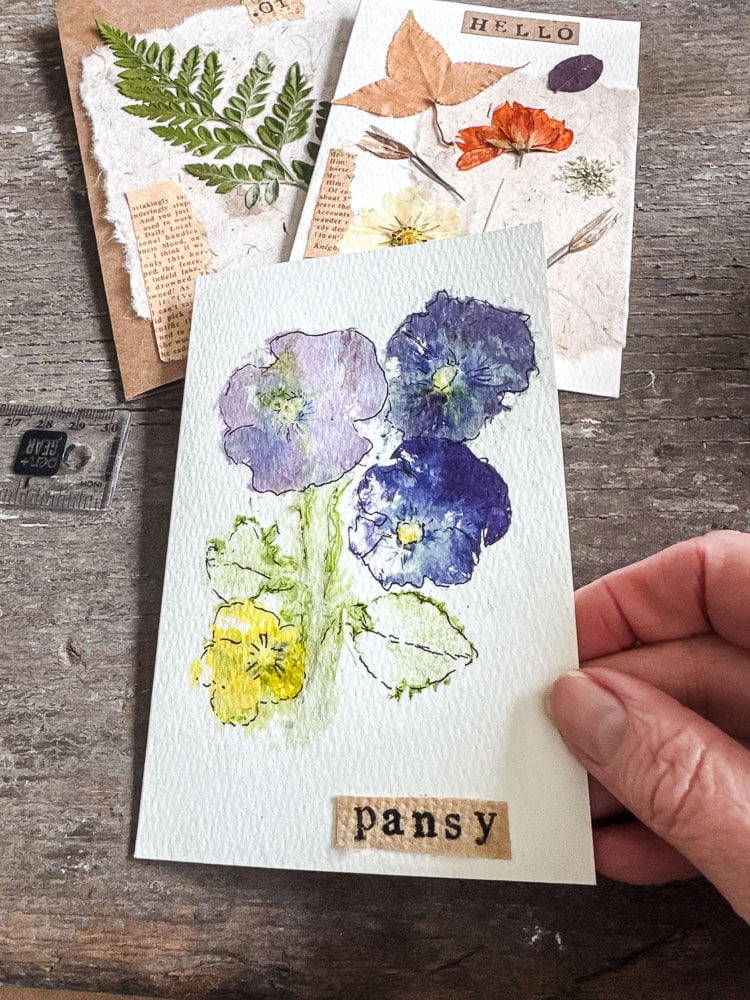
The finished card is genuinely stunning! It’s bold, colorful, and completely one of a kind since no two flower impressions ever look exactly the same.
It’s also the card in this set that will make people ask, “How did you DO that?” which is always a satisfying question to answer.
**one note: the color from the pansy did bleed through the notecard a bit, I am going to glue a small sheet of natural paper inside**
Card #5: The Birthday Cupcake Card
Save the best for last. This is the one that will make people smile the moment they see it. It’s playful, it’s unexpected, and it looks nothing like a typical handmade card.
Nobody is going to guess you made it from a cupcake liner, a $3.99 bunch of baby’s breath from Trader Joe’s, and a birthday candle. Nobody.
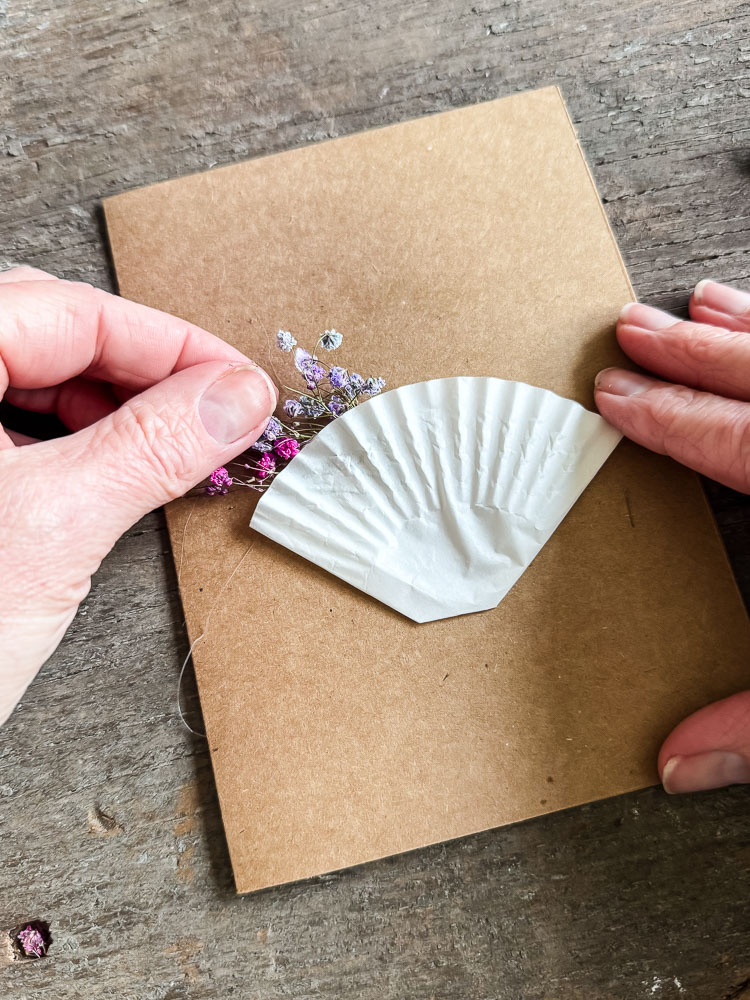
The concept is simple and completely charming: a cupcake liner forms the base of the “cupcake,” colorful baby’s breath is hot-glued on top to create the fluffy, dimensional frosting, and a real birthday candle sits right in the middle.
It’s three-dimensional, it’s joyful, and it is absolutely the card to make for anyone who deserves a little extra celebration.
I let the baby’s breath air dry for a few days before I used it for this project. Even sprigs of fresh baby’s breath will dry out naturally if used for this project.
What You’ll Need:
- Brown 5×7 natural cardstock card
- Fresh colorful baby’s breath (I grabbed a $3.99 bunch at Trader Joe’s)
- 1 cupcake liner
- 1 birthday candle
- Small strip of contrasting paper for stamping
- Letter stamps & ink pad
- Hot glue (although you could use Mod Podge, but there would be a wait time for drying)
Step 1: Fold The Cupcake Liner
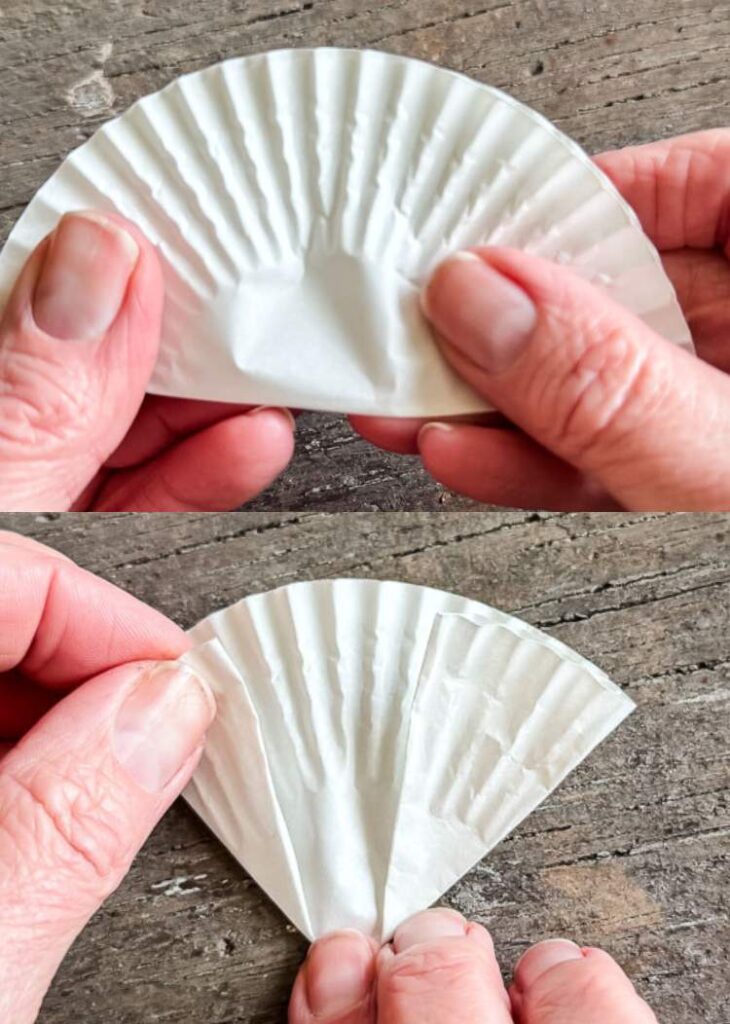
Take a paper cupcake liner and first fold it in half. Then fold back both sides inward. Try to be gentle as you don’t want to flatten out the ribbed pattern of the liner.
Step 2: Attach The Cupcake Liner.
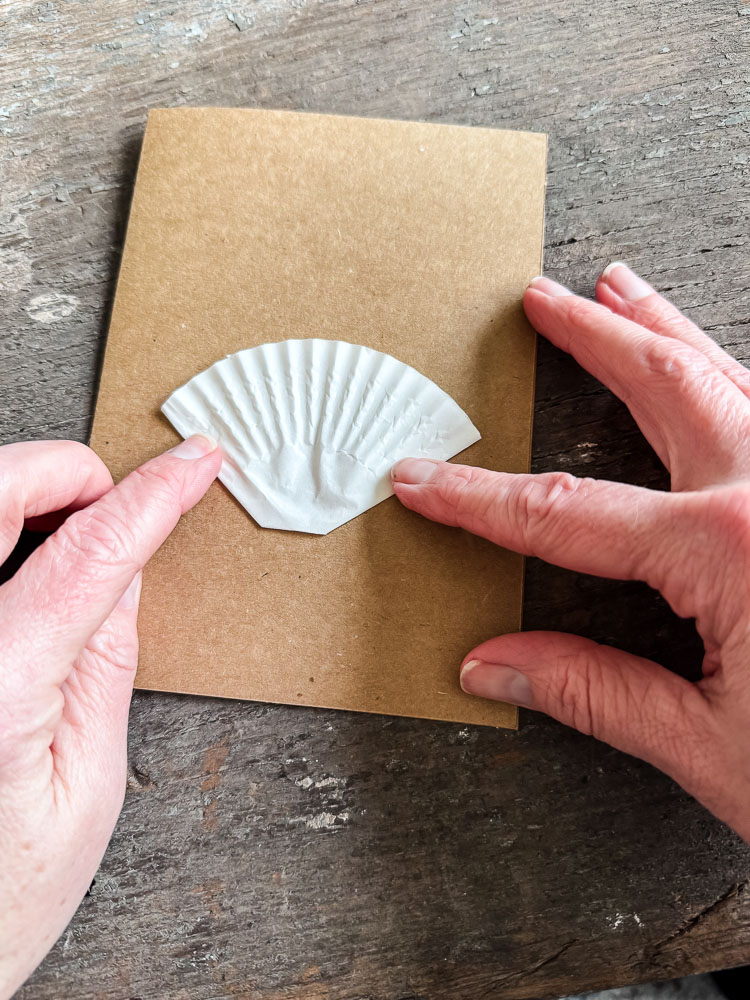
Position your cupcake liner on the lower half of the card. This is the base of your cupcake. Hot glue the 2 ‘flaps’ and bottom in place, leaving the center section open to hold your flowers and candle. Let the glue set.
I’m using hot glue for this project, but you could also use Mod Podge sparingly to hold the liner in place and even on the baby’s breath.
Step 3: Build Your Frosting
This is the fun part. Cut small clusters of colorful baby’s breath and hot glue them along the top edge of the cupcake liner, building upward to create that fluffy, dimensional frosting effect. Work in small sections, layering and filling until you have a full, rounded top. The colorful baby’s breath clusters look almost like little candy sprinkles. It’s absolutely adorable.

Pro Tip: Let each section of baby’s breath set fully before adding the next. Hot glue cools quickly, but if you rush it, the clusters can shift before they’re secure.
Step 4: Add The Candle
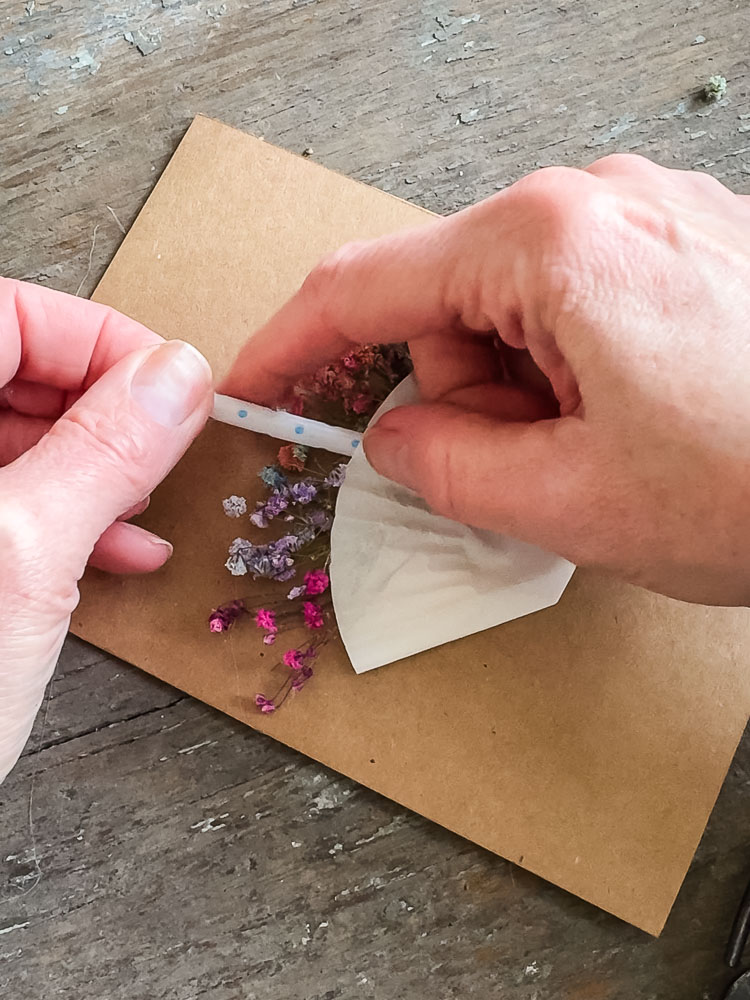
Hot glue your birthday candle right in the center of the baby’s breath frosting. This is the detail that ties the whole thing together and makes it unmistakably a birthday card. Just run a narrow bead of hot glue down the back of the candle and hold it in place until it adheres.
Step 5: Stamp Your Greeting
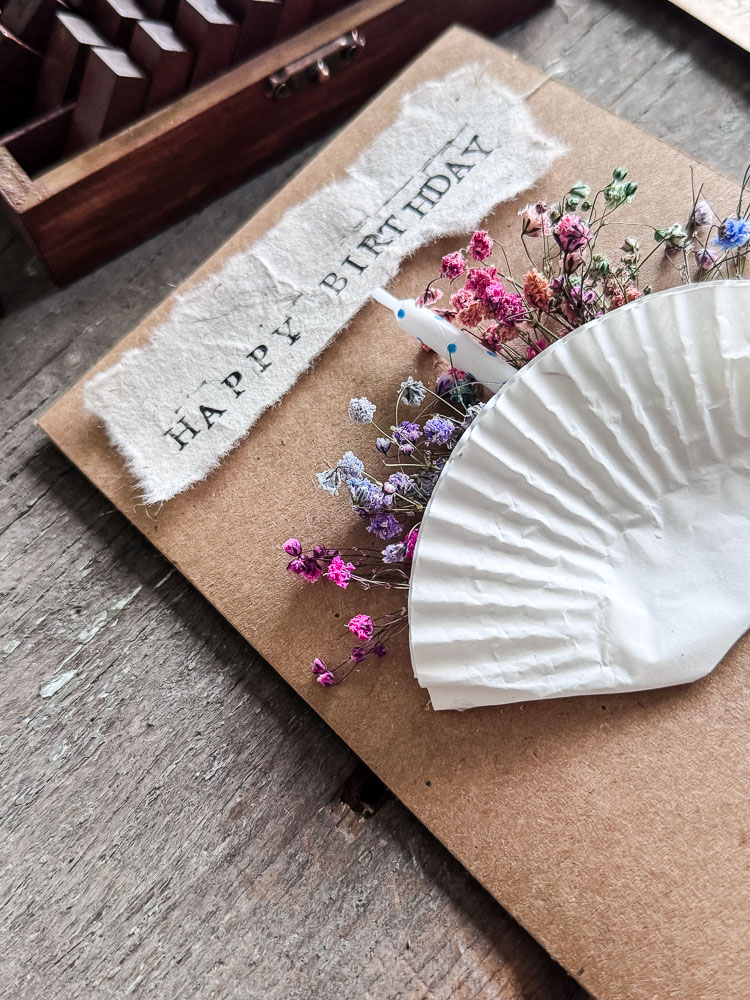
Stamp your birthday message onto a small contrasting paper strip and adhere it to the card. Either along the top of the card above the cupcake works perfectly, or tuck it along the bottom edge.
The Finished Cupcake Birthday Card
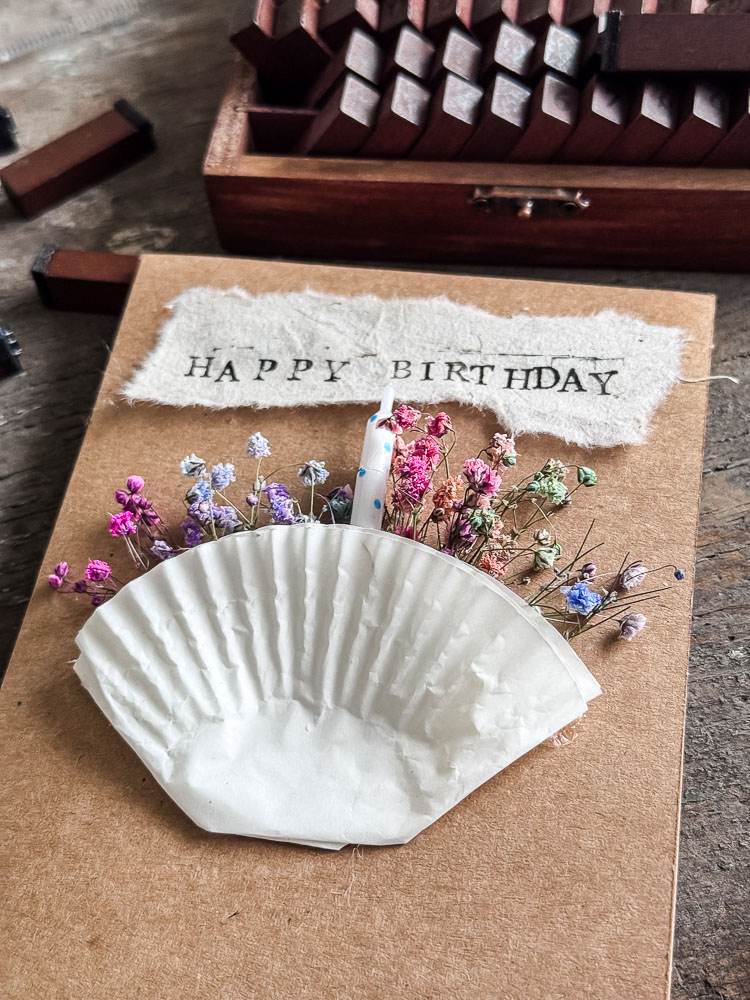
The finished card is pure joy. It’s dimensional, it’s colorful, it’s completely unexpected… and it costs almost nothing to make. This is going to be a card for a little girl’s first birthday party next month. I think it is just so sweet!!
Making Cards Is a Gift in Itself
There’s a reason handmade cards feel so different from store-bought ones. They carry something that can’t be manufactured or packaged. A little bit of time, a little bit of thought, and a little bit of you.
What I love most about this set of five cards is that they each have a completely different personality. The pressed flower newsprint card is quiet and elegant.
The fern card is earthy and layered. The book page bouquet is romantic and literary. The flower-pounded pansy card is bold and surprising. And the birthday cupcake card is pure, unabashed fun. Together they prove that handmade doesn’t mean cookie-cutter...it means exactly the opposite.
If you’re just starting out with handmade cards, my original pressed flower notecard post is a wonderful place to begin. And if you want to go deeper on the flower pounding technique, that full tutorial is right here.
Now go make something beautiful for someone you love. They’ll never forget it.
What I used
Flower Note Cards
My top choices & supplies that I have used to make these notecards
See your projects featured! If you are inspired by this or any of my other DIY projects, I would love to see them and add you to the Reader’s Spotlight gallery. Send a photo to me at jennifer@cottageonbunkerhill.com
xo, Jennifer


Jennifer these are incredible, I can’t pick a favorite. I want to try them all. BTW I can’t stamp in a straight line either but I think it ads to the charm. I’ve moved twice in the last 8 years and at some point gave away my flower press 🤦🏻♀️. I use big books but then can’t remember where they are. The fresh pansy card is amazing. Thanks for such inspiration, Pinterest seems to be broken so I’ll have to wait to pin them.
Oh thank you! I really had fun making these! I was optimistic and tried to stamp on one of the cards but had to cover it up with the paper!!!!! If it makes you feel better, I pulled out one of my big gardening books to check on something and a cosmos I pressed last year fell out!!
What a great tutorial. And I bet the outlining of the pansies would look great with a gold sharpie too. I think I’m doing that for my girls for mother’s day this year. Thank you so much <3
Oh, the gold would look so pretty!!Now I’m trying to remember where my gold marker is??? I saw it at Christmas…from there it’s a mystery!!
I LOVE these, so beautiful and creative. They could also be framed afterwards, like a 2-for-1 gift that goes beyond the card itself. Thank you for the detailed tutorials!
Thanks, Lisa! I was worried it was getting to long when I was writing it but thought it was much easier to have all the cards in one spot for you all instead of separate tutorials. I was thinking I have to do some on bigger pieces of paper to frame! I’ll add that to the list!