Hey there, crafty friends! Today, I’m excited to share a fun and easy DIY project that’s perfect for preserving the beauty of your garden blooms. If you’re looking for a way to add a touch of nature to your home decor, you’ve come to the right place.
Flower pounding is a simple yet stunning technique that allows you to transfer the colors and patterns of fresh flowers onto paper or fabric. It’s a great way to create unique and personalized pieces, from notecards to wall art.
In this tutorial, I’ll walk you through the step-by-step process, sharing my tips and tricks for achieving the best results. So grab your flowers, a hammer, and let’s get creative

Flower Craft Ideas: A Step-by-Step Guide to Flower Pounding
Today I will show you step-by-step the basics of flower pounding from what supplies to grab beforehand, what flowers worked best for me, and 4 different projects that I made with my pounded flower art.
Here is a “quick-start guide”, I will explain each step to you next.
Step-by-Step Guide to Flower Pounding
- Gather Your Supplies:
- Fresh flowers (choose a variety of colors and shapes)
- Watercolor paper & canvas
- Parchment paper
- A mallet or hammer
- A flat surface
- Prepare Your Flowers:
- Gently remove any excess leaves or stems.
- Arrange the flowers in a design on your chosen surface.
- Protect Your Surface:
- Protect your counter or table with cardboard or cutting board.
- Pound the Flowers.
- Place a sheet of parchment paper over the flowers.
- Using a mallet or hammer, gently pound the flowers through the parchment paper.
- Be sure to cover all areas of the flowers.
- Reveal Your Creation
- Carefully remove the parchment paper to reveal your flower-pounded artwork.
- Remove the flowers, a toothpick works well for removing small flower debris
This post may contain affiliate links, which means I may earn a small commission if you make a purchase through my links, at no extra cost to you. Read my disclosure policy here.
Gather Your Supplies
This project doesn’t require any hard-to-find supplies. You will need a variety of fresh flowers, parchment paper, a hammer or mallet, and a surface to transfer the flower pigment onto like watercolor paper or art canvas.

Here are the materials that I used:
- Fresh Flowers
- Hammer
- Parchment Paper
- Watercolor Paper or Watercolor Notecards
- Printable Canvas
- Frame & Wood Panel
What Type of Flowers Should I Use For Flower Pounding Art?
While trying this flower art technique I gathered as many different flowers from my garden to experiment on before sharing it with you all. Some were amazing and some flowers that I thought would work well just didn’t perform.

Here are my winners:
- Cosmos (by far the best transfer of flower pigment!)
- Nasturtium (I used yellow & red)
- Roses (I used red & pink)
- Morning Glories
- Calibrachoa (petunias would work too)
- Garden Phlox
- Russian Sage
- Amaranth
- Celosia
- Hydrangeas (fair)
- Hydrangea Leaf, Cosmos Greens, Coleus, & Ferns
Even though I have a large garden not every type of flower was in bloom. I also would try black-eyed Susan, or other daisy-like flowers, lavender, and pansies would make vibrant prints
What didn’t perform well for me were zinnias (I tried various colors but really wasn’t impressed with any of them) , sunflowers, & rose leaves.
Flower Pounding: Making Canvas Art
For the first idea, I will walk you through how I made a simple art canvas that can be framed and hung.
What I used was a sheet of printable canvas. It is made for use in printers but doubles as a great surface for this craft project.
To create contrast for this print I first wanted to make a base of green leaves before adding all of the colorful flowers.

Once the leaves are in place, cover the canvas with a sheet of parchment paper. To keep the paper in place you can use tape on the edges if needed.
Make sure to protect the counter or surface you are working on! I used a thick pad of art paper but a cutting board or thick piece of cardboard works too.

Start hammering the leaves, be mindful to get the entire leaf and all the edges to create the best print. You will have to pound the leaves longer than the flowers to release the pigment.

As you pound the leaves keep an eye out for the parchment sheet to start looking wet, this is a sign that the pigment is transferring. Don’t be afraid to take a peek under the parchment to check on the progress, I did this multiple times for all of the art projects that I did today.

Remove the parchment and the now pulverized leaves from the canvas; this is what the prints will look like. I found that a toothpick worked wonderfully to remove all of the leftover leaf bits.

Next, it was time for the star of the show: the flowers! As I arranged them on the canvas, I aimed for a harmonious mix of colors and textures. I placed different flower types and shades side by side to create a visually interesting composition.
Once the flowers were in place, I covered them with parchment paper and began pounding with my mallet. I made sure to strike every part of each flower, including the edges, to ensure a complete transfer.

To monitor the progress, again don’t be afraid to lift the parchment or use a toothpick to lift a flower petal to check on the progress, I did it multiple times. Some flowers required a couple extra pounds to make a clear print.

Tip: when removing the flower debris use a toothpick or paintbrush. If some of the debris is stubborn just wait until it dries and it will be much easier to brush off. If you are too aggressive you could damage the canvas or paper.

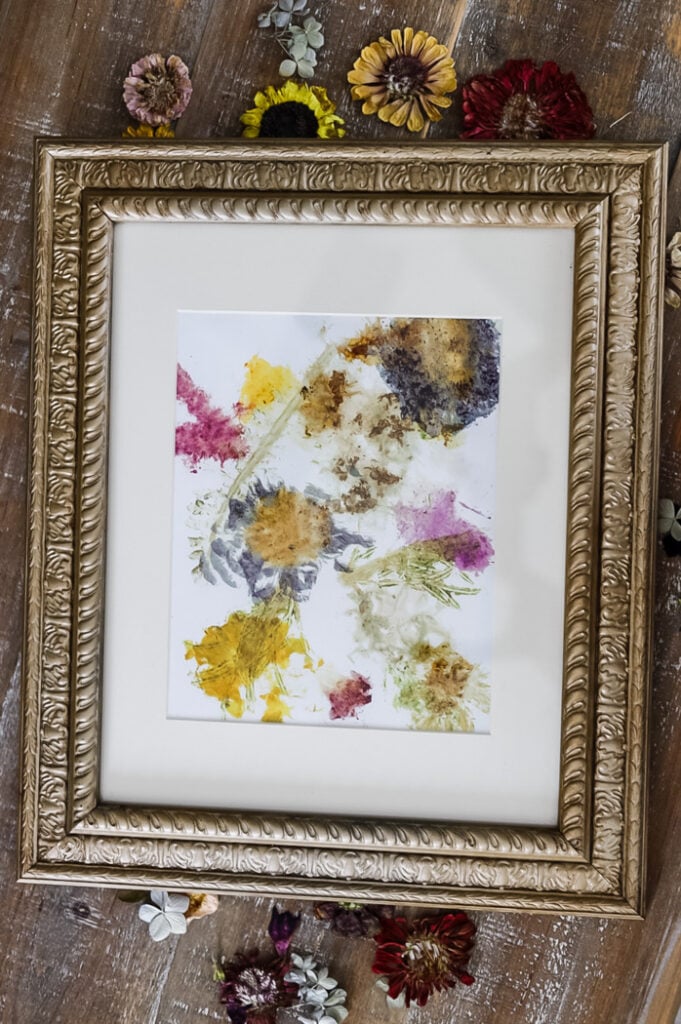
Once the canvas had dried I framed it in a matted frame that I already had for hanging. Doesn’t it look pretty?
Working With Watercolor Paper
The next medium that I will show you is watercolor paper. This is the perfect surface for doing flower pounding. The porous paper holds the flower pigments so well.
This is a great project to make your own notecards or just to make a few small pieces of artwork. ( links: small watercolor sheets , watercolor notecards)
Here I made a simple print with just a piece of Russian sage. Doing the same steps as the prior canvas art. Place your flower, cover with parchment, and pound with a hammer until the print is on the watercolor sheet.

Then I made a few more watercolor cards using a variety of flowers. It was so fun creating different combinations! My #1 favorite flower for this project was definitely the cosmos, with nasturtiums as a close second. They both made the most dramatic prints!

Did I have some duds?? Yes! Not every attempt came out beautifully, so have a few extra pieces of paper at the ready. There are a few variables working with flowers, that’s nature!
Below, you can click through my favorite watercolor prints to see the different combinations that I did.
DIY Rustic Framed Flower Art


Another easy idea to make your own art from one of the flower pounding watercolor sheets was to make a rustic wooden frame.
For this, I started with a wood craft panel (find in the woodworking section of your craft store, Amazon sells them in sets but are slightly more expensive). Then I stained it with the Varathane Less Mess wood stain (it comes in a little bottle w/ a sponge-tipped applicator, super easy to use, especially for this girl who isn’t a fan of staining!)
Once the stain was dried I used a squirt of spray adhesive to keep the art in place. Glue dots would work too, just don’t use hot glue or glue that can seep through the paper.

To Wrap It Up!
From the vibrant hues of a watercolor notecard to the beauty of a framed canvas, flower pounding offers endless creative possibilities. The technique is simple, yet the results can be truly breathtaking.
As you’ve seen, flower pounding is a versatile craft that can be adapted to suit your style and preferences. Whether you’re a seasoned artist or just starting out, this project is a wonderful way to connect with nature and create unique, personalized pieces.

So, grab your flowers, a hammer, and a blank canvas, and let your imagination run wild. The beauty of flower pounding lies in its simplicity and the endless possibilities it offers.
See your projects featured! If you are inspired by this or any of my other DIY projects I would love to see them and add you to the Reader’s Spotlight gallery. Send a photo to me at jennifer@cottageonbunkerhill.com
xo, Jennifer
Pin For Later!

Fresh Flower Wreath Collection

Looking for more pretty ideas?See all of our wreath tutorials using fresh flowers & natural materials


As a florist I’m thrilled about these ideas. All of them are so unique and beautiful. Thanks for sharing it Jennifer.
I love to hear that!!!!! Thanks so much for taking the time to comment!
Jennifer
I LOVE this idea. It’s so clever and the results are stunning. So unique. Can’t wait to share this next week on DRA. Hope you are having a good eeek . Where that that beautiful weather go? 🤪 🌧️
Definitely try it!!!
This is a fascinating technique, Jennifer! Each piece is so unique and so beautiful! I definitely want to try this!
You have to try it! It’s really cool!!