
Capture the beauty of autumn with this simple DIY project. Create stunning leaf-shaped trinket dishes using materials you probably already have at home. All you need are a few colorful leaves from your yard and a package of clay (either oven-bake or air-dry). Let’s get started!
Crafting with Clay: Leaf-Shaped Trinket Dishes
Embrace the cozy charm of autumn with this easy DIY project. Create leaf-shaped trinket dishes that add a touch of nature to your home. These versatile pieces can be used to organize keys, jewelry, or simply as decorative accents. Perfect for adding a touch of fall flair to your entryway table or mantelpiece.

This post may contain affiliate links, which means I may earn a small commission if you make a purchase through my links, at no extra cost to you. Read my disclosure policy here.
Gather Your Supplies: Autumn Leaves and Clay
Materials Needed:
- A Variety of Fresh Leaves
- Oven-Bake Clay or Air-Dry Clay
- Paint Colors of Your Choice ( Acrylic Craft or Spray Paint)
- Waverly Antique Wax
Fall’s Finest: Selecting the Perfect Leaves
One great thing about this project is that you don’t need many supplies to create these pretty trinket dishes! All you need is to go outside and collect a few leaves and get a package of clay…and then you can paint them whatever colors you would like!
When picking out leaves you want to look for leaves with good veining that will leave a detailed imprint on the clay.
I am going to make a set of 3 trinket dishes and I picked a large hydrangea leaf, a maple leaf, and a sunflower leaf.

Prepping the Clay Canvas

Choosing Your Clay: For this project, you can use either oven-bake or air-dry clay. Both are easy to work with and roll out, so choose the option that best suits your timeline. For the oven-baked clay, you will bake the clay leaves in a 275° oven until they are set, mine took about 30 minutes. While air-dry clay may need a day or two to fully harden. Both types of clay are generally available at similar prices.
Note: If you’re using oven-bake clay and baking it in small porcelain bowls, it might take a bit longer to set.
Rolling Out the Clay: To create a sturdy base for your trinket dish, roll out your chosen clay on a silicone baking mat using a rolling pin. Aim for a thickness of about 1/4 inch and a size that comfortably accommodates your chosen leaf.
Creating Leaf Impressions
Step-by-Step Instructions:
- Roll out the clay on a silicone baking mat using a rolling pin until it’s about 1/4 inch thick and large enough to accommodate your chosen leaf.
- Place the leaf in the center of the clay.
- Gently press the leaf into the clay with a rolling pin to create a deep impression.
- Use a steak knife to carefully cut around the edges of the leaf.
- Carefully lift the leaf from the clay, starting from the stem end and gently pulling upward.
- Repeat steps 2-5 with different leaves to create a variety of trinket dishes.
Tip: Experiment with different types and sizes of leaves to create unique and personalized trinket dishes.

Once the clay was rolled out, I placed a maple leaf into the center of the clay and rolled over it with a rolling pin.

Use a steak knife to carefully cut around the edges of the leaf.
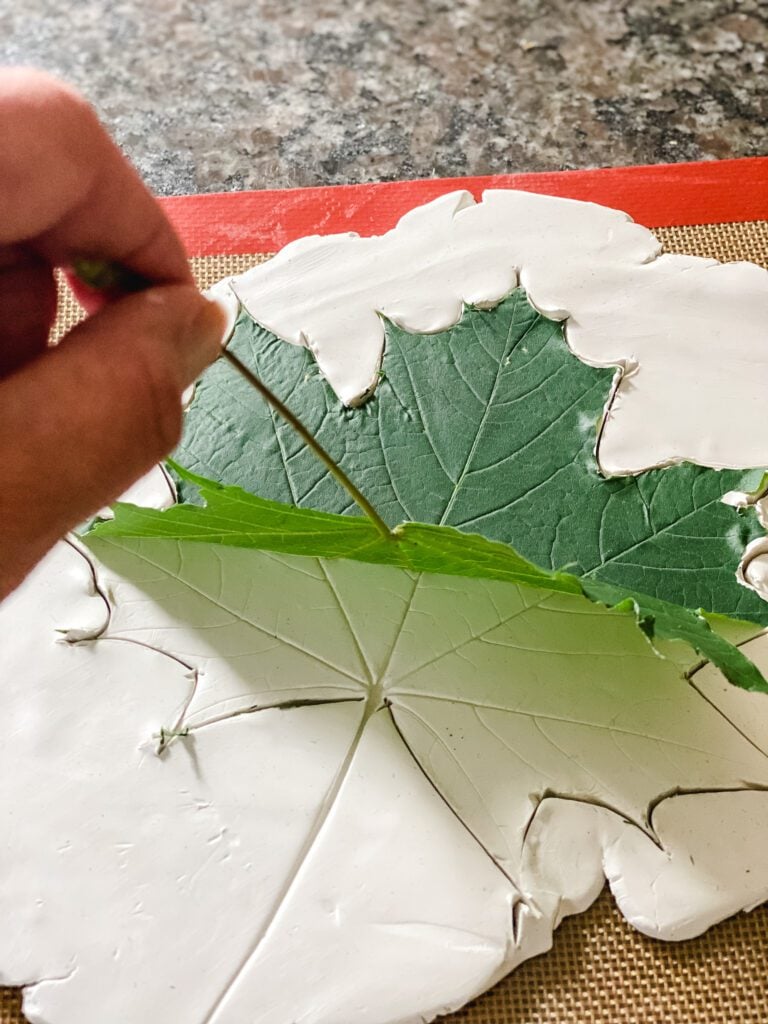
Then I lifted the maple leaf out of the clay starting from the stem end and pulling the leaf upward.

Doesn’t it look cool already?? After I removed the leaf I just pulled off the excess clay around the edges.

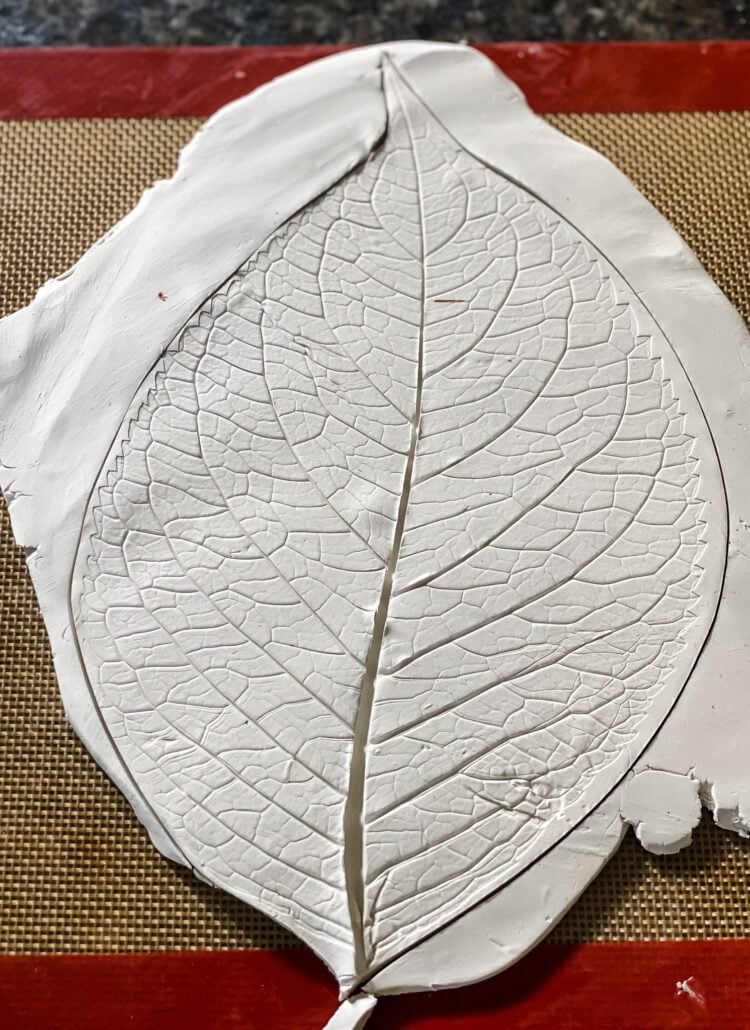
To create a variety of trinket dishes, I repeated the process with a hydrangea leaf and then with a sunflower leaf. This resulted in a beautiful set with different sizes and shapes.
I was particularly impressed with the hydrangea leaf imprint. Its delicate details are truly stunning, and I can’t wait for you to see the finished trinket dish!
Shaping Your Trinket Dish

To shape your trinket dishes, gently press the clay into shallow oven-safe bowls or create molds from aluminum foil. To prevent sticking, lightly grease the bowls with cooking spray.
Baking Your Clay Creations to Life
Baking Instructions:
- Sculpey Oven-Bake Clay: Preheat your oven to 275°F (135°C). Bake the clay for 15 minutes for a 1/4-inch thick project.
- Other Brands: Check the clay packaging for specific baking instructions
Note: Baking times may vary depending on the size and thickness of your clay creations.
Here’s a breakdown of the baking times I used:
- Maple and Hydrangea Leaves in Bowls: Approximately 30 minutes
- Sunflower Leaf in Aluminum Foil: Approximately 20 minutes
Remember to monitor your clay closely during baking to ensure it’s fully hardened.
If you’re using air-dry clay, check the trinket dishes after a day to see if they’ve hardened. Drying time can vary depending on your home’s temperature and humidity. A simple touch test can help you determine if the clay is dry.

After I removed the baking sheet from the oven I left the maple and hydrangea leaves inside of the bowls to cool down before removing them.
A Touch of Color: Painting Your Trinket Dishes

Once the leaf dishes are completely cooled it is time to paint them. For this project use whatever colors work for you!
Both acrylic craft paints and spray paints will work well with the clay leaves.

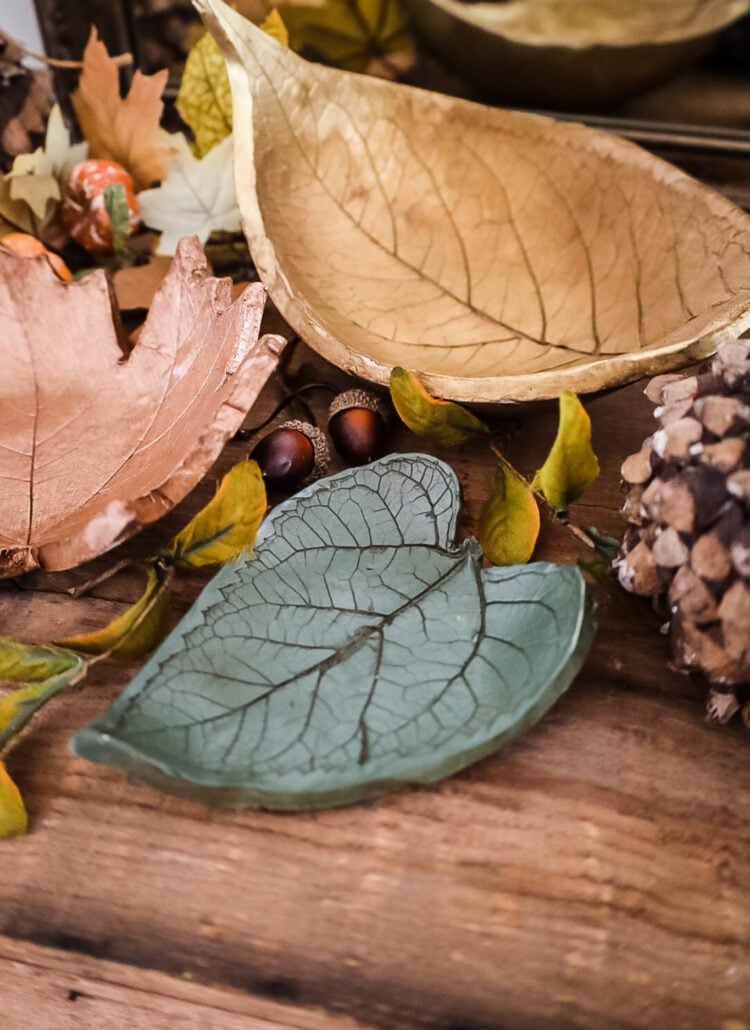
Today I used spray paints because I already had them left over from other projects. I painted the hydrangea leaf with antiqued gold, the maple in a pretty copper, and the sunflower leaf a dark green.


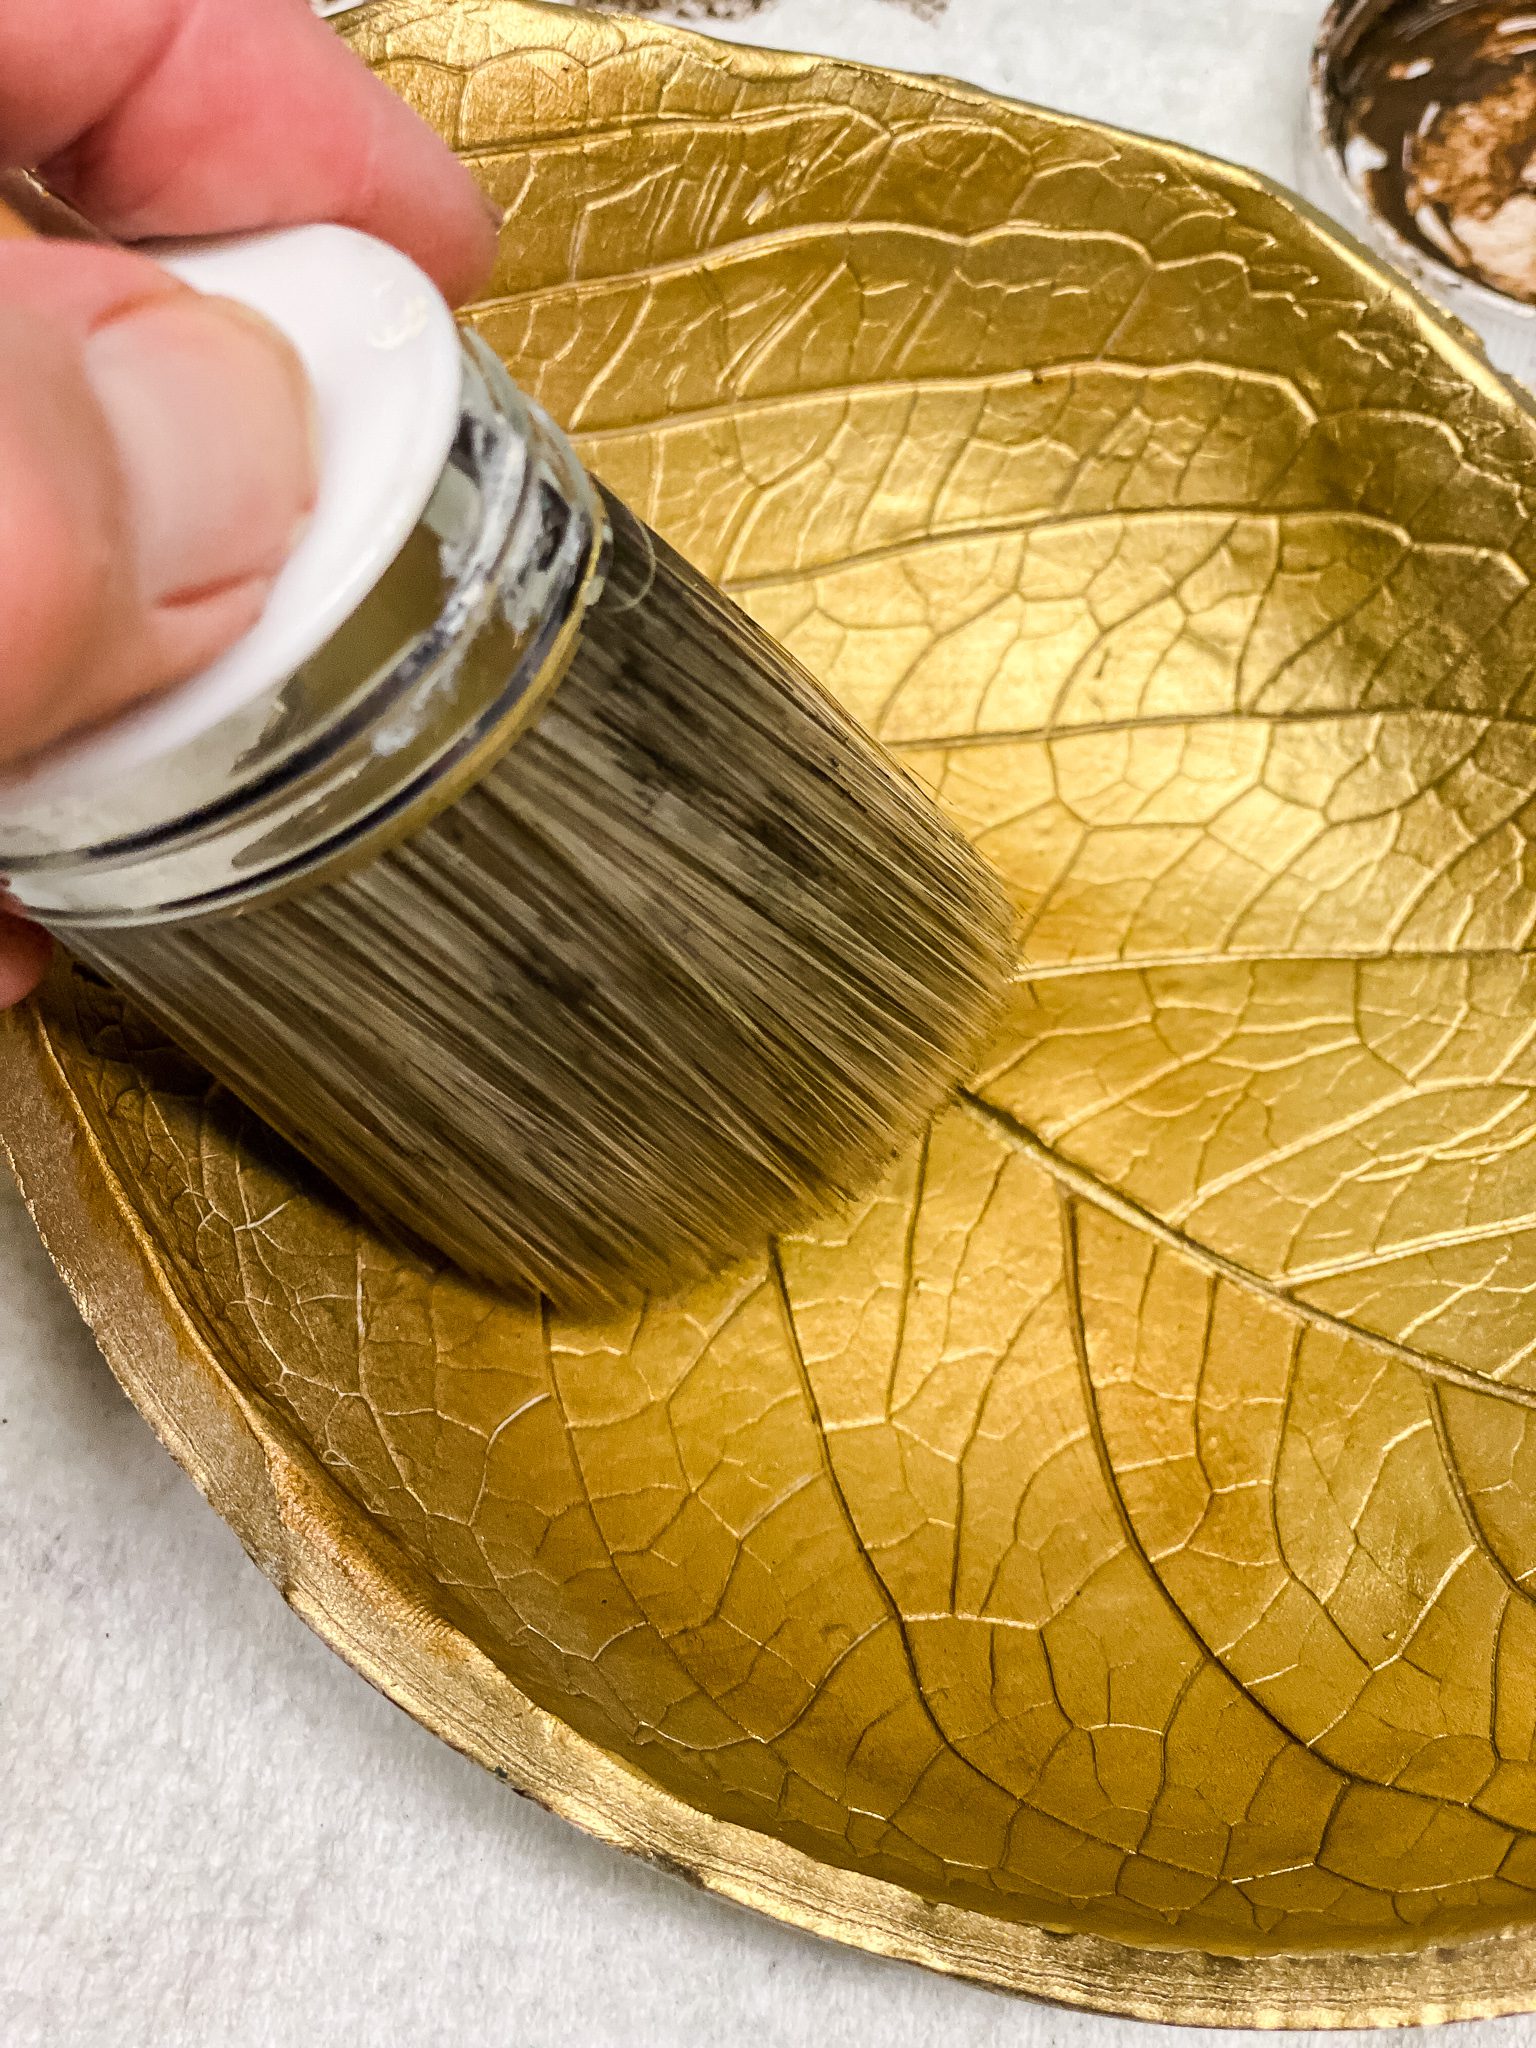
Once the paint was dry, I wanted to highlight the natural veins of the leaf and reduce the metallic shine slightly. To achieve this, I applied a small amount of Waverly Antique Wax to the leaves and gently rubbed it in. I love the chalky texture of Waverly wax, which makes it incredibly easy to work with
A Set of Nature-Inspired Trinket Dishes

OK, can you believe a couple of hours ago these beautiful trinket dishes were a pile of clay?? They are just perfect for using on my entryway table this Fall!
This would also be a great project to do with children…but I would just use acrylic paints so they can paint them on their own!

It’s amazing how much detail from the leaves you can see in these little dishes! Honestly, they came out better than I had imagined that they would!! I love when that happens with a project…because I’ve had my share of Pinterest fails!!!

The hydrangea leaf is definitely my favorite one!! The shape and the point detail at the end of the leaf are giving me heart emoji eyes!!
Congratulations on creating your beautiful autumn leaf trinket dishes! These unique and personalized pieces are a wonderful addition to any home.
Whether you use them as functional organizers or simply as decorative accents, your handcrafted creations are sure to bring a touch of nature and warmth to your space.
See your projects featured! If you are inspired by this or any of my other DIY projects I would love to see them and add you to the Reader’s Spotlight gallery. Send a photo to me at jennifer@cottageonbunkerhill.com
xo, Jennifer
More Fall Leaf Craft Projects:


My friend Rachel and I are always on the same creative wavelength…this week she used clay to create leaf napkin rings! Such a cute project that I am definitely going to make for Fall!

How to Make Autumn Leaf Clay Trinket Dishes
Here is an easy DIY for Fall! All you need is a package of either air-dry or oven-bake clay and a few leaves from your yard, and a little paint.
Materials
- Fresh Leaves
- Oven-Bake or Air-Dry Clay
- Acrylic or Spray Paints
- Waverly Antique Wax
Tools
- Rolling Pin
- Knife
- Bowls
Instructions
- Gather leaves. Find larger leaves with good veining. I used a hydrangea, maple, and sunflower leaf.
- Roll out your clay to 1/4 inch thickness and large enough to fit your leaf
- Place the leaf on the clay and roll over it with a rolling pin
- Use the tip of a knife to cut out the leaf shape
- Remove excess clay
- Place clay leaf in a small bowl (I wiped a tiny amount of cooking spray inside the bowl to prevent sticking) to create a rounded shape for the trinket dish
- If using oven-baked clay follow directions for baking times on the package
- If using air-dry clay check for dryness after 24 hours, drying time will depend on your climate.
- Once clay leaves are cooled or dried paint them in your choice of colors. You can use either acrylic craft paint or spray paint.
- To bring out the detail of the leaves I brushed a small amount of Waverly antique wax over the leaves when the paint was dried.
Recommended Products
As an Amazon Associate and member of other affiliate programs, I earn from qualifying purchases.


Fall Inspiration
decorating + DIY ideas:
Fresh Flower Wreath Collection

Looking for more pretty ideas?See all of our wreath tutorials using fresh flowers & natural materials
Check out what the rest of the Thrifty Style Team has for you this month!!

Redhead Can Decorate –A Look Back at Redhead Can Decorates Best Affordable DIY Projects
Our Crafty Mom –Wooden Candle Holders with a Faux Concrete Finish
I Should Be Mopping the Floor –Unique Containers for Flower Arrangements
The How to Home –How to Make a Pom Pom Pillow
DIY Beautify –Thrifty Vintage Art for Your Walls
2 Bees in a Pod –French Country Lamp Makeover
Postcards From the Ridge –How to Paint a Glass Vase to Look Like Stoneware
The Tattered Pew –The Secret Tip to Drying Hydrangeas
Cottage on Bunker Hill –How to Make Autumn Leaf Clay Trinket Dishes
Amy Sadler Designs –Wheat and Floral Decor for Fall Decorating
Songbird –DIY Hanging Glass Bottles for Tiny Flower Bouquets
My Family Thyme –Make an Easy and Inexpensive Fall Wreath
Southern Yankee DIY – DIY Faux Concrete Planter


These are amazing! I love this project so much. 🙂 Shared it on Thistlekeeping! You are such an inspiration!
You are the best!!
Jennifer
These turned out so good. We are on the same page with air-dry leaves this week. lol. Great minds! 🥰🥰
I think my great nieces would love making these for their Mom for Christmas!! Thanks for the inspiration.
Hi!
My daughter and I are making these and we just got them out of the bowls to finish air drying and noticed on the bottom of the dish there are cracks. How do we fix that and/or is there a trick to it not happening again. Thank you in advance for your help.
Eva
Hi! These are beautiful! I’m wondering if I could use these to make my own autumn scented candles . Thank you
I LOVE these, Jennifer! I have never experimented with clay before, but you have inspired me to give it a try! What a simple, yet beautiful project! Pinned!
I’m a novice too! I’ve only made a few projects with clay before.
Jennifer these are gorgeous! I love the shape and the way you finished them. I’ve never worked with this type of clay but am definitely going to try it. Thanks for the tutorial! Pinned!
Thanks so much, Angie!!
Love this Jennifer, they came out just perfect.
You’re the best!! Thanks, Wendy!!
Okay Midas!!!! I love everything you do! These are so stinkin cute!!!!
You are the best!!
GORGEOUS!
Thank you so much!!!
Jennifer, I love this idea so much! I’m definitely going to make some for fall! Thank you so much for such a creative idea! I’m sharing this tomorrow on my Seven on Saturday roundup post! Happy Weekend!!
These leaf bowls are stunning! So creative and beautifully done.
Jennifer I am loving these! You are so stinking creative…I just want to harness some of your creativity! Can you send some my way!!!! Pinned!
Thanks, my friend!! I’ll have to come out and visit you and bring it with me!!
These are simply beautiful! I love the detail of the veins and the final colors. So pretty!
Thanks so much, Mary Beth!
Gosh, Jennifer…these are truly just STUNNING! I love the detail and colors. And I’m with you, the shape of that hydrangea leaf is the perfect one! xoxo, kristi
Thanks, Kristi!!!
I just ordered the clay!!!
Jen-you make the coolest things for home decor. I would love to make these for my kiddos for Christmas for their jewelry. I must make the time!!!
Girl,
These look amazing! Thanks for linking to my napkin rings.
Thanks!!! They did come out cool! Sometimes I impress myself…LOL!!!
Jennifer, I just love how beautiful these turned out. The metallic paint on them makes the leaf pop. Such a fun project!
These turned out so beautiful Jen! That dark wax really highlights all the veining! Def need to make a few this fall!
I know, right!! That wax is everything!!!!
Jennifer!! This is gorgeous!! You seriously have no idea how obsessed I am!! We’re doing homeschool this year and this might be a Autumn at project we do!! ❤️
!000% this is a great project with kids!! I used to love collecting Fall leaves with the daycare kids to do projects.
These turned out so good!!! I want to make them!
You have to! You have so many cool leaves to use!
Wow Jennifer – these trinket dishes are beautiful. I made some a few years ago and never even thought to paint them…they look amazing!
Wow these are beautiful! Love the colors and the shapes.
These would make great gifts.
Pinned!