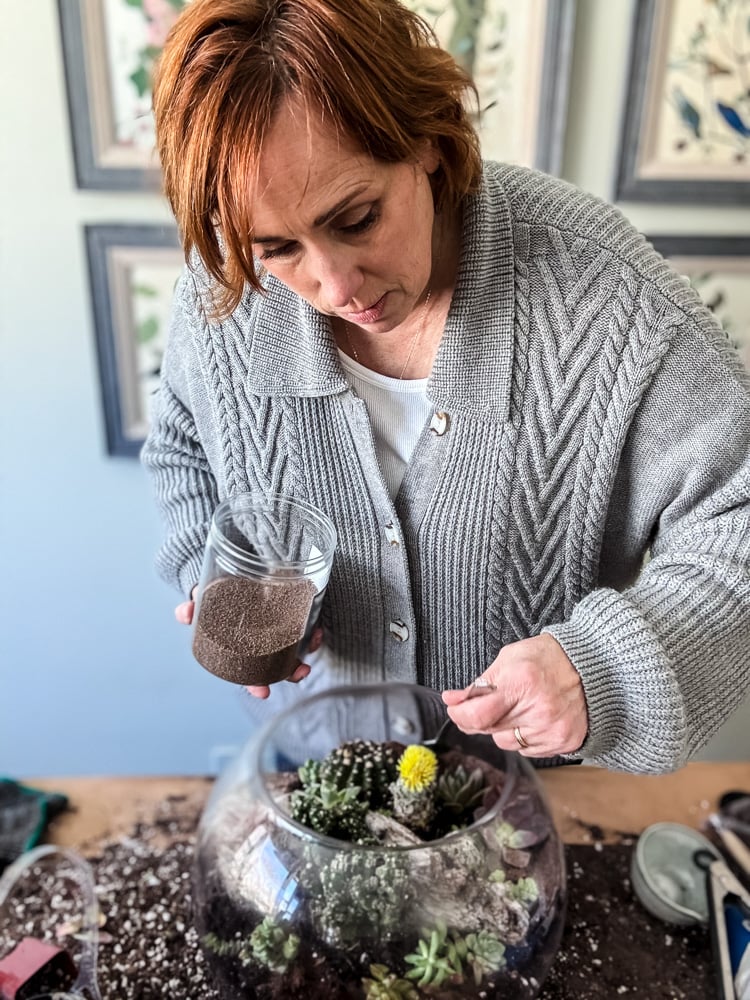
You know Spring is really coming in New England when the local nurseries start posting their pansies. After a long winter, I’ll admit it, I stalk their social media pages, waiting for that post. The minute I see those flats of colorful blooms, I’m in the car.
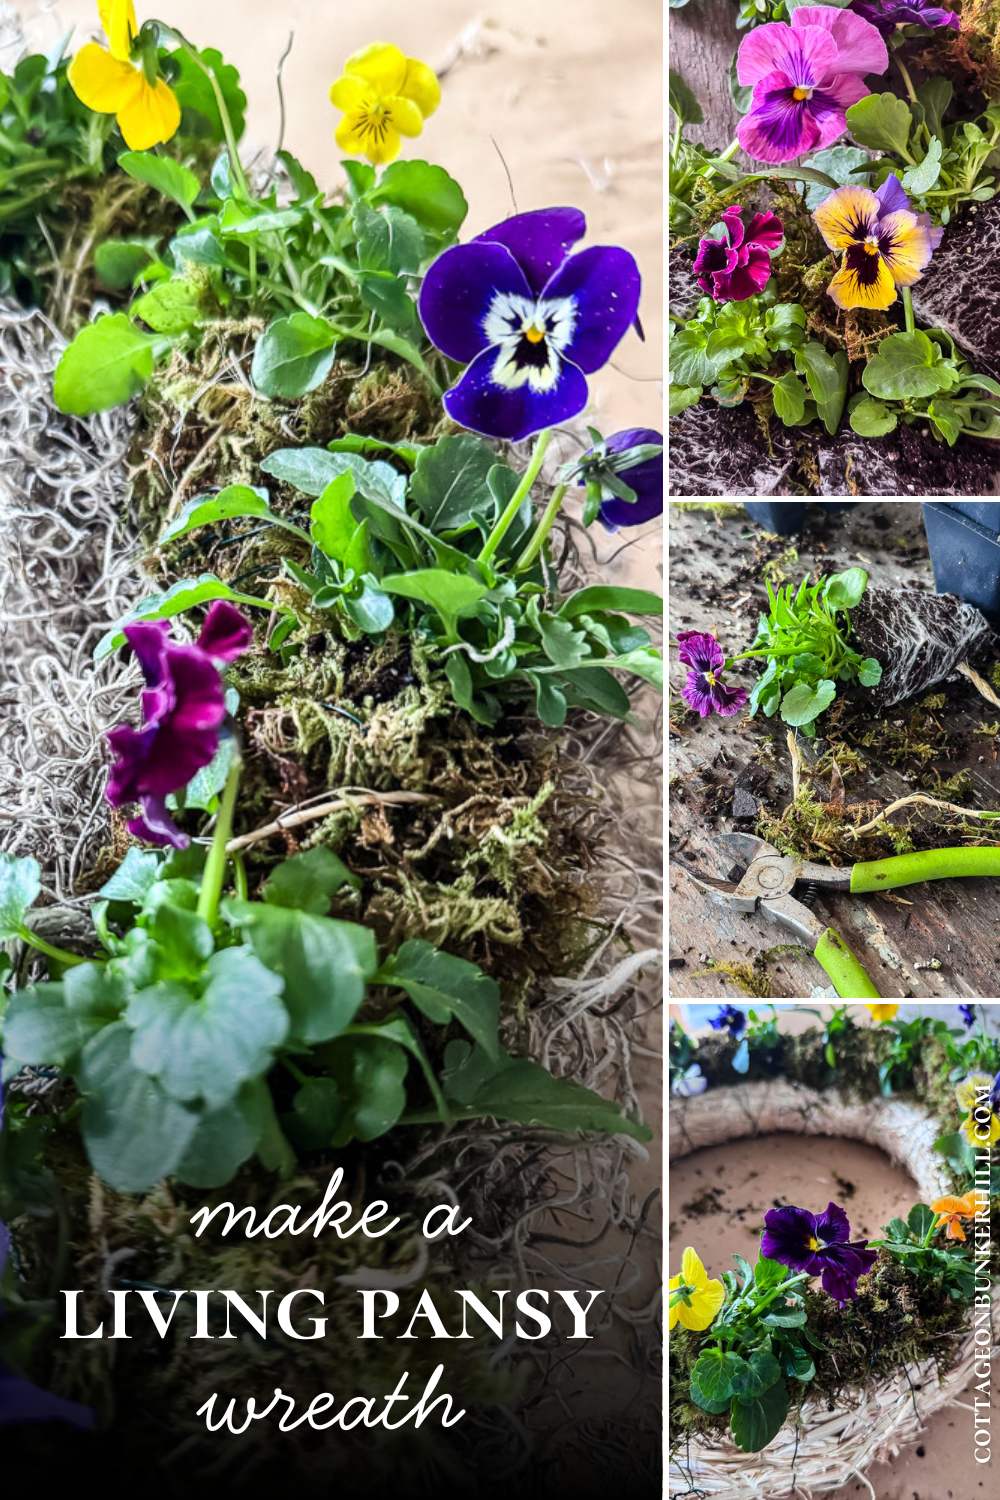
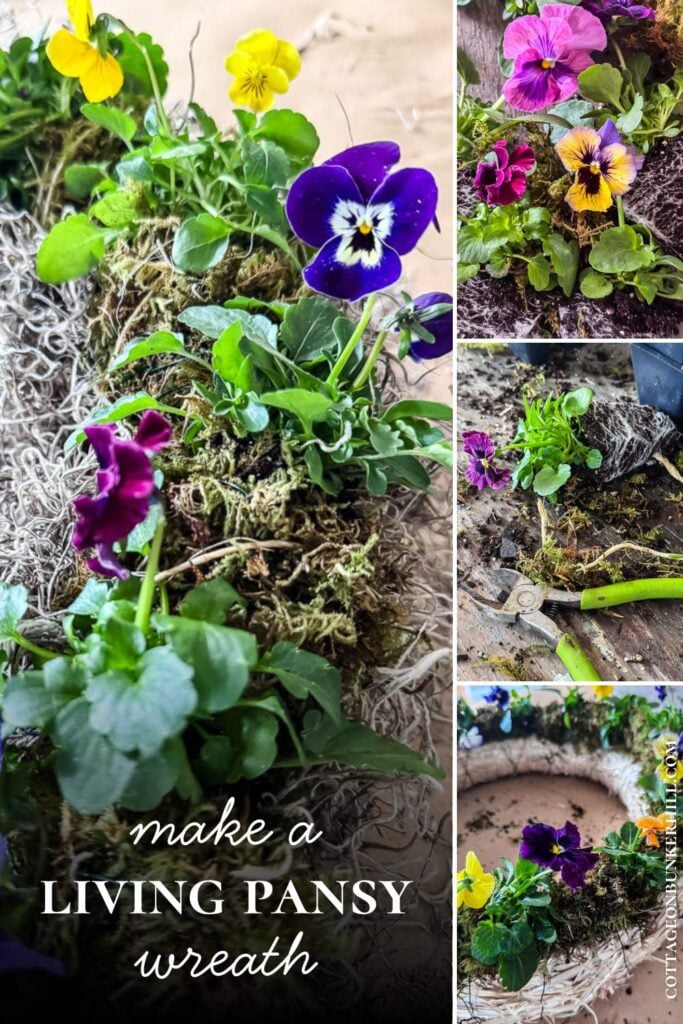
Last weekend, I finally made the trip to my favorite local spot and came home with a tray of gorgeous pansies in every color. But instead of planting them in the ground (where it’s still too cold), I decided to do something different: make a living pansy wreath.
This isn’t your typical wreath. It’s fresh, it’s blooming, and it lasts for months in New England’s cool spring weather. When the pansies eventually outgrow the wreath? I’ll just pop them into my cut flower garden. Nothing goes to waste.
Living Pansy Wreath: Quick Facts
What it is: A wreath made with fresh, potted pansies wrapped in moss and wired to a straw form
Difficulty: Beginner to intermediate (easier than it looks!)
Time to make: 1+ hour
How long it lasts: 2-3 months in cool spring weather
Care: Mist every 2-3 days; hang in a protected spot
Best for: Covered porches, under eaves, sheltered front doors
After it’s done: Plant the pansies in your garden; reuse the wreath form
Welcome to this month’s Garden to Home project: a living wreath that brings fresh flowers to your front door without the weekly replacements. It looks harder than it is (I promise!), no strange supplies, and will make you smile every time you walk up to your house.
Let me show you how I made it.
Welcome! I’m Jennifer, and I’ve always believed nature is the most beautiful art supply. For years, I’ve been preserving New England’s blooms and foliage through pressing, drying, and crafting. Let me show you how to capture a little bit of the season and bring it indoors—simply and beautifully.
This post may contain affiliate links, which means we receive a small commission if you purchase through our links. See our disclaimer page for more information.
DIY Live Pansy Wreath (Easier Than It Looks!)
Looking for a spring wreath that feels fresh, lasts for weeks, and doesn’t require a foam base? This month’s Garden to Home project is for you. I’m sharing how to make a live pansy wreath using a reusable straw wreath form, nursery-grown pansies, and just a few basic supplies like sphagnum moss, floral wire, and sisal twine. The technique is simple: make moss-wrapped pansy bundles, wire them onto the form, and fill in with Spanish moss for a polished finish. It’s a sustainable, living wreath that you can water, enjoy all season, and then dismantle to start fresh next year. Ready to create your own?
Garden to Home
I’ve always believed the line between garden and home should be blurry. This series is all about crossing that line. Taking what grows outside and bringing it indoors in beautiful, lasting ways. New projects posted monthly.
Let’s grow together!
What You Will Need

Materials for this Project
- 18-inch straw wreath form (under $5 at Hobby Lobby)
- 3-6 six-packs of pansies in various colors (approx. $15-18)
- Sphagnum moss
- Spanish moss (or Michael’s)
- Strong floral wire (or Michael’s)
- Sisal twine (optional)
- Bowl of water for soaking moss
Tools:
- Floral wire cutters
- Spray bottle for watering
- Hot glue gun (optional)
Note: The sphagnum moss I used comes compressed in almost sheet-like layers. Once you soak it in water and pull the layers apart, it puffs right up beautifully. One package was more than enough to cover all 15 pansy bundles for this project, and it’s very affordable!
Step-by-Step Instructions
Here’s the thing: this wreath looks way more complicated than it actually is. If you’re new to wreath making and feeling a little intimidated by the finished product, I get it! But I promise you can do this! I’m walking you through every single step with clear instructions, so no skipping, no assuming you already know something. Just follow along, and you’ll have a gorgeous living wreath on your door.
Step 1: Prep Your Moss and Pansies
Before you start assembling anything, you need to get your materials ready. Trust me, having everything prepped and within reach makes this project so much smoother.
Soak your sphagnum moss: Place it in a bucket or large bowl of water and let it absorb moisture until it’s thoroughly damp. You want it wet enough to hold together but not dripping. Give it a gentle squeeze to remove excess water.
Water your pansies: Make sure your pansies are well-hydrated before you start. If they’re dry, give them a good drink and let them sit for a bit. Hydrated plants are easier to work with and handle the stress of being transplanted better.
Set up your workspace: Lay out your wreath form, floral wire, wire cutters, and prepped moss on a table or work surface. When I’m working on projects, I cover the counter with brown butcher paper. Making this wreath can get a little messy, so either cover your table or work outside or in the garage.
Quick steps:
- Soak sphagnum moss in water until moist
- Water your pansies before starting (they should be well-hydrated)
- Set up your workspace with all materials within reach
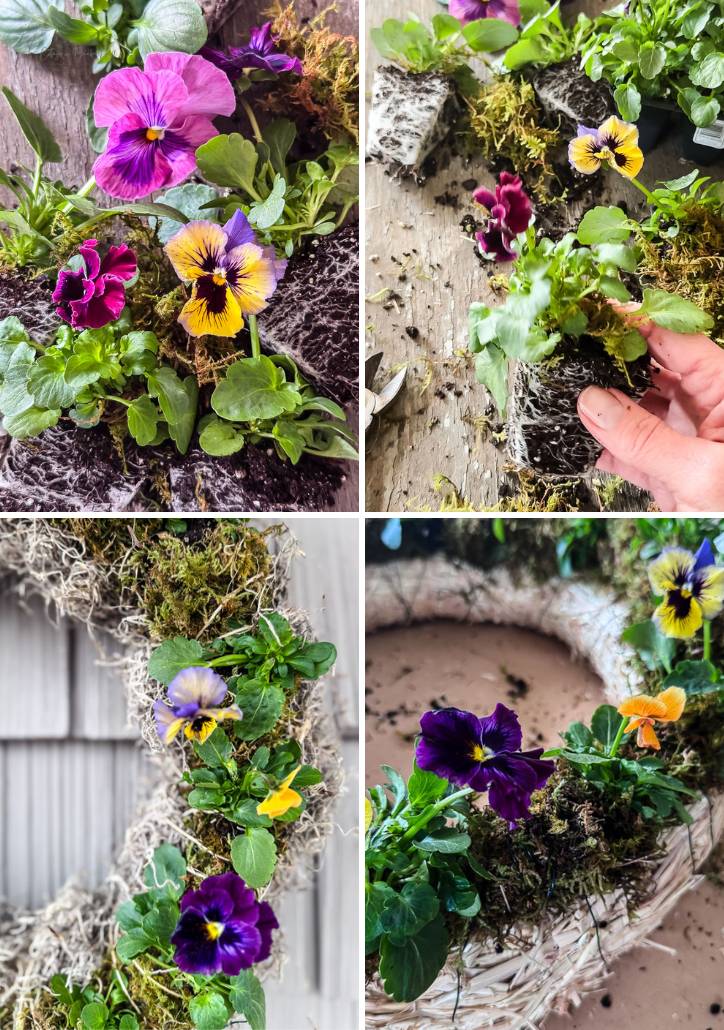
Step 2: Make Your Pansy Bundles
This is where the magic starts. You’re going to create 15 individual pansy bundles, each one wrapped in moss and secured with wire.
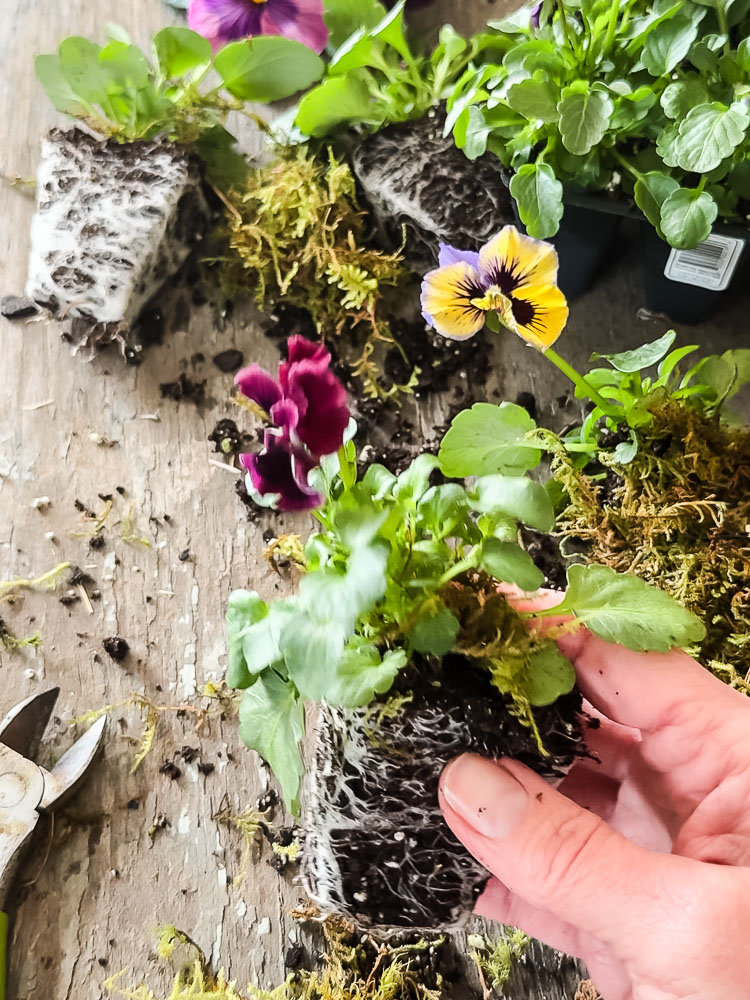
Here’s How:
Gently remove pansies from their six-pack, keeping the root ball and soil intact. You don’t need to shake off the dirt or disturb the roots, just pop it out carefully.
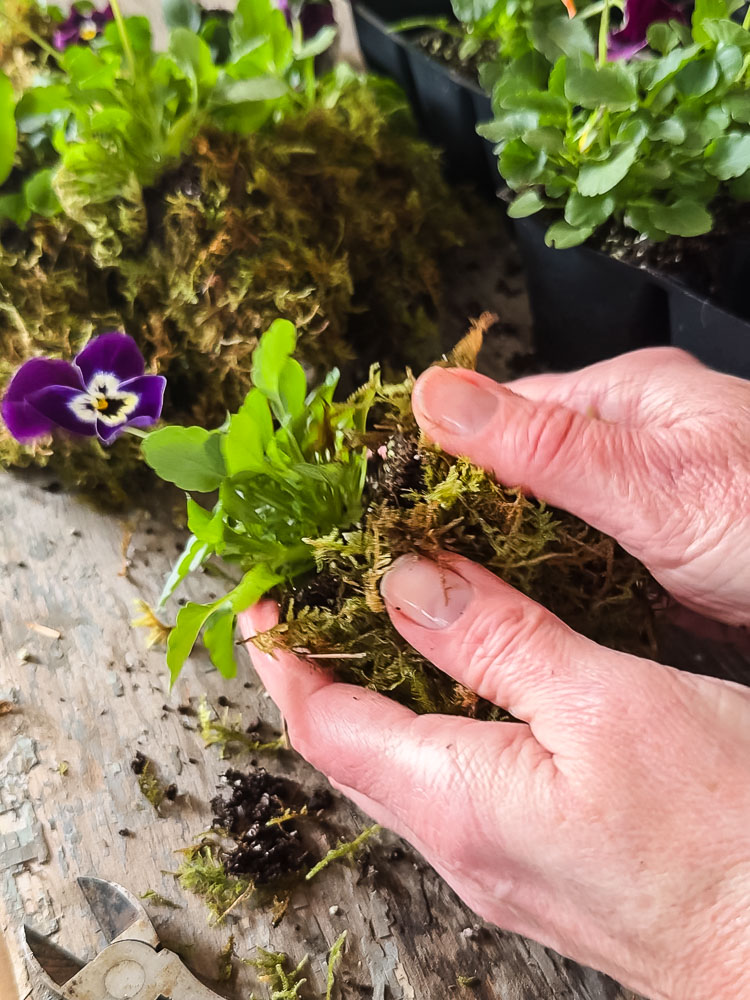
Take a handful of your damp sphagnum moss and wrap it around the pansy’s root ball, covering the soil completely. Be generous here! You want enough moss to fully encase the roots and create a nice cushion. Think of it like you’re tucking the pansy into a cozy moss blanket.
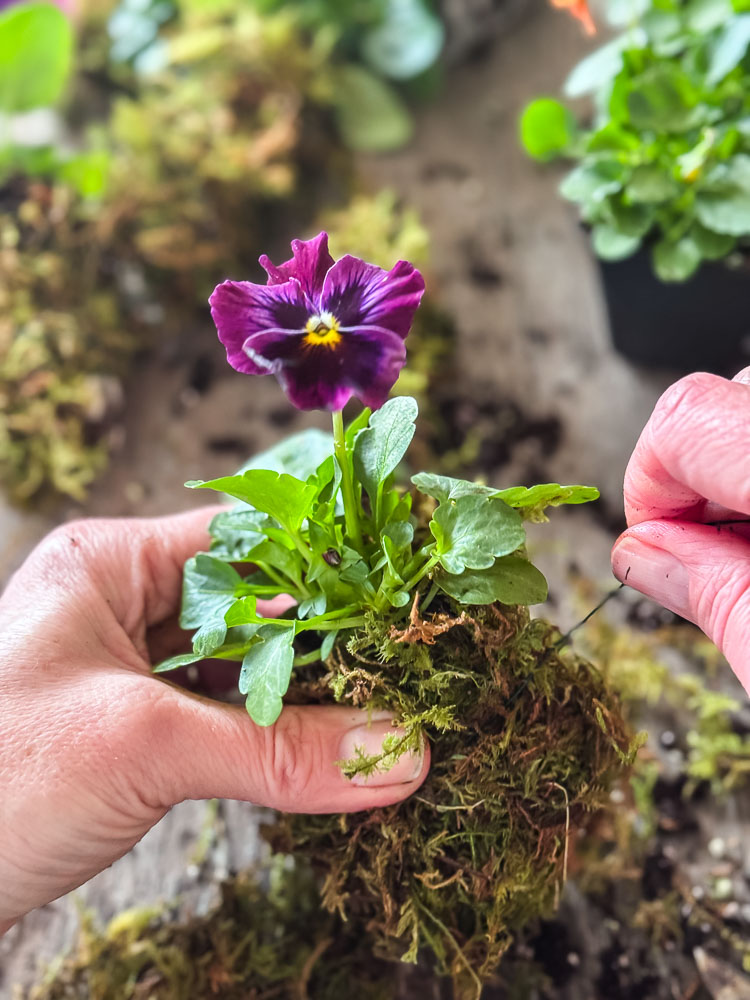
Once the moss is in place, take your floral wire and wrap it around the moss-covered root ball several times to secure everything. This is important: Make sure the wire is fairly snug. Too loose, and the moss will shift or fall apart when you attach it to the wreath. You want it tight enough to hold, but not so tight that you’re crushing the roots.
Repeat this process until you have 15 pansy bundles ready to go. I lined mine up on my work table as I made them. It’s satisfying to see them all ready and waiting!
Quick steps:
- Remove individual pansies from six-packs, keeping soil intact
- Wrap each pansy’s root ball with damp sphagnum moss. Be generous with the moss. You want to completely cover the soil
- Secure moss with floral wire, creating a little wrapped bundle
- Make 15 bundles total (for an 18-inch wreath)
Step 3: Attach Bundles to Wreath Form
Now comes the fun part-watching your wreath come to life as you add each pansy bundle.
Here’s the process:
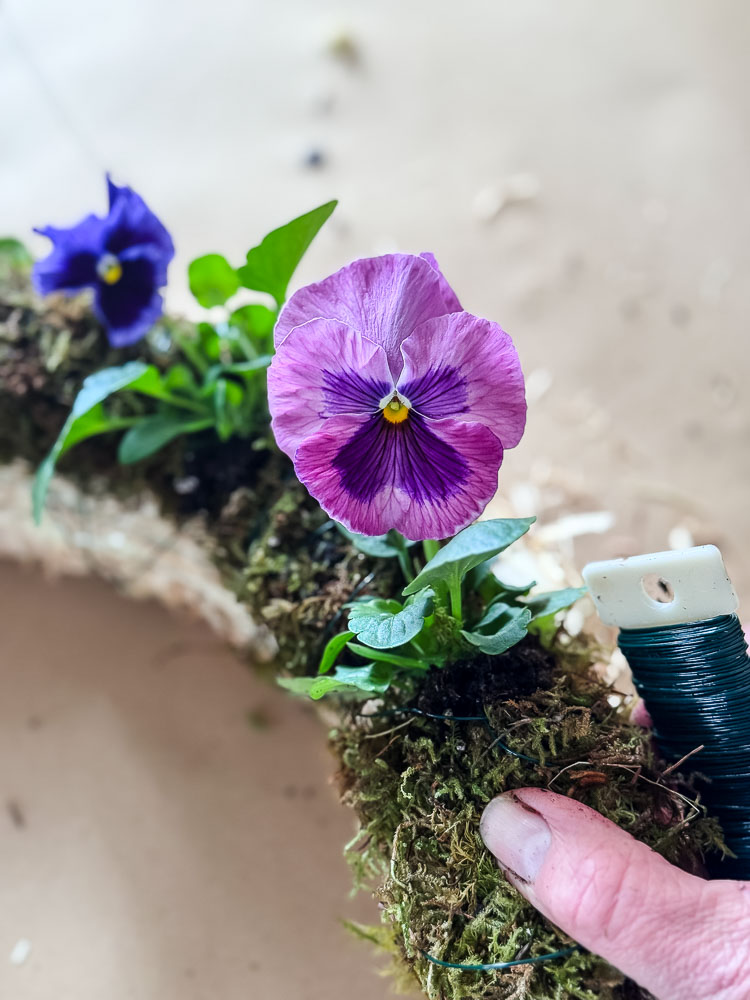
Start at the top of your straw wreath form. Take your first pansy bundle and position it where you want it, then begin wrapping your floral wire paddle around both the bundle and the wreath form. Wrap it several times to secure it firmly in place.
Important: Don’t cut the wire between bundles! Keep the wire paddle attached and just keep wrapping as you go. This creates one continuous wire support system around the entire wreath, which is much stronger than individual wire pieces.
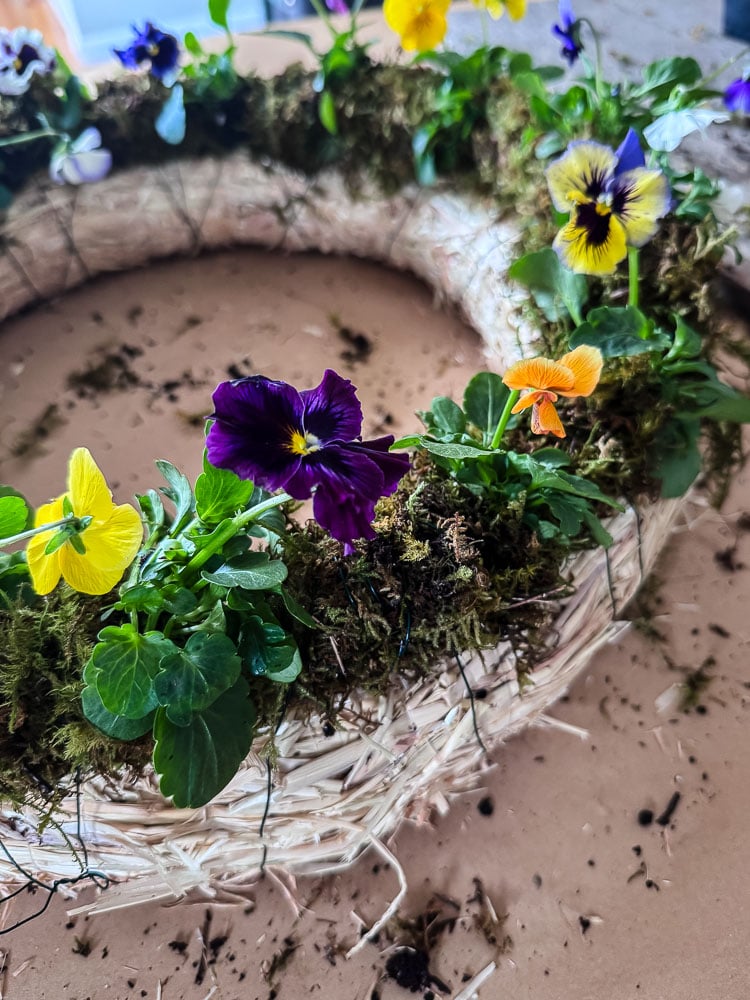
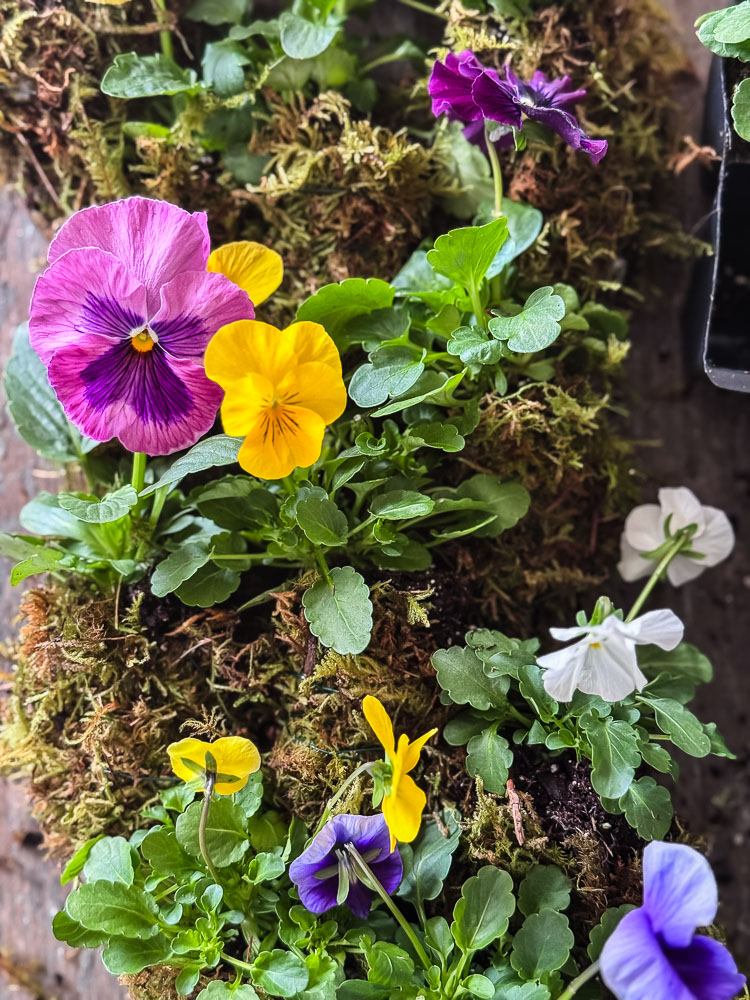
Work your way clockwise around the wreath, adding one pansy bundle at a time. Position each new bundle close to the previous one. You want them touching or close together. Keep wrapping that wire paddle around and around as you go, securing each bundle to the form.
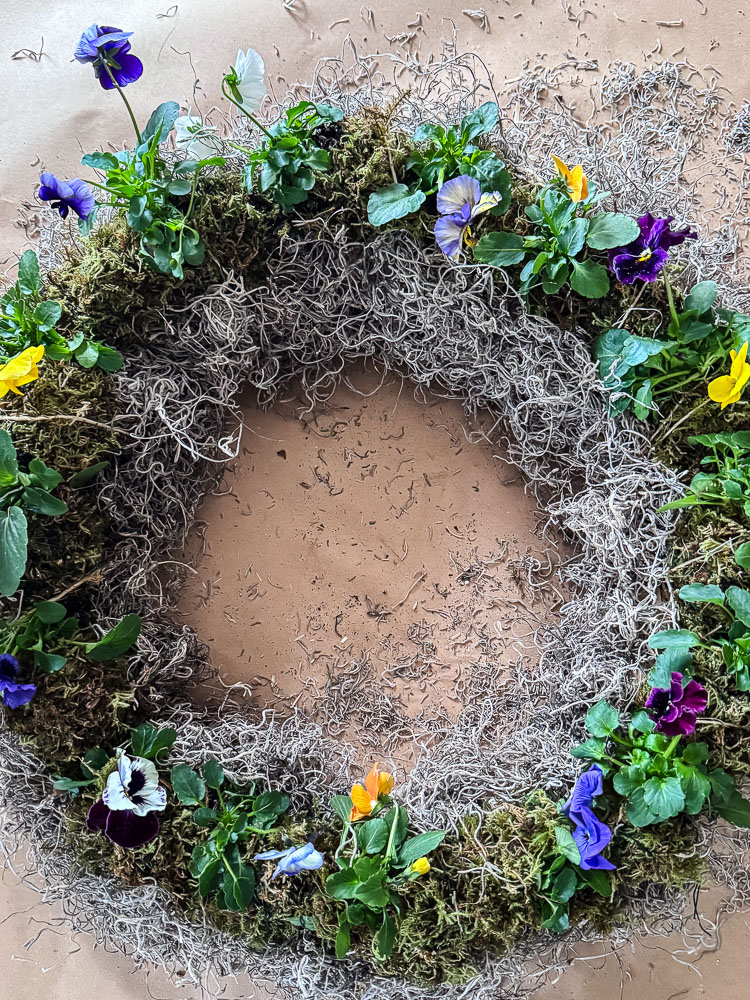
Continue until all 15 bundles are attached and your wreath form is completely covered with pansies. By the end, you’ll have wire wrapped all the way around, holding everything securely in place.
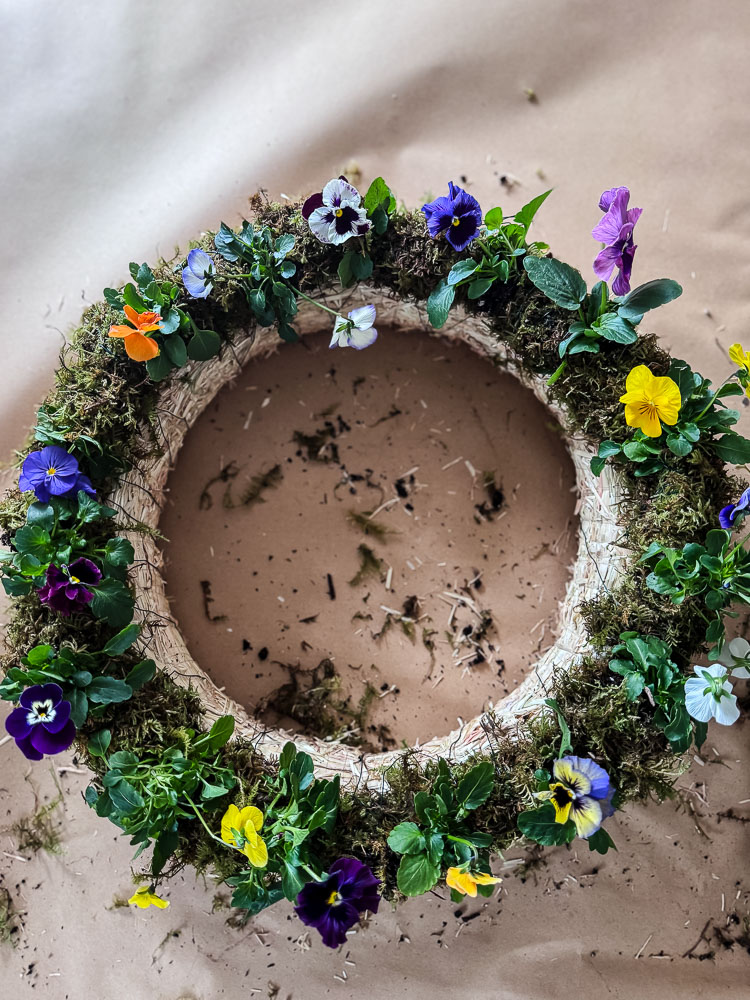
What it should look like at this stage: A circle of pansies with visible wire holding them on, and the straw wreath form still showing in the center and around the edges. Don’t worry, we’ll cover all that in the next steps!
Quick steps:
- Start at the top of your straw wreath form
- Using the floral wire paddle, wrap each pansy bundle onto the form
- Work clockwise around the wreath, keeping bundles close together
- Continue wrapping wire as you go. Don’t cut it between bundles
- Fill the entire wreath form with your 15 bundles
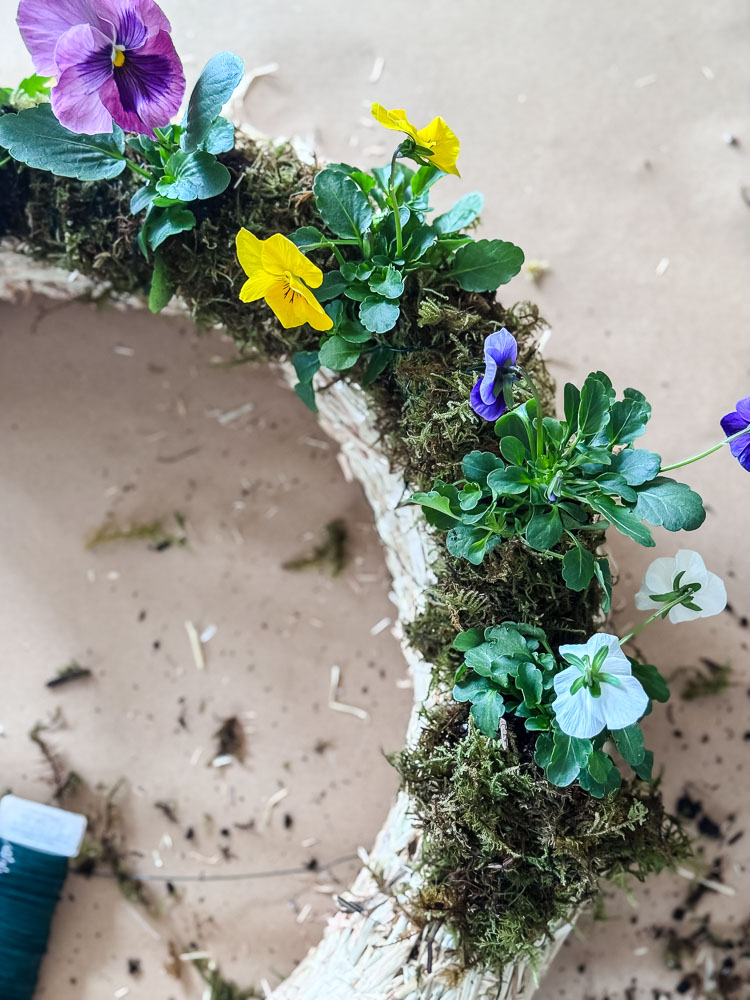
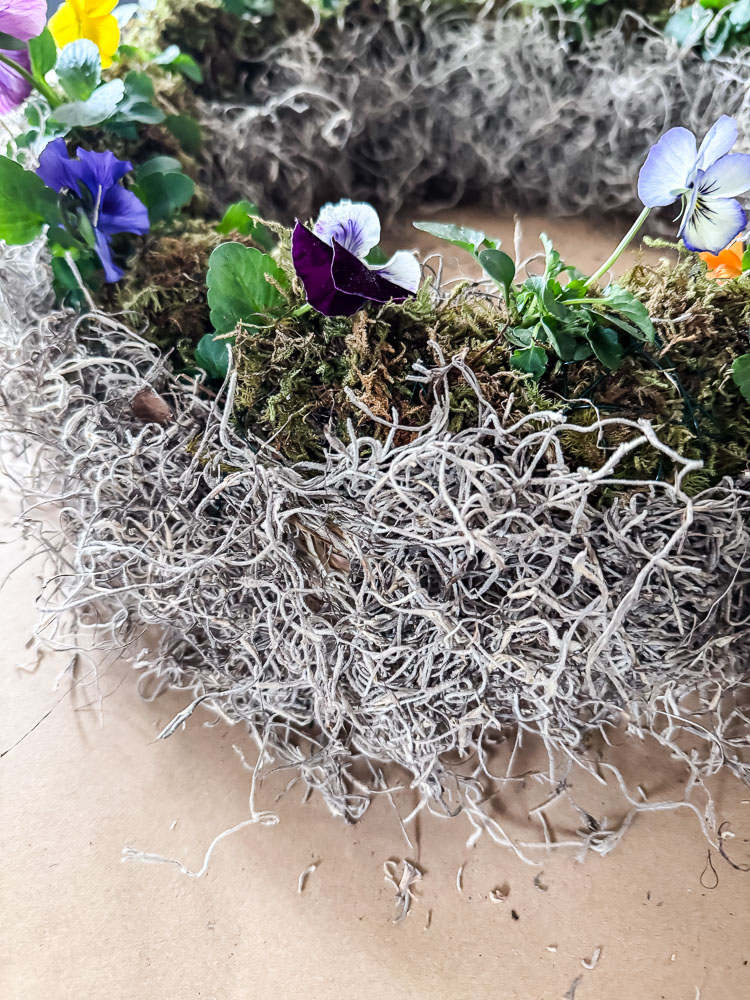
Step 5: Hide the Wreath Form with Spanish Moss
At this point, your wreath is covered in beautiful pansies. But you can still see the straw wreath form peeking through in the center opening and around the outer edges. Time to fix that!
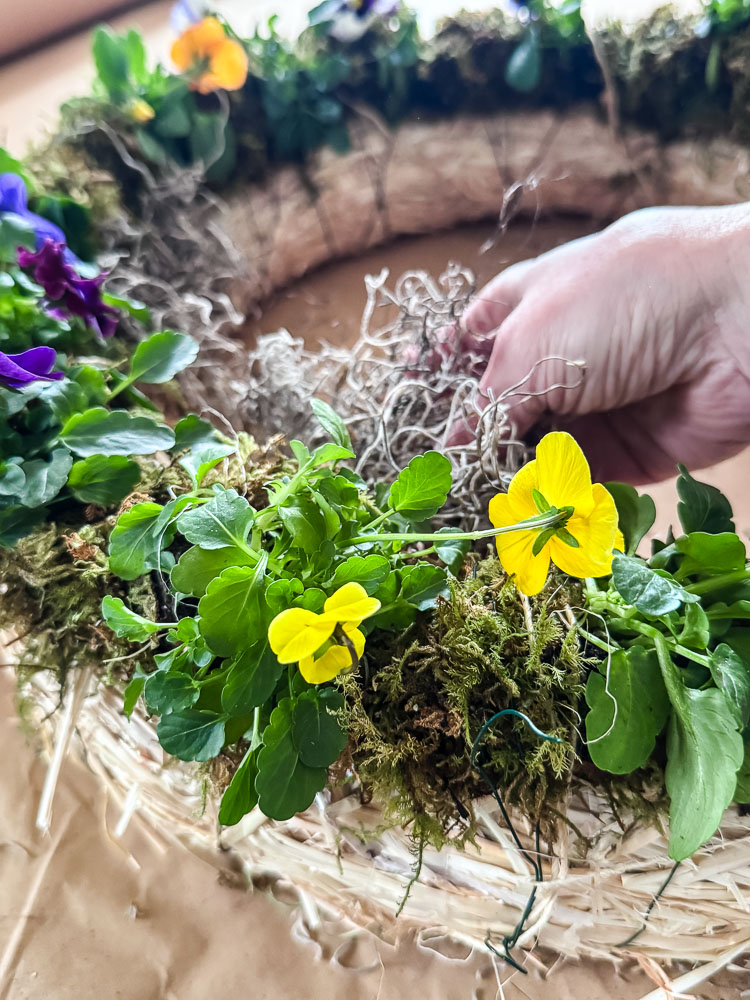
Here’s how to cover it:
Take handfuls of Spanish moss and start tucking it into the center opening of the wreath. Work your way around the inner circle, filling in all the visible straw.
Here’s the trick: use the floral wire that’s already holding your pansies to the wreath. Tuck the Spanish moss behind the wire; it acts like a little anchor, holding the moss in place without needing additional wire or glue.
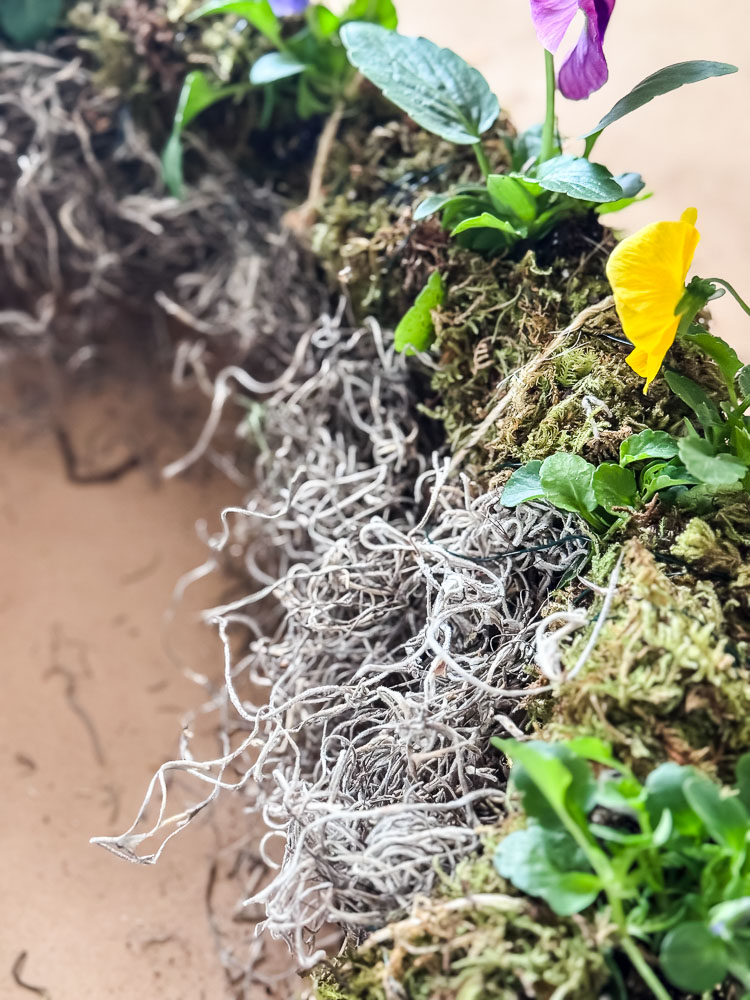
Do the same thing around the outer edge of the wreath wherever you see exposed straw. Tuck, tuck, tuck that moss behind the existing wire.
When you need extra support: In some spots, the existing wire won’t be enough to hold the Spanish moss securely. When that happens, just wrap a new piece of floral wire around that section of moss to anchor it down.
Why I use wire instead of hot glue: I’m planning to reuse this straw wreath form once the pansies are done blooming. Wire is so much easier to remove than dried hot glue, and the wreath form stays in better condition for the next project. But feel free to hot glue the Spanish moss onto the straw wreath form if it’s easier for you.
Keep adding Spanish moss until you can’t see any straw peeking through the center, edges, or anywhere it shows. The goal is a lush, full wreath where only pansies and moss are visible.
If there are any unruly pieces, you can trim them with scissors. I also used my hands to compress the moss down a bit.
Quick steps:
- Take Spanish moss and tuck it into the center opening of the wreath. Use the existing floral wire (the wire holding the pansies) to tuck moss behind
- Or hot glue if you prefer
- Fill in any visible straw on the outer edge, too
- Secure with additional wire wraps where needed
- Why I use wire instead of glue: I plan to reuse this wreath form once the pansies are done, and wire is easier to remove.
Step 5: Final Twine Wrap (Optional but Pretty!)
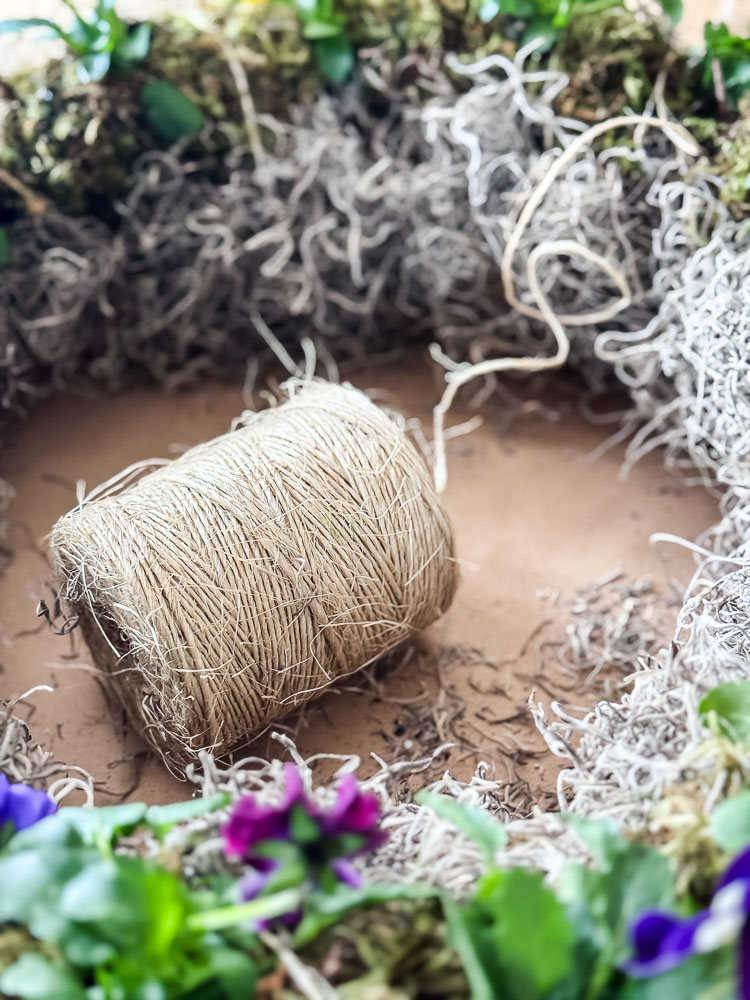
You’re basically done at this point,but if you want to add one more finishing touch, here’s what I did.
Take your sisal twine and wrap it around the entire wreath at an angle. Crisscross it over the pansies and moss as you work your way around.
Is this necessary? Nope! Your wreath is already secure and beautiful. But I love the way this extra wrap looks. It adds visual interest and reinforces that natural, handmade feel.
Quick steps:
- Wrap sisal twine around the entire wreath at an angle
- This is decorative but also adds a little more support & a nice finishing touch
How to Display & Care for Your Living Wreath
Where to Hang It:
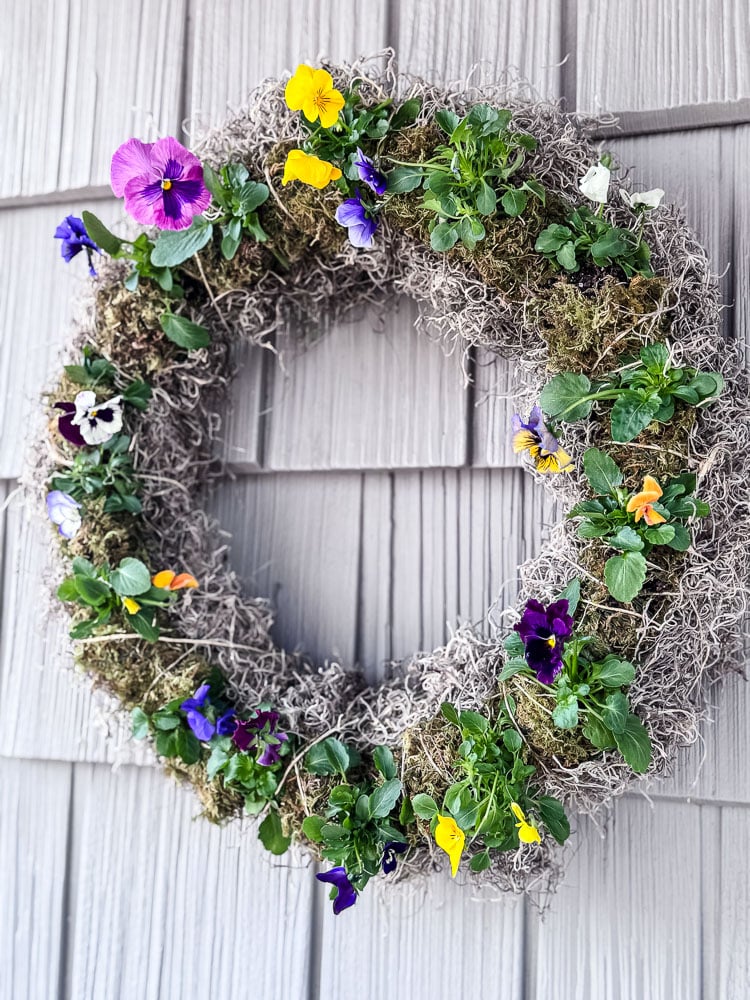
I hung mine on the house next to my front door on our covered front porch. Living wreaths do best in a protected spot: covered porches, front door, under eaves, or anywhere sheltered from harsh direct sun and heavy rain.
Pansies can handle some sun, but all-day blazing sun will dry them out faster and shorten their blooming time. A spot with morning sun and afternoon shade is ideal, but honestly, anywhere protected works beautifully.
Watering:
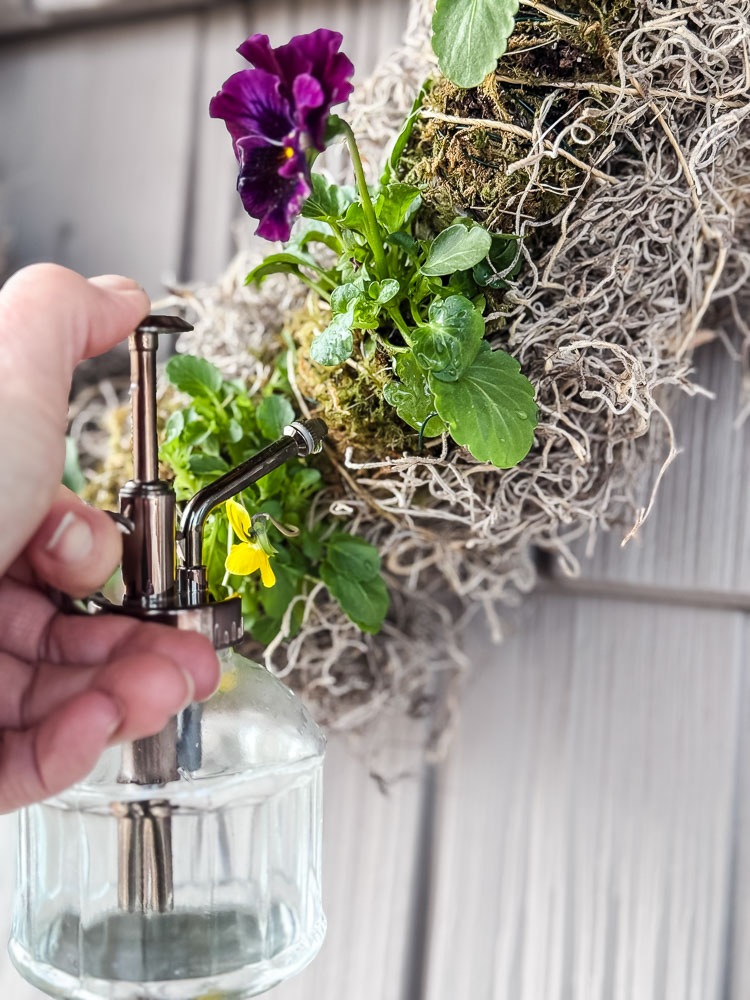
This is the most important part of keeping your wreath looking gorgeous!
Check your wreath every 2-3 days by gently touching the moss. If it feels dry, it’s time to water. I use a spray bottle to mist the entire wreath: the moss, the pansies, everything. You want it moist, not soaking wet or dripping.
If your wreath gets natural rain, that’s a bonus! Just keep an eye on it and supplement with misting as needed.
On warmer spring days, you might need to check it daily. The moss dries out faster in the sun and wind, so just stay aware of your wreath’s environment.
How Long Will It Last:
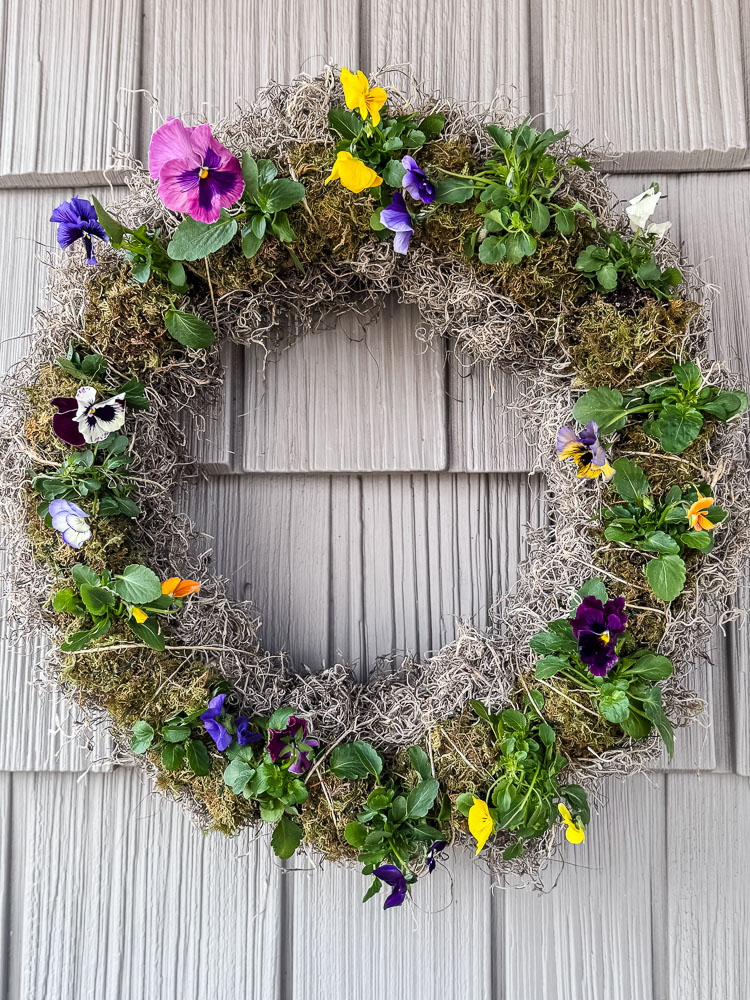
Here in New England, pansies are Spring superstars. They love cool weather, which means this wreath will bloom happily for a couple of months, well into late Spring.
The pansies will also grow and fill in the entire wreath (I’ll add a photo once it does!)
Once temperatures consistently hit the 70s and 80s, pansies start to struggle. But until then? You’ve got weeks and weeks of fresh blooms on your door.
What to Do When It’s Done:
When the pansies outgrow the wreath, or you’re ready for a new seasonal look, don’t toss them! Pop them into your garden. I’ll be adding mine to my cut flower garden.
The straw wreath form can be cleaned off and reused for your next project. This is why I used wire instead of hot glue; it’s so much easier to dismantle and save the form for another wreath down the road.
Nothing goes to waste, and you get a second life out of those pansies. That’s the garden-to-home philosophy in action!
Tips & Tricks
Fresh Flowers, Lasting Beauty
After a long winter of staring at dried arrangements and pressed flowers, there’s something incredibly satisfying about working with living blooms again. This wreath brought Spring to my front porch weeks before anything in my garden even thought about waking up.
This wreath will bloom for months in New England’s cool spring weather, and when the pansies are done? They’ll go right into my cut flower garden. Nothing wasted, everything beautiful—that’s the garden-to-home philosophy in action.
This is what this series is all about: finding simple, beautiful ways to blur the line between garden and home. Whether it’s dried flowers from last summer or fresh pansies blooming right now, it’s about bringing what grows outside into the spaces where we live.
If you make your own living wreath, I’d love to see it! Send photos to cottageonbunkerhill@gmail.com to be featured in the Reader’s Spotlight.
Looking for more garden-to-home projects? Check out last month’s DIY Dried Flower Hanging Frame or my Pressed Flower Magnets. There’s a new project every month—let’s keep growing and creating together.
xo, Jennifer
Love projects like this? Don’t miss out! Join my newsletter family for more cozy, budget-friendly DIY ideas delivered right to your inbox. You’ll get exclusive tips, early access to tutorials, and all the inspiration you need to make your home feel handmade and heartfelt.
40+ creative
DIY Wreath
tutorials