
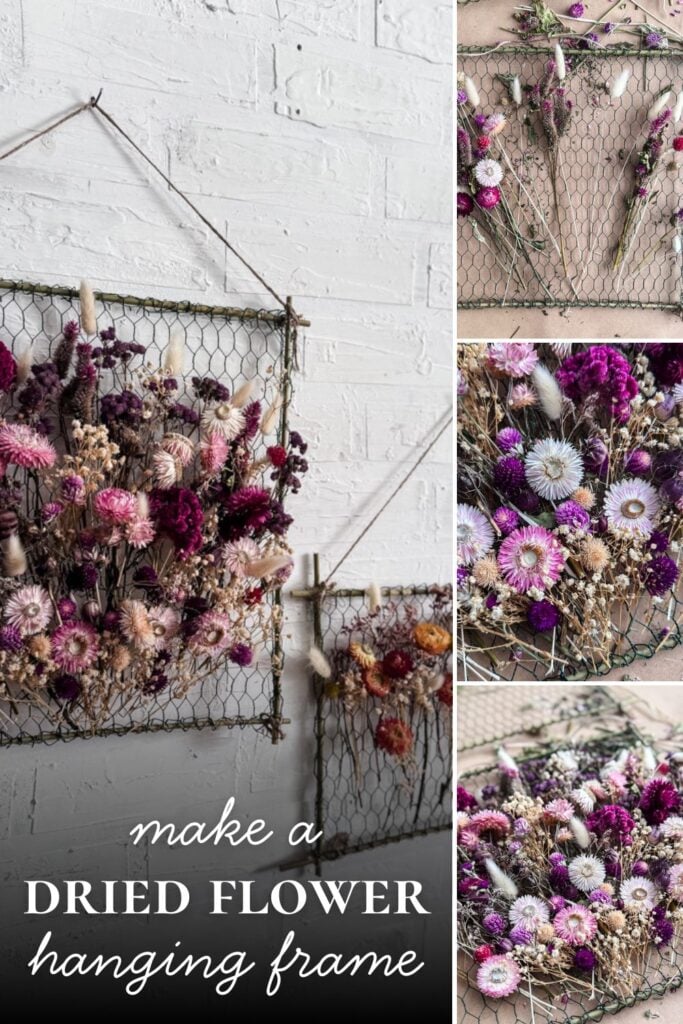
You know that feeling when you see something beautiful in a store, flip over the price tag, and just laugh? That was me with the Anthropologie dried flower frames. Gorgeous? Yes. Worth the splurge? For me, not when I knew I could make my own.
So I did. And it got me thinking about all the ways I bring my garden indoors-not just in vases, but in projects that last. Pressed flowers. Dried arrangements. Frames like these. Welcome to what I’m calling my Garden-to-Home series, a collection of projects that start in the soil and end up on your walls, shelves, and tables. First up: DIY dried flower frames inspired by that Anthropologie beauty,
Garden to Home: Turn Your Dried Flowers Into Stunning Wall Art
This project started with a serious case of Anthropologie envy. Their dried flower frames are stunning. Their price tags? Less so. So I grabbed some bamboo stakes, a roll of chicken wire, and an armload of dried flowers from my garden, and I made my own.
Welcome to the first official project in my Garden to Home series: simple, beautiful ways to bring what you grow into the spaces where you live. Today we’re making dried flower frames with bamboo stakes, chicken wire, and flowers from my garden (plus a few store-bought favorites).
Here’s The Inspiration Pieces From Anthropologie:

Welcome! I’m Jennifer, and I’ve always believed nature is the most beautiful art supply. For years, I’ve been preserving New England’s blooms and foliage through pressing, drying, and crafting. Let me show you how to capture a little bit of the season and bring it indoors—simply and beautifully.
What You’ll Need
Here’s the thing I love most about this project: it’s cheap. Like, really cheap. And you might already own everything you need.
I picked up green chicken wire made for crafting; it’s way lighter and more flexible than the heavy-duty stuff from the garden center. Trust me, your hands will thank you.
For the frame itself, I used thin 18-inch bamboo plant stakes. But if you want a beefier, more substantial frame, just buy wider bamboo and cut it down. No rules here!
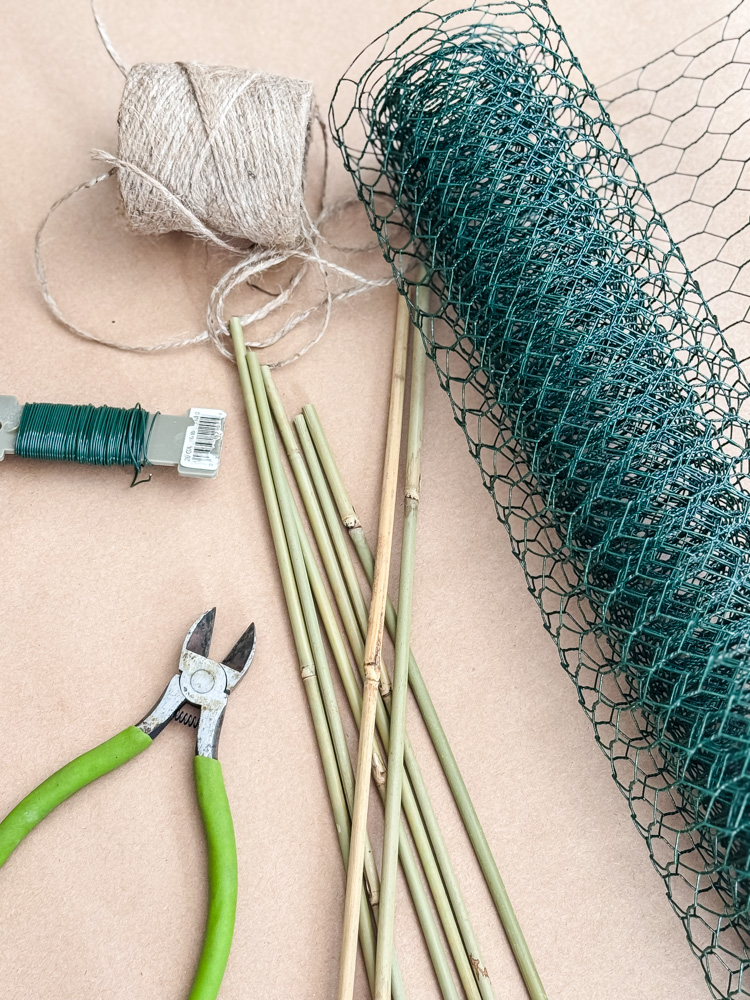
Materials for this Project
- 16-inch bamboo plant stakes
- Green crafting chicken wire
- Floral wire paddle (you want thin wire)
- Floral wire cutters
- Jute twine
- Hot glue gun
- Heavy book (for flattening chicken wire)
- Safety gloves (for handling wire)
- Assortment of dried flowers
Garden to Home
I’ve always believed the line between garden and home should be blurry. This series is all about crossing that line. Taking what grows outside and bringing it indoors in beautiful, lasting ways. New projects posted monthly.
Let’s grow together!
Step-By-Step Instructions
Now let’s get into the tutorial! First, we will go through the steps for making the chicken wire frames and then the fun part: decorating with dried flowers!
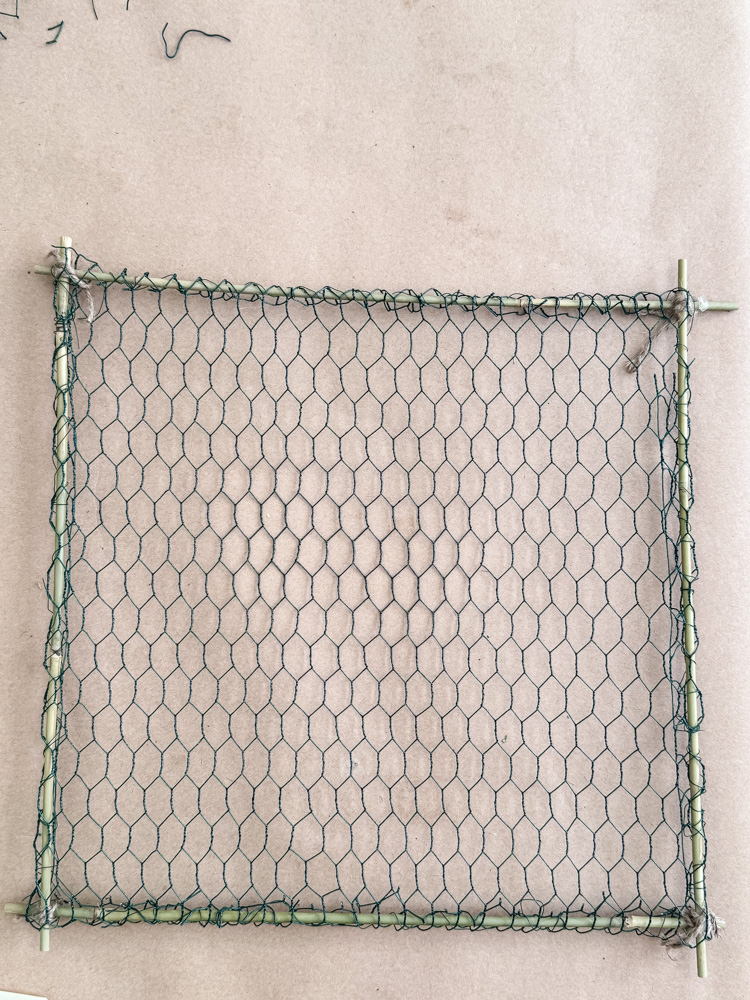
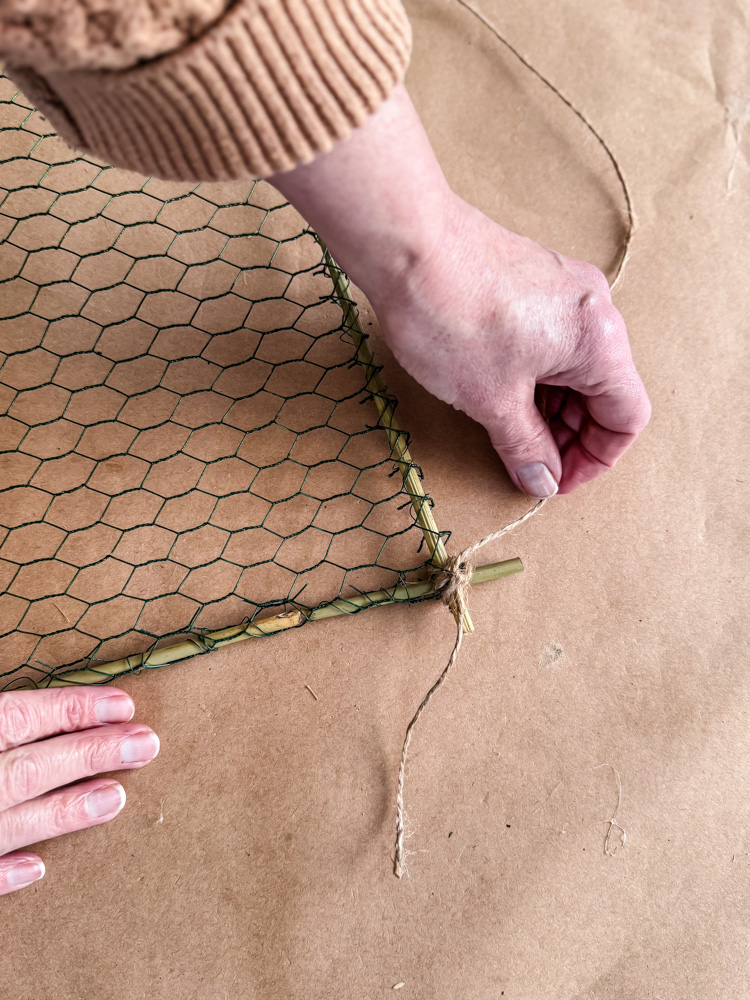
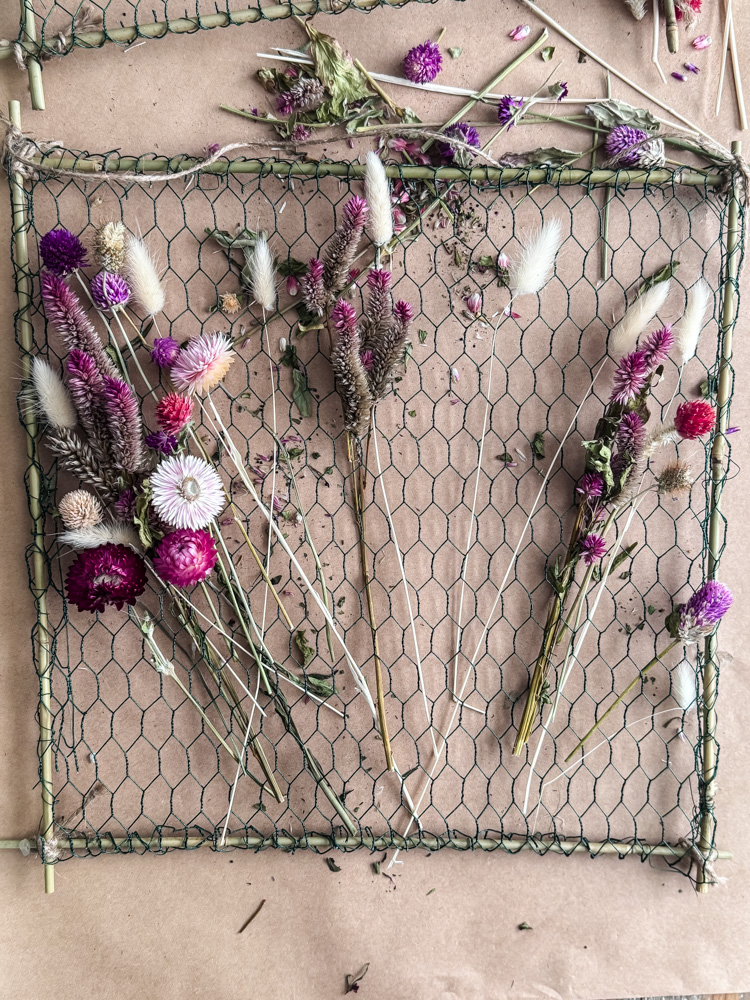
Step 1: Build Your Bamboo Frames
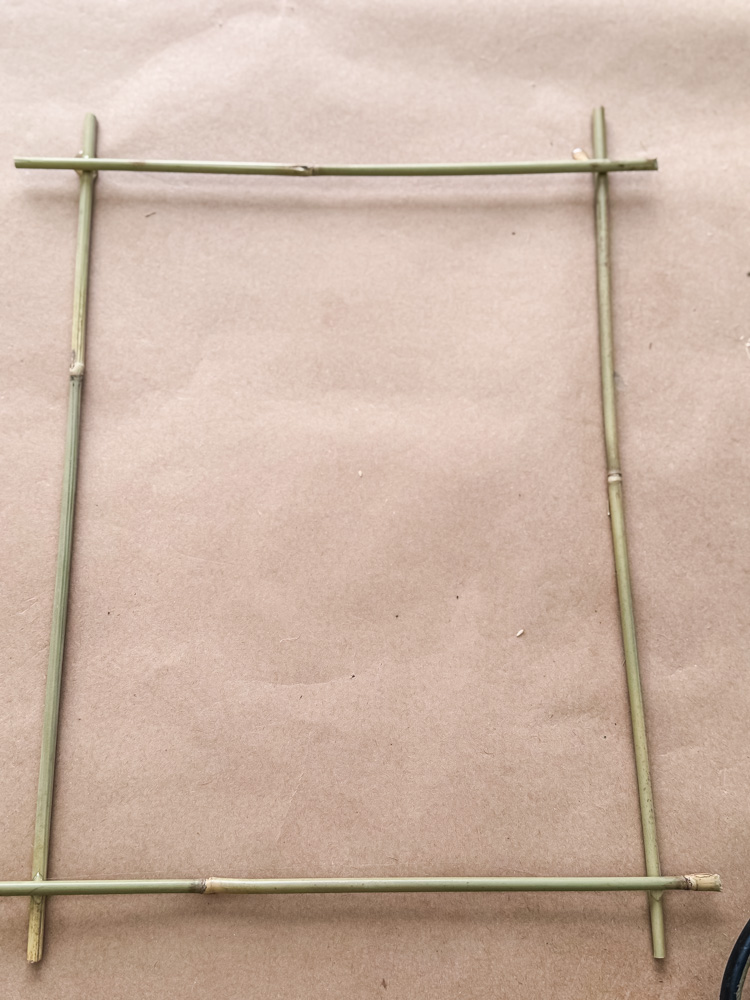
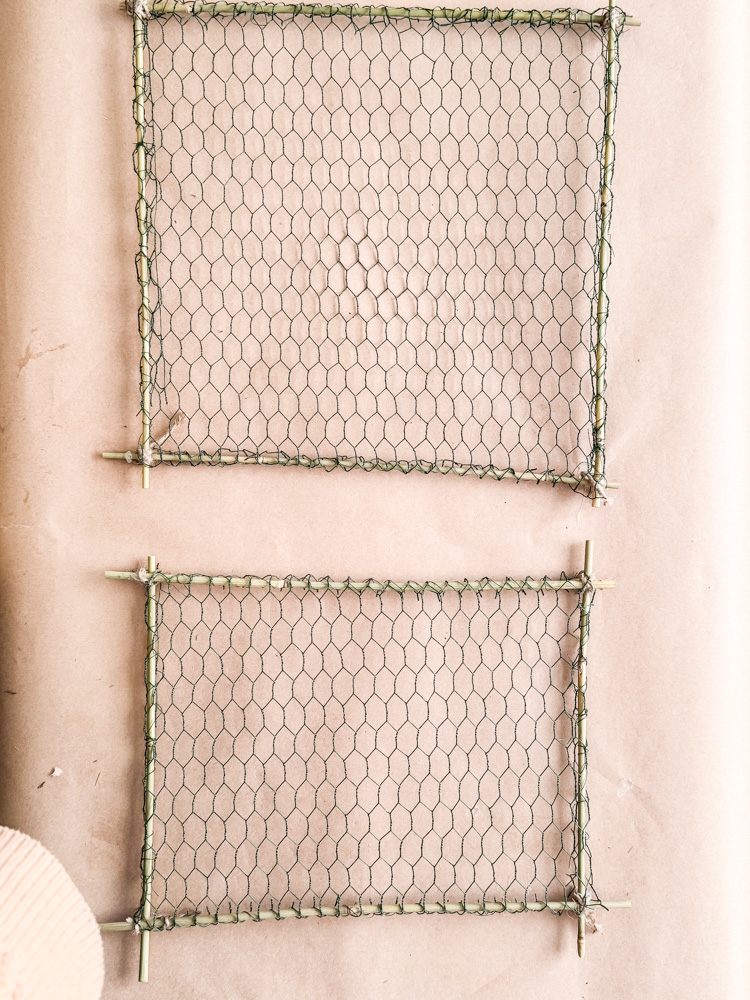
I started by creating two bamboo frames: one 16″ x 16″ square and one 16″ x 14″ rectangle. For each frame, I arranged four bamboo stakes into the shape I wanted.
At each corner, I applied a small dot of hot glue to hold the bamboo in place temporarily. Then, I secured each corner by wrapping jute twine around the joint in an X-pattern, pulling tight and knotting it off.
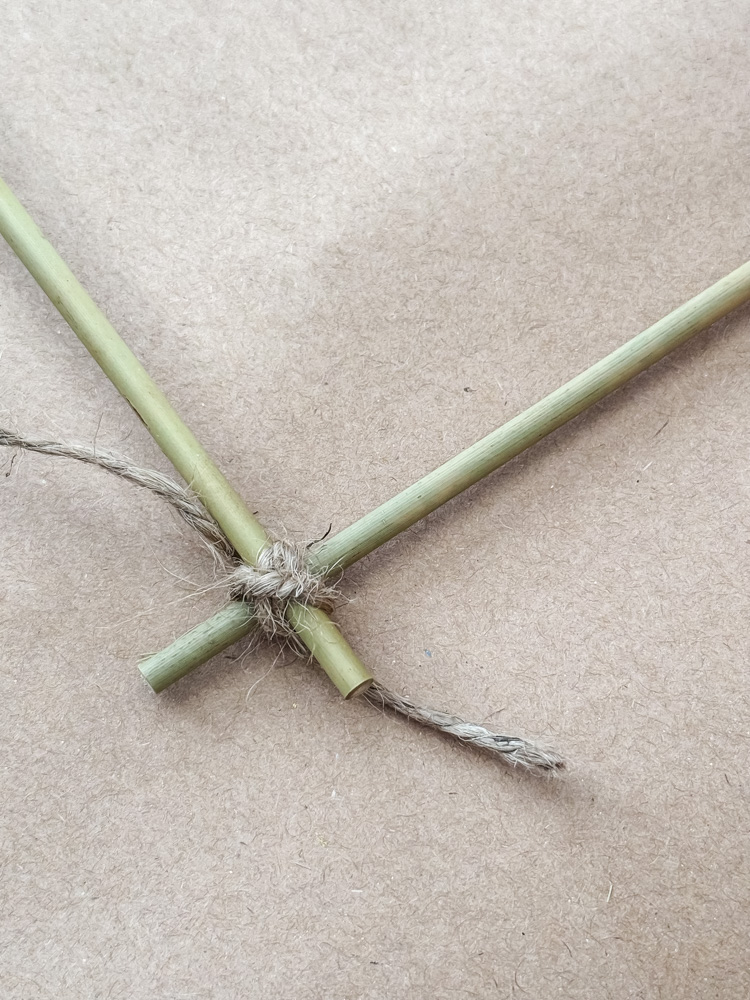
The hot glue just keeps things steady while you work-the twine does the real securing. (I learned this from trying it without gluing first, and the bamboo kept rolling away!)
- Arrange stakes into square/rectangular shapes
- Secure corners with a dab of hot glue to hold in place
- Wrap tightly with twine to reinforce
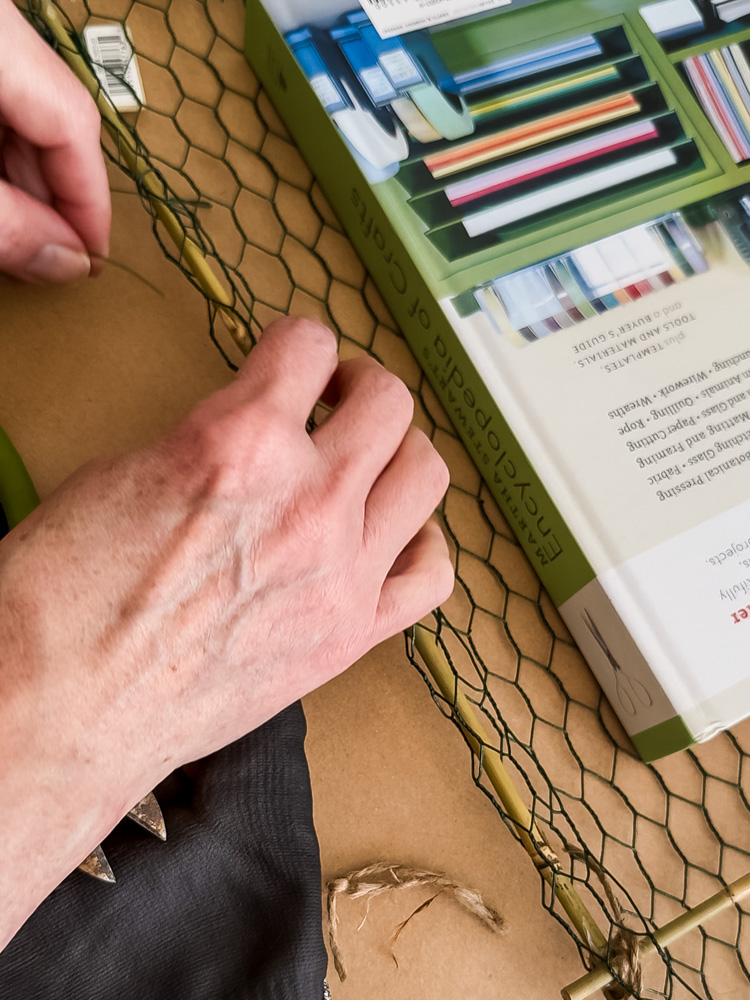
Step 2: Attach the Chicken Wire
This part looks trickier than it is! Here’s my method:
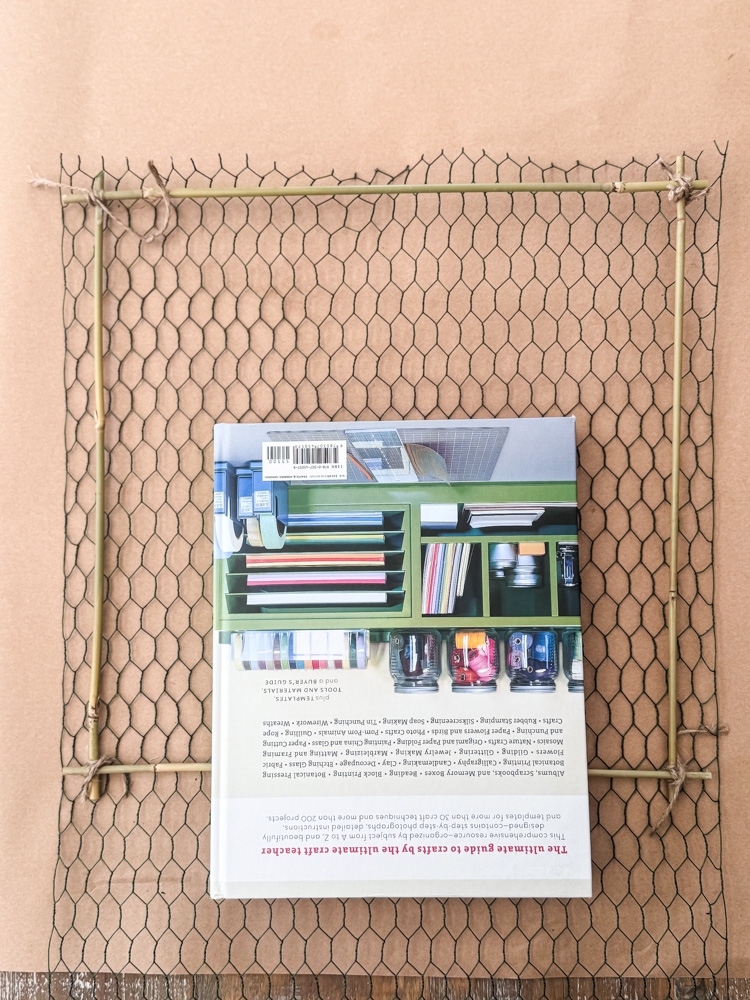
First, I unrolled the chicken wire and placed a heavy book on it to keep it flat. (Chicken wire has a mind of its own and wants to curl back up!)I laid my bamboo frame on top of the flattened wire, positioning it so there was about 1 inch of wire extending beyond the frame on all sides.
Safety first: Put on your gloves! Chicken wire edges are sharp.
Working one side at a time, I folded the wire edges over the bamboo frame, crimping it tightly around the wood. Think of it like wrapping a present-you want it smooth and secure.
- Flatten wire under a heavy book
- Place frame on top, bend edges over (wear those gloves!)
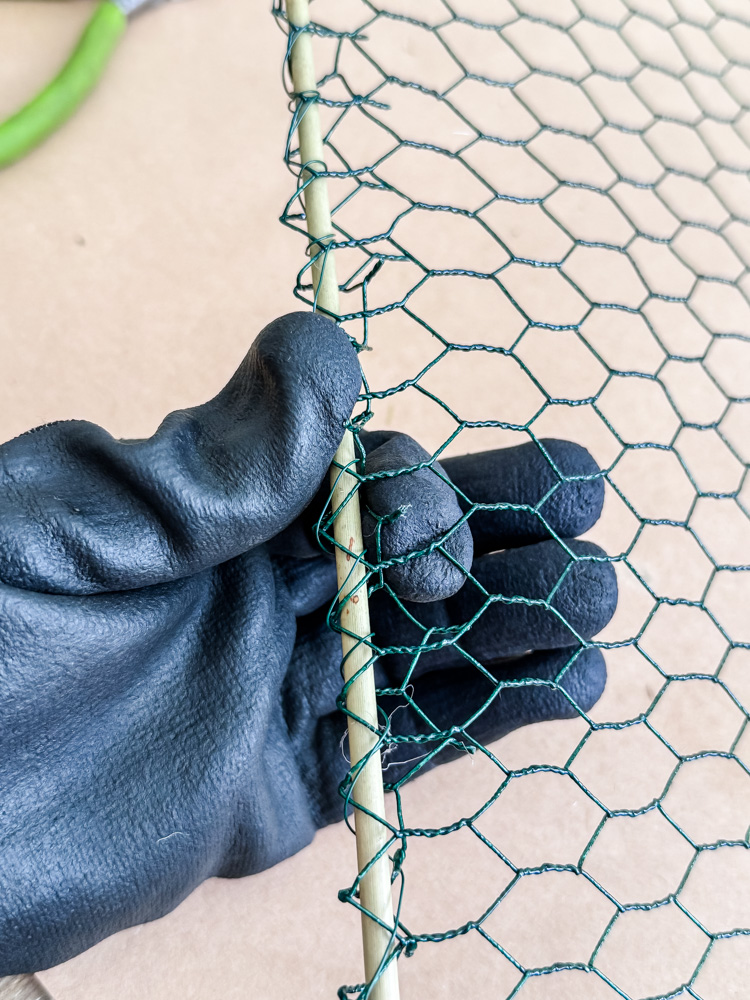
Step 3: Secure the Frame with Floral Wire
Once the chicken wire was folded over the frame, I needed to really lock it in place.
This is where the floral wire comes in. I unrolled a long piece of floral wire from the paddle. Starting at one corner, I wove the wire through the openings in the chicken wire and around the bamboo frame-almost like you’re hemming a pair of pants with a blanket stitch.
I worked my way around all four sides, keeping the wire taut. When I reached the end, I twisted it off and tucked the sharp end under so it wouldn’t poke anyone.
I put my gloves back on and gently flexed the frame—bending it slightly and then straightening it back out. This helps the chicken wire settle and lie flatter against the bamboo. The wire naturally wants to curve and buckle, so a little manipulation is needed. Don’t stress if it’s not perfectly flat-as long as the wire is taut and secure, you’re good to go!
Step 4: Add a Twine Hanger
Almost done with the frame! Now it just needs a way to hang.
For the hanger, I cut a piece of jute twine longer than the width of my frame, about 24 inches for my 18-inch frame. I tied each end securely to the top two corners, creating a loop for hanging.
Tip: The length of twine you need depends on how much ‘drop’ you want. A longer piece means the frame hangs lower from the nail. This will depend on where you are hanging it in your own home.
Filling The Frames
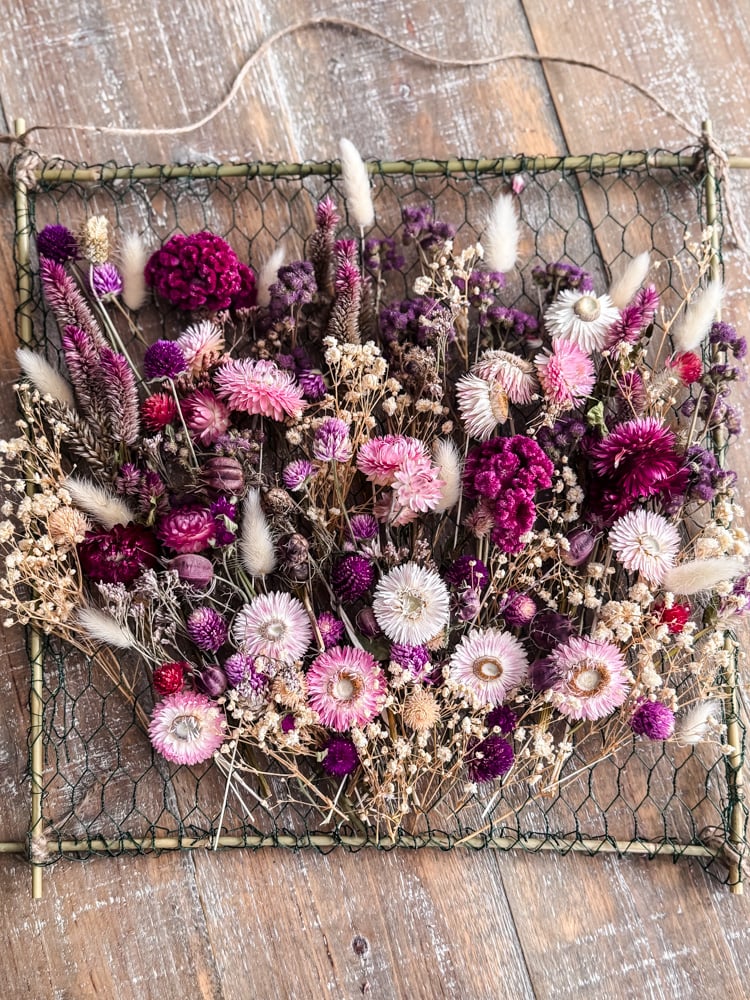
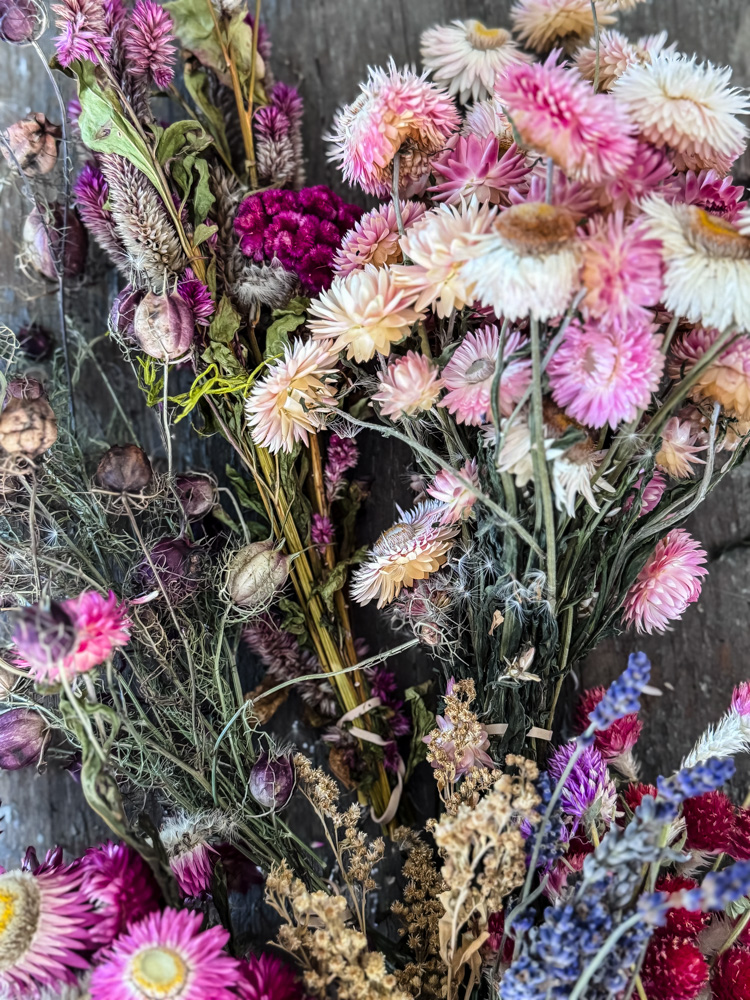
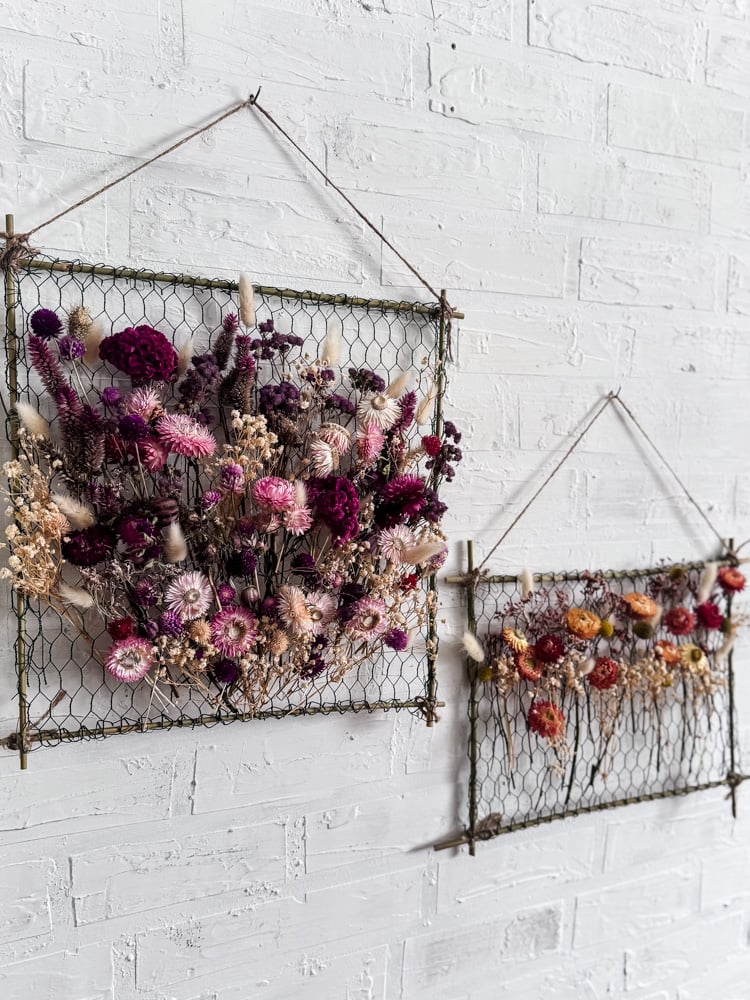
With the frames complete, now comes the best part: filling them with flowers! I used mostly blooms I grew and dried from my summer garden, strawflowers and gomphrena, along with some store-bought baby’s breath and bunny tails to fill things out.
But this is where you get to be creative! There’s no single right way to arrange these.
If you don’t grow your own flowers to dry, no problem. Craft stores, online shops, farm markets, and even some grocery stores carry dried florals. Pick colors and textures you love and make it your own.
Material List – Flowers
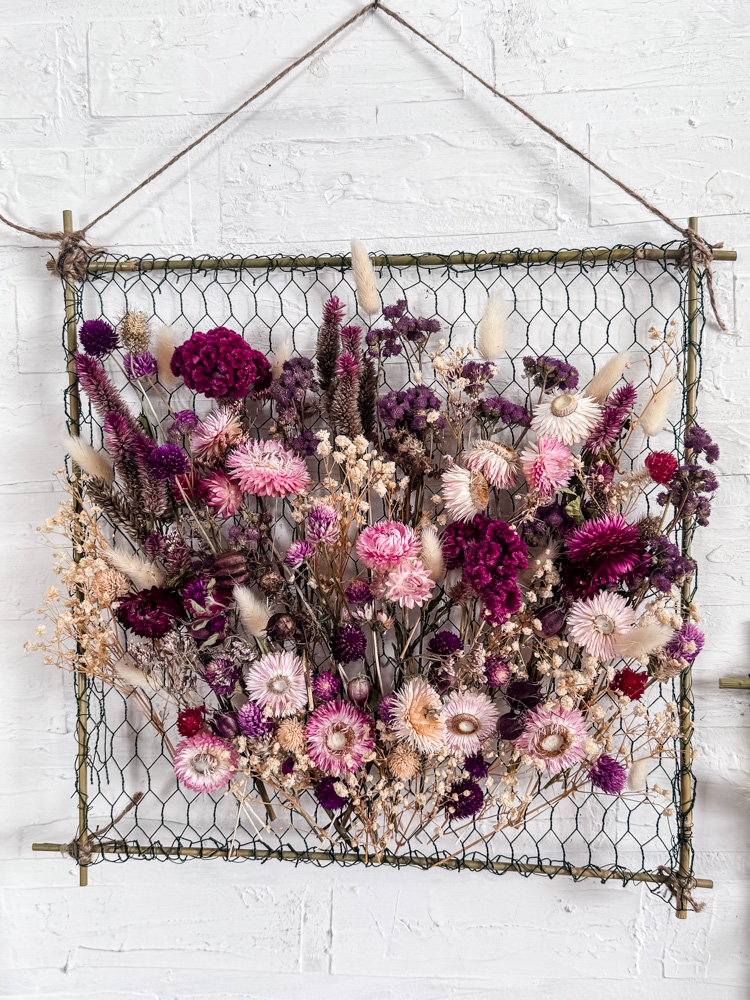
For the Large Square Frame (18″ x 18″):
- Pink, red, and white strawflowers (from my garden)
- Pink, purple, and white gomphrena (garden)
- Celosia (garden)
- Nigella pods (garden)
- Cream baby’s breath
- White bunny tails
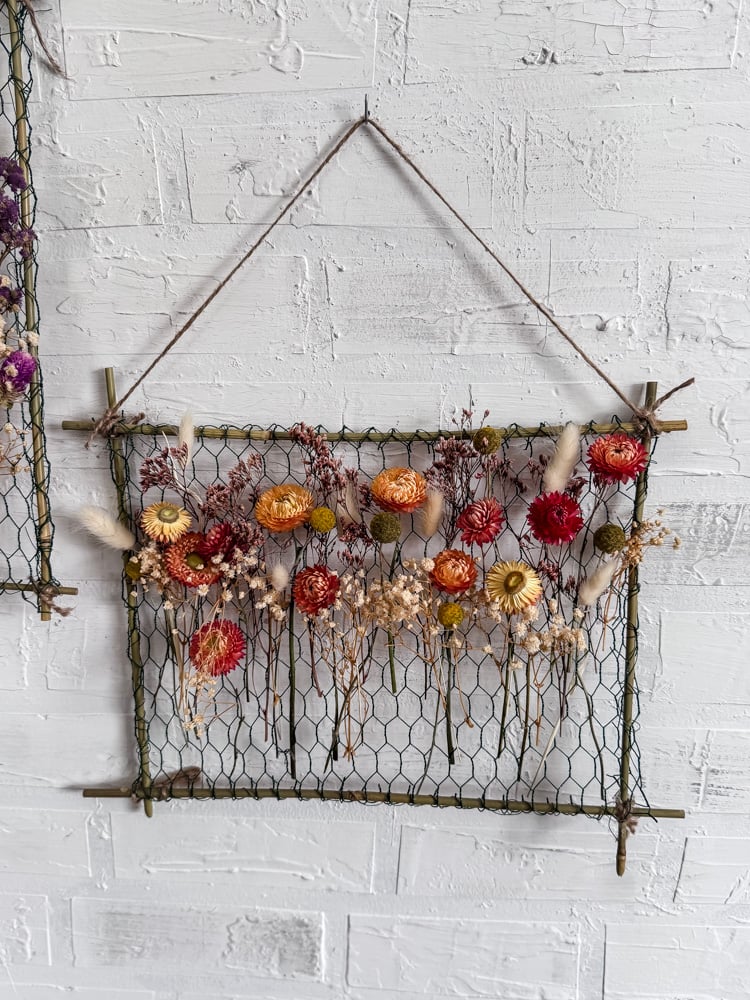
For the Smaller Rectangle Frame (18″ x 15″):
- Orange and yellow strawflowers (from my garden)
- Yellow drumstick flowers (garden)
- Cream baby’s breath
- White bunny tails
For The Large Square Frame
I went for a lush, romantic “bouquet” effect.
For this frame, I wanted a bold, romantic look using bright jewel-tone flowers: deep purples and vivid pinks—balanced with soft whites and creams to keep it from feeling too intense.
Here’s how I arranged them:
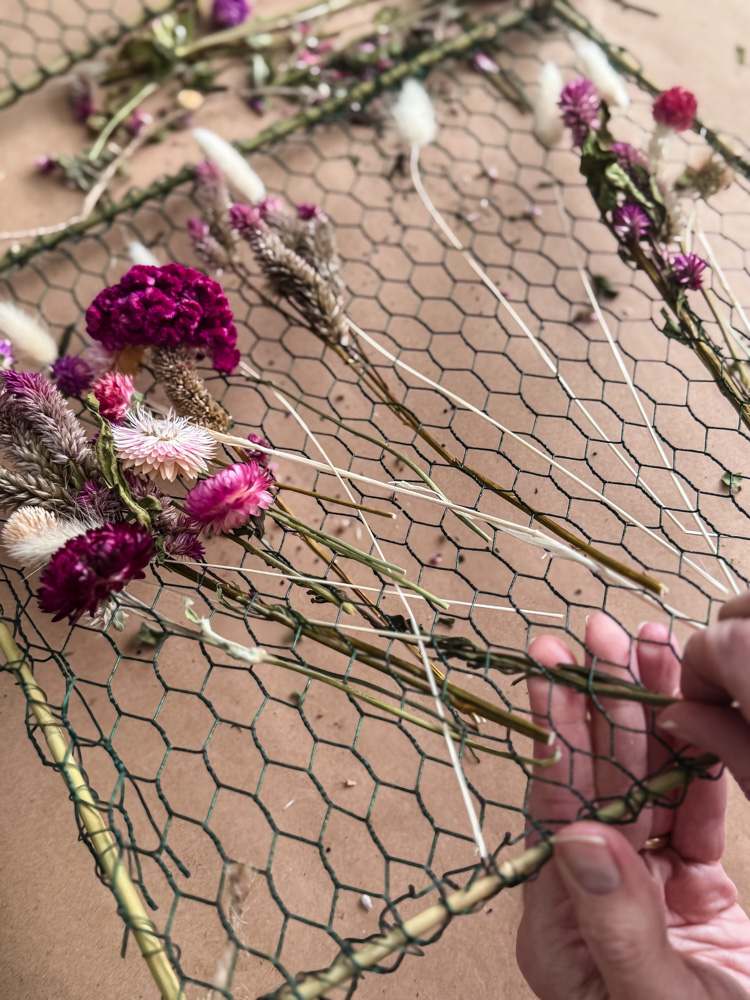
I worked from the front of the frame, placing each flower where I wanted it to sit. Then I pushed the stem end through one of the chicken wire holes to the back, pulling it gently until the flower head rested against the wire. This secures everything in place with no visible glue or ties-just flowers floating beautifully against the wire.
A word of warning (with a laugh): I got a little too aggressive on a few flowers while lacing them through and… well, let’s just say they were beheaded. It happens! Have some extra flowers on hand for when you get overzealous like I did. Trust me, you’ll thank yourself later!

I started on the left side of the frame and added my first cluster of flowers, then moved to the center, and then to the right, filling the top half of the frame first. Once I had that top layer established, I worked my way down, adding flowers slightly lower to create depth and dimension.
Here’s where those beheaded flowers came in handy! For the lower center section, I actually hot-glued some of the strawflower and gomphrena heads I’d accidentally snapped off earlier. They filled gaps beautifully without needing long stems.
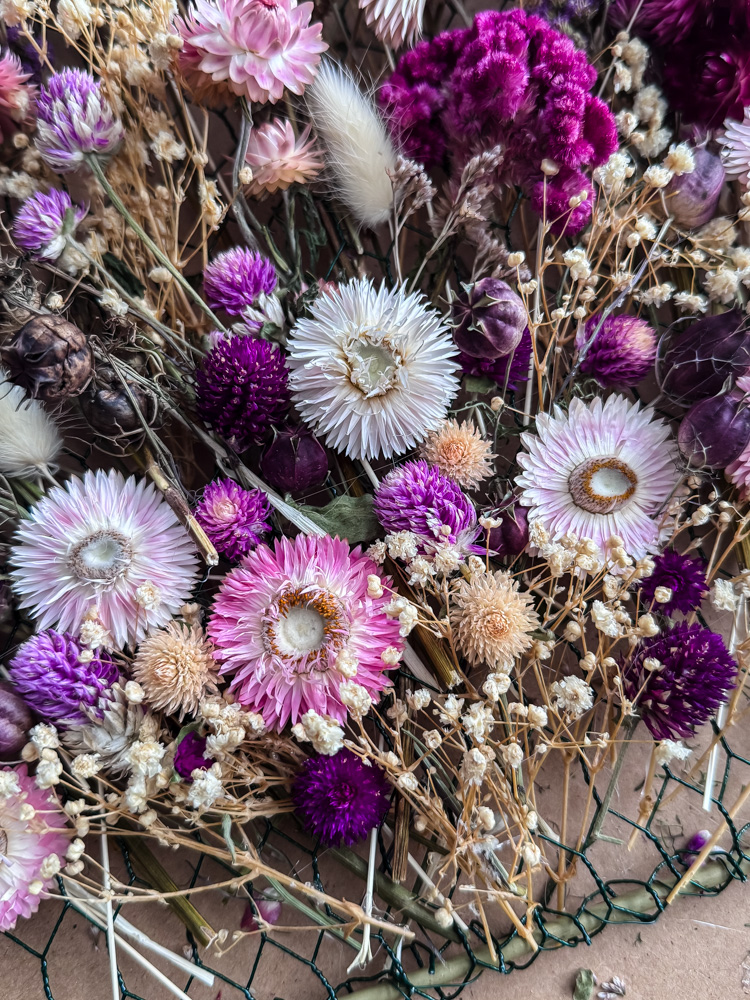
Finally, I tucked soft cream baby’s breath throughout the entire frame to fill in any sparse spots and add an airy, romantic feel.
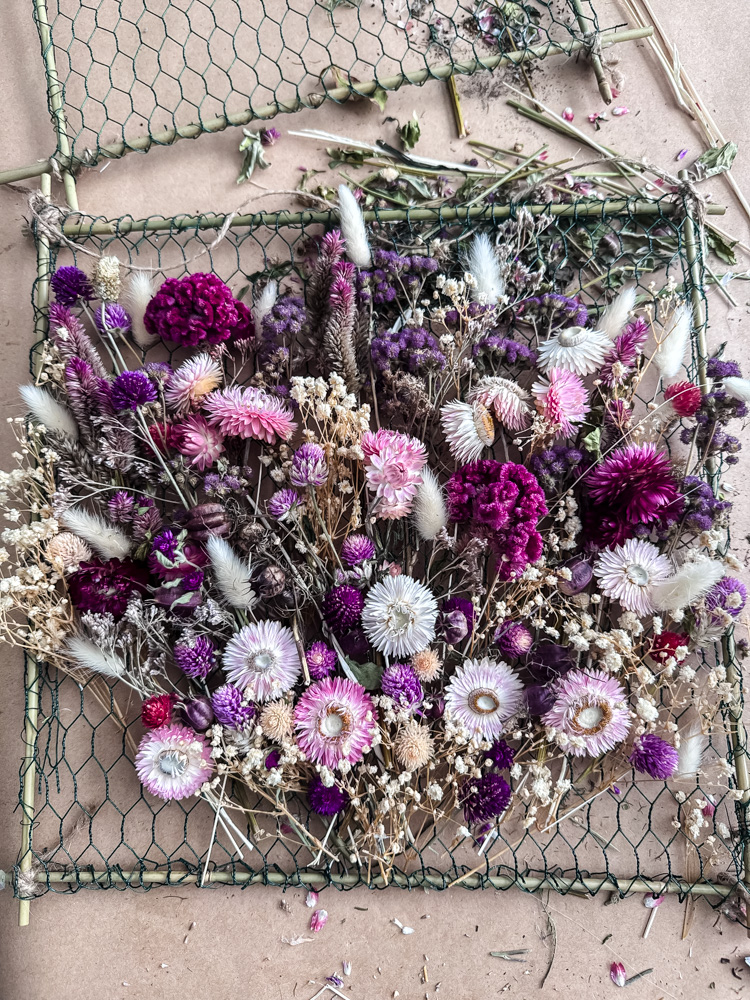
When you step back and look at it, it reads like a three-dimensional bouquet suspended in mid-air: lush, full, and layered.
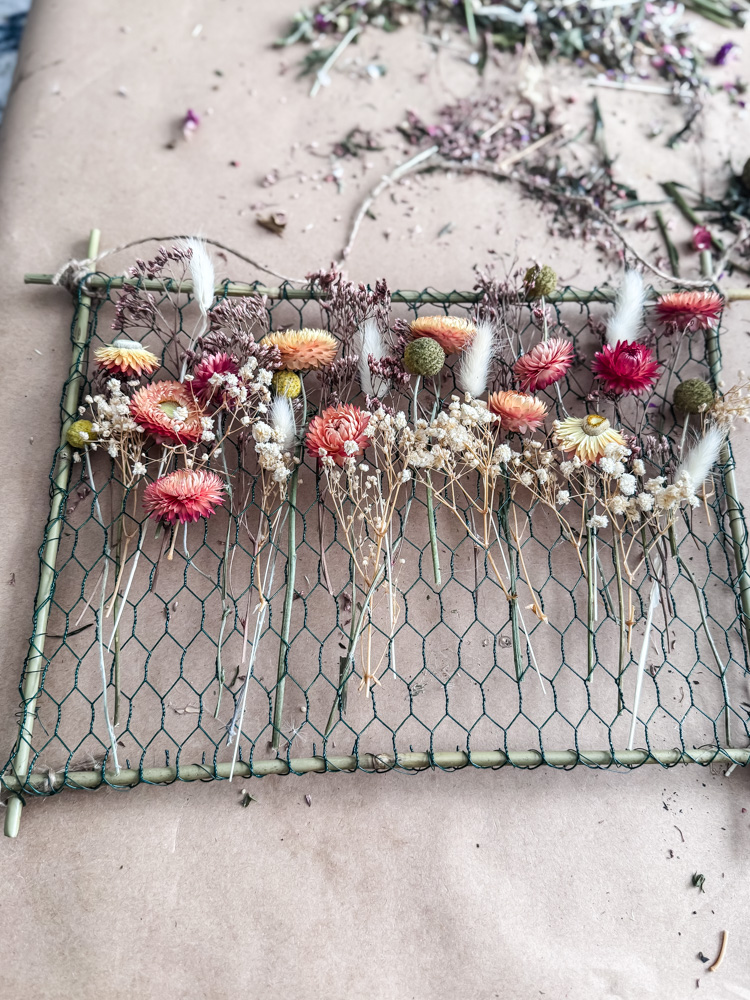
For the Smaller Rectangle Frame
I kept it simpler, like flowers growing in a garden bed
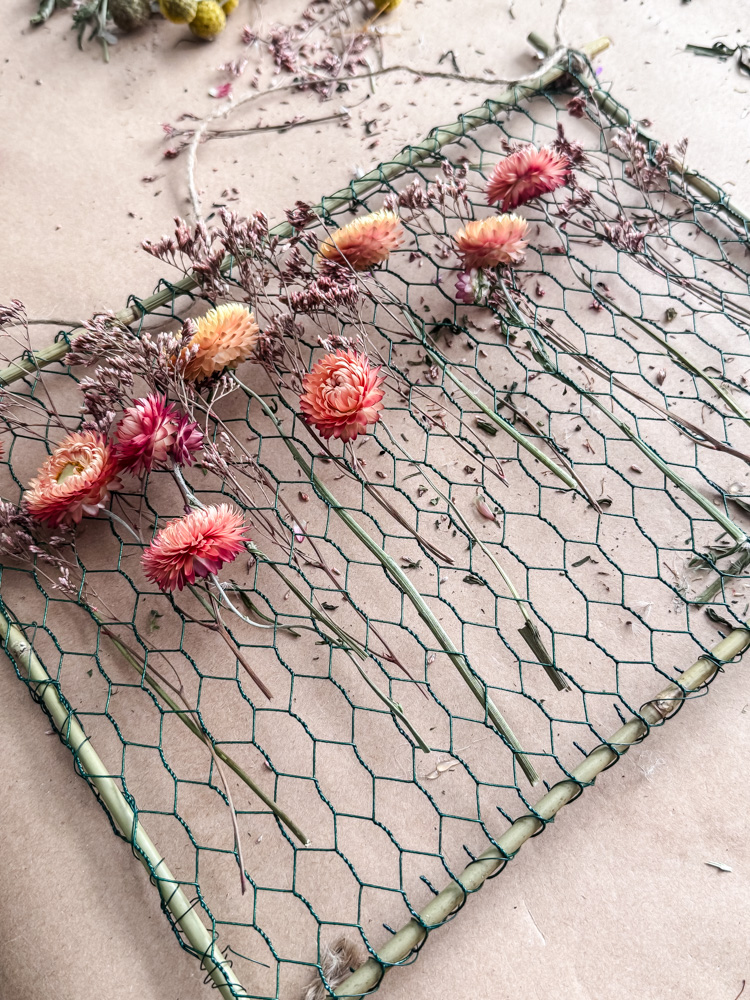
For the 18″ x 15″ rectangle, I went a completely different direction. Instead of a full bouquet, I created a simple row of flowers across the frame like a garden bed.
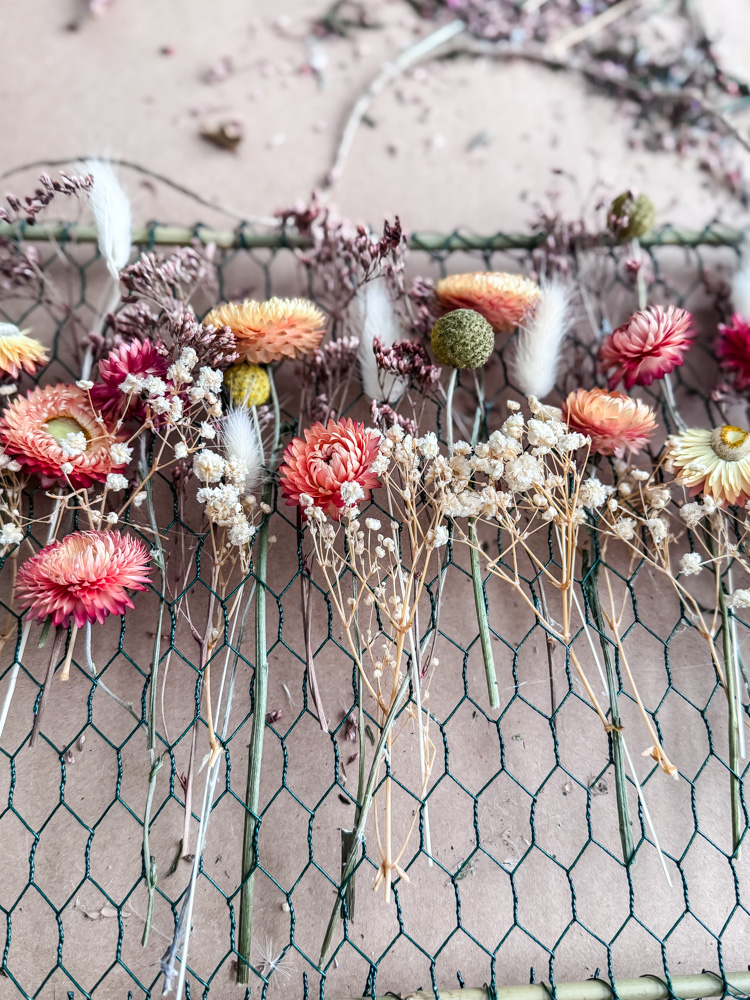
I started on one side and worked my way across, keeping the stems roughly at the same height and creating a horizontal line of blooms. This gave it a more minimalist, modern feel compared to the overflowing square frame.
This style uses fewer flowers, so if you’re working with a limited supply from your garden, this is a great approach!
Styling & Display Ideas
I hung the large square frame and the smaller rectangle on the corner leading into the living room. They add such a beautiful touch of nature to the wall, especially in late winter when I’m craving signs of spring!
Other ways to style these:
- Hang two or three in a gallery wall arrangement
- Lean a large one on a mantel or shelf
- Use smaller ones as seasonal decor (swap out flowers for fall, winter greenery, etc.)
- Gift them! These make incredibly thoughtful, handmade presents
Tips & Tricks
- Choose sturdy dried flowers. Delicate blooms might shed petals. Strawflowers, statice, and grasses hold up beautifully.
- Wear gloves when handling chicken wire. Those edges are sharp!
- Don’t overfill. The beauty is in seeing the individual stems and negative space.
- Customize your frame size. Want a 12″ x 12″ or a long horizontal? Just adjust your bamboo cuts!
- Artificial flowers work too! Have a stash of artificial stems? Try them instead of dried blooms.
COST BREAKDOWN
Let’s compare:
- High-end store version: $80-100+ for one frame
- My DIY version (for TWO frames!):
- Bamboo stakes: $7
- Chicken wire: $8
- Floral wire: $3
- Twine: $3
- Dried flowers from my garden/stash: FREE
- Total: About $21 for both frames
Now It’s Your Turn!
One of my favorite parts of having a cottage garden has been planting flowers with the intention of drying them to use for crafting and decorating. I planted most of the flowers you saw here last spring. Tiny seeds, barely visible in my palm. By July, they were blooming in the most vivid pinks and oranges I’d ever seen. I cut them throughout the summer, hung them to dry, and they’ve been there since last fall.
This is what Garden to Home is all about. Taking what grows and turning it into something that lasts.
If you don’t have dried flowers from your own garden yet, don’t let that stop you. Grab some from a craft store and start creating! But if you’re planning this year’s garden, consider planting a few varieties just for drying. It adds a whole new dimension to gardening when you know your flowers will live on long past frost.
Made your own dried flower frame? I’d love to see it! Email photos to cottageonbunkerhill@gmail.com to be featured in the Reader’s Spotlight.
xo, Jennifer
Love projects like this? Don’t miss out! Join my newsletter family for more cozy, budget-friendly DIY ideas delivered right to your inbox. You’ll get exclusive tips, early access to tutorials, and all the inspiration you need to make your home feel handmade and heartfelt.


I was so excited to come upon someone who loves dried flowers and their projects as much as I do! Reading this post and a bit about you made me want to sign up for your blog. Looking forward to your next post!
I’m so glad to hear that! I really love creating with flowers.
I like yours better than Anthropology. This harkens back to a hobby I shared with a friend or two in the 1970s. Time to get started again. ❤️