

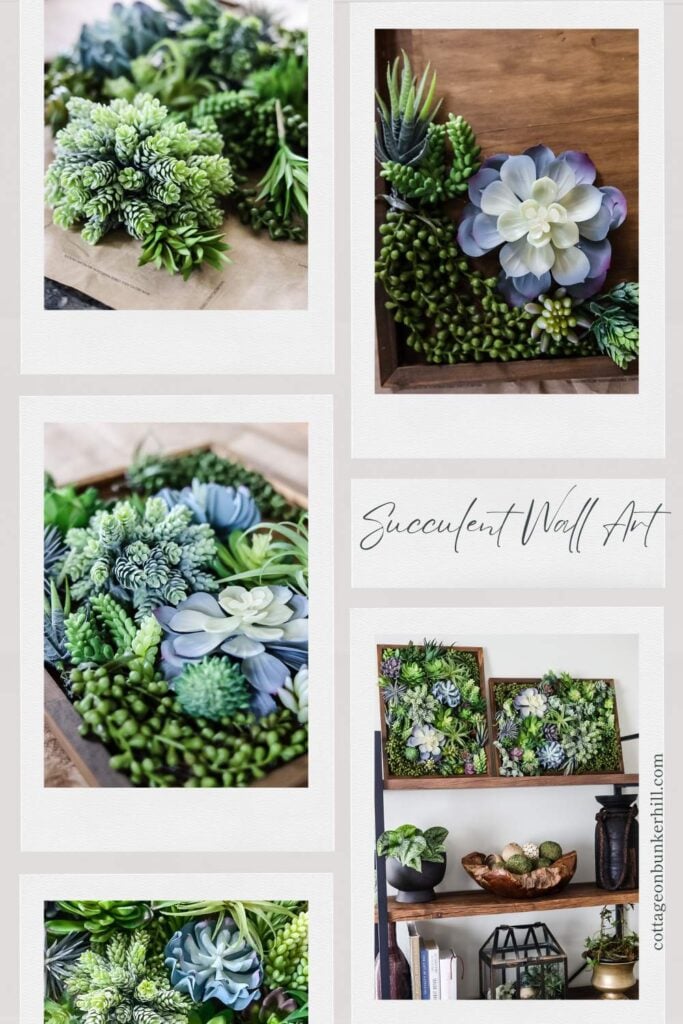
Here is the perfect project idea for adding a touch of green to your home even if you don’t have a green thumb. This DIY succulent wall art looks so realistic and it’s an easy project to make.
DIY Succulent Wall Art
Today I have the perfect project for adding a bit of biophilic design to your space.
Biophilic design is basically the concept of bringing the outdoors in and adding a few of those natural elements to your home. It is supposed to create a positive calming environment because we have a built-in connection to nature.
Even though this project uses artificial succulents it turned out so realistic looking and really adds that “wow” factor.
My inspiration for this project is the Pottery Barn succulent wall art that they have in the Summer catalog. Yes, they are gorgeous but the large one is $399! Way out of my budget.
So you know that I am going to come up with my own take on their art for a much smaller budget!!
INSPIRATION:

This post may contain affiliate links, which means I may earn a small commission if you make a purchase through my links, at no extra cost to you. Read my disclosure policy here.
Supplies for DIY Succulent Wall Art:
I’m going to be making 2 pieces of succulent wall art using 14×18 boards. This project would look great with smaller-sized boards too.
The other thing you will need is a few sets of artificial succulents. I ordered mine from Amazon because they had the best prices on them compared to the craft stores.
But I seriously underestimated how many I would need for the big frames I was using! The 2 frames I made have about 42 assorted succulents each.
There was such a variety of shapes and sizes in each of the sets. Here are the exact sets I ordered:
This project is more expensive to make compared to some of my other projects around here but still much more affordable than the inspiration art from Pottery Barn!
Stain or Paint Your Frames

The first step of this project is to stain the wood frames. For this type of project, I love the ease of the Varathane Less Mess Stain. Confession, I don’t like working with stain but this is super easy and has a sponge tip applicator…and doesn’t smell.
Both frames got a quick coat of dark walnut stain. Make sure to get the sides of the frames and the complete bottom board so that even if there is a small gap between succulents all you will see is the stain and not an unfinished surface.
No need to do the backs of the boards because no one will see them when they are hanging on the wall.
The Succulents


If you can work near an open window or leave the succulents in the garage to air out after you unwrap them I would, I thought that some of them had a strong plastic odor. When I made my first frame it was cold out so the windows were closed and the smell started to get to me, On the 2nd day I had the windows open and the odor didn’t bother me.
Gluing the succulents in place

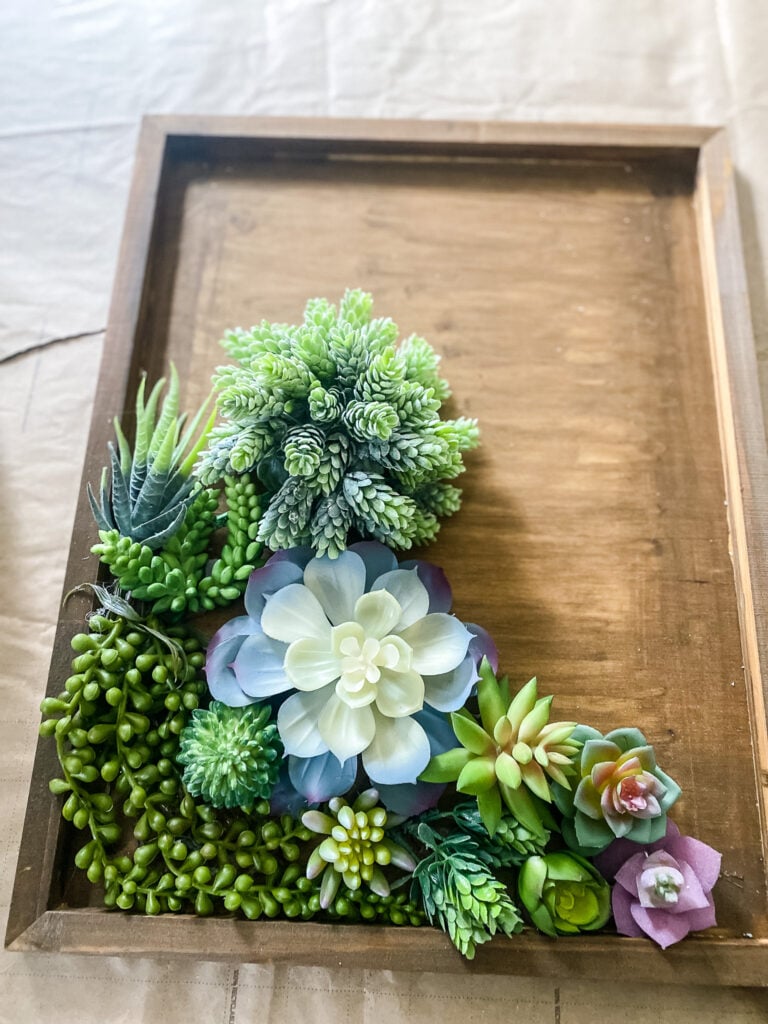
There was no particular formula I used as I started to hot glue all the succulents to the frame.
What I did was start in one corner and work my way up the frame. It involved a lot of playing around with the pile of succulents to see what seemed to go together visually.
For some of the succulents, I needed to cut off the stems on the back so I could glue them in place like this big one.
Also, I used a generous amount of hot glue to adhere them to the board. My go-to hot glue stick is Gorilla Glue. They are much stronger and more reliable than the store brand. Worth the cost difference, they have never let me down.

In opposite corners of the board, I used the string of pearls succulents to fill that space. The sets come with 2 of these and I really like how they look in the finished project.


Yes, on some of the artificial succulents I needed to cut the stems but for many of them I just left the stem in place and tucked it behind the other glued succulents.
Tips for Arranging the Succulents

As I worked my way out from the corner of the board I started filling up the side and across with succulents. So the succulents fanned out as I kept gluing them onto the board.
It seemed to make the workflow go more smoothly than if you just filled the entire bottom and then did another row.

Also, you are going to want to tuck the succulents in closely together. As I went along I just varied the shapes, colors, and styles of the succulents to create a really spectacular look…just wait!
The air plant looks so cool glued on the frames. It sits higher than some of the other succulents, wish the sets had more of them because I love how they look!

Make sure you have plenty of glue sticks for this wall art project! I felt like I was constantly adding a new one to my glue gun!

The key to this wall art is to make sure the succulents are really snuggled together.

There were a couple of empty spots so I snipped a small piece off of one of the extra string of pearl plants and hot glued it in whatever shape I needed to hide the hole (each set had 2 so I have extras after I made these).

Here is the finished first frame that I made. It looks so realistic in person!
Making the Second Frame
OK, now. for the second piece of succulent wall art, I wanted something to compliment the first one but look slightly different.

Since I’m using the same sets of succulents for both frames I have doubles of the artificial plants.
So I just arranged them all in a different way.

But I still did the string of pearls in the top right and bottom left corners of the frame like the first frame I made.
DIY Succulent Wall Art- Finished

I’m still debating where I am going to hang them up! I’m torn between my office and a wall in the living room.
I’m leaning toward my office because they would make such a good background for when I am on video calls!
But I have to say I really love how this project came out! You never know for sure when starting a project how the finished piece will turn out but I think this succulent art looks amazing…I seriously can’t stop looking at it!!
Hanging Tips

For hanging I would recommend attaching 2 heavy-duty D-ring picture hangers, one on each top corner. Then hanging the frames using monkey hooks.
My other suggestion would be to use the Command large picture hanging velcro strips, a set on each corner. But they only work on smooth walls.
The wall art is heavy because of the weight of all the succulents so I would not suggest a sawtooth hanger for these.
See your projects featured! If you are inspired by this or any of my other DIY projects, I would love to see them and add you to the Reader’s Spotlight gallery. Send a photo to me at jennifer@cottageonbunkerhill.com
xo, Jennifer

fake it ’til you make it
17 Pottery Barn
Inspired DIYs
DIY Succulent Wall Art
What I Used

PIN FOR LATER!
More Diy Project Ideas


DIY Succulent Wall Art
Here is the perfect project idea for adding a touch of green to your home even if you don't have a green thumb. This DIY succulent wall art looks so realistic and it's an easy project to make.
Materials
- Wood Board Art Frames (2) 14x18
- Artificial Succulents
- Hot Glue Gun
- Stain or Paint
Tools
- Hot Glue Gun
Instructions
- Stain or paint the wood board frames
- Hot glue the succulents to cover the entire board
- Trim off the stem from the larger succulents but for smaller ones, you can bend the stems and hide behind other succulents to save time.
- It took about 42 succulents for each frame, but it will depend on your size.
- Repeat on the second frame but glue the succulents in a different pattern.
- To hang I recommend heavy-duty D-ring picture hangers, one on each corner
Recommended Products
As an Amazon Associate and member of other affiliate programs, I earn from qualifying purchases.
-
Gorilla Hot Glue Sticks, Full Size, 4" Long x .43" Diameter, 45 Count, Clear, (Pack of 1)
-
Gorilla Dual Temp Full-Size Hot Glue Gun, Orange
-
Varathane Less Mess Wood Stain and Applicator, 4 oz, Dark Walnut
-
Unfinished Birch Wood Canvas Panels Kit, Falling in Art 2 Pack of 14x18 Studio 3/4 De...
-
Winlyn 19 Pcs Assorted Artificial Succulents Plants Unpotted Small Green Aloe Hops Cactus String ...
-
caqpo Artificial Succulents


These are absolutely stunning, Jennifer! I couldn’t stop staring at them during our call yesterday. We’re sharing this on our roundup on Sunday! Cheers!
Thanks so much!!
Jennifer,
This turned out so great. I love it, and I’m sharing it tomorrow. You go girl.
You’re the best!
These turned out beautifully. I would love to share this on my newsletter next week. Hugs to you, my friend.
Would love that!
I love the color it adds to the room.
Thanks, Tammy!!
Just an amazing job friend! Yours is better than the original!😍