• Home
  • Blog
  • Meet Jennifer
    • Meet Jennifer Howard
    • Work With Me
    • Disclosure + Privacy
    • Contact
  • Shop
  • Nav Social Icons

  • Skip to primary navigation
  • Skip to main content
  • Skip to primary sidebar
  • Skip to footer
  • Home
  • Blog
  • Shop My Favorites
  • DECORATING
    • Decorating Tips & Tricks
    • DIY Decorating Projects
    • High End Dupes
    • Thrifting
    • Home Tours
    • Wreaths
    • Spring & Easter Ideas and Projects
    • Summer Decorating and Projects
    • Fall Decorating Ideas & Projects
    • Christmas Decorating Ideas & Projects
    • Shopping
  • GARDENING
    • Flower Gardening
    • Gardening Project Ideas
    • Vegetable Gardening
  • LIFESTYLE
    • Weekly Rewind
    • Recipes
    • Around New England
    • Visiting Magnolia
  • Meet Jennifer
    • Work With Me
    • Contact
    • Disclosure + Privacy
  • Mobile Menu Widgets

Cottage On Bunker Hill

Cottage On Bunker Hill

Home & Garden in New England

  • LIFESTYLE
    • Weekly Rewind
    • Recipes
    • Around New England
    • Visiting Magnolia
  • DECORATING
    • High End Dupes
    • Decorating Tips & Tricks
    • DIY Decorating Projects
    • Thrifting
    • Wreaths
    • Shopping
    • Home Tours
    • Spring & Easter Ideas and Projects
    • Summer Decorating and Projects
    • Fall Decorating Ideas & Projects
    • Christmas Decorating Ideas & Projects
  • GARDENING
    • Flower Gardening
    • Gardening Project Ideas
    • Vegetable Gardening
    • Grow With Me Gardening Series
  • Home
  • Blog
  • Meet Jennifer
    • Meet Jennifer Howard
    • Work With Me
    • Disclosure + Privacy
    • Contact
  • Shop

Bedroom Makeover

In: Decorating Tips & Tricks, DIY Decorating Projects

I recently gave our room a bedroom makeover. I had a dated cherry sleigh bed and matching bureau/dresser. In my last DIY I showed you how I updated my husband’s bureau. You can see that DIY here .

Now I moved on to my dresser. I wanted a white, pretty cottage look ( I refinished my husband’s in a gray more modern look).

Bedroom Makeover
BEFORE

My first step was to paint the dresser with two coats of white chalk paint, letting the paint dry completely between coats. I removed all the wooden knobs before painting the drawers-all 22 of them!

After the white chalk paint was completely dry I wanted to add a bit of color and texture to my now white dresser. I used dark gray and silver chalk paint.

Bedroom Makeover
GRAY AND SILVER CHALK PAINT

I used a dry brush technique. When you dry brush paint you dip your brush into the paint and then remove all the excess paint from your brush.

Bedroom Makeover
DRY BRUSH TECHNIQUE

**I like to use a paper towel and do a few quick brush strokes to remove the extra paint.**

I went over the dresser with the gray paint first then the silver. The gray really picked up the details on the corners and edges.

When you dry brush it adds color in a subtle way because there is just a light coat of paint being applied.

GOING OVER THE DRESSER WITH THE SILVER CHALK PAINT

I loved working with a metallic chalk paint- it added such a pretty shimmer and a little glam to my dresser without being overwhelming.

**Keep your brush strokes going with the grain of the wood and in a straight motion**

When all the paint had dried I used a fine grit sandpaper to distress. I focused on the edges and corners to bring out the details of the dresser.

I wiped off the dresser with a microfiber cloth to pick up all the dust from sanding.

**I applied a coat of a clear protector to the dresser because it was going to get daily use.**

Glass Knobs

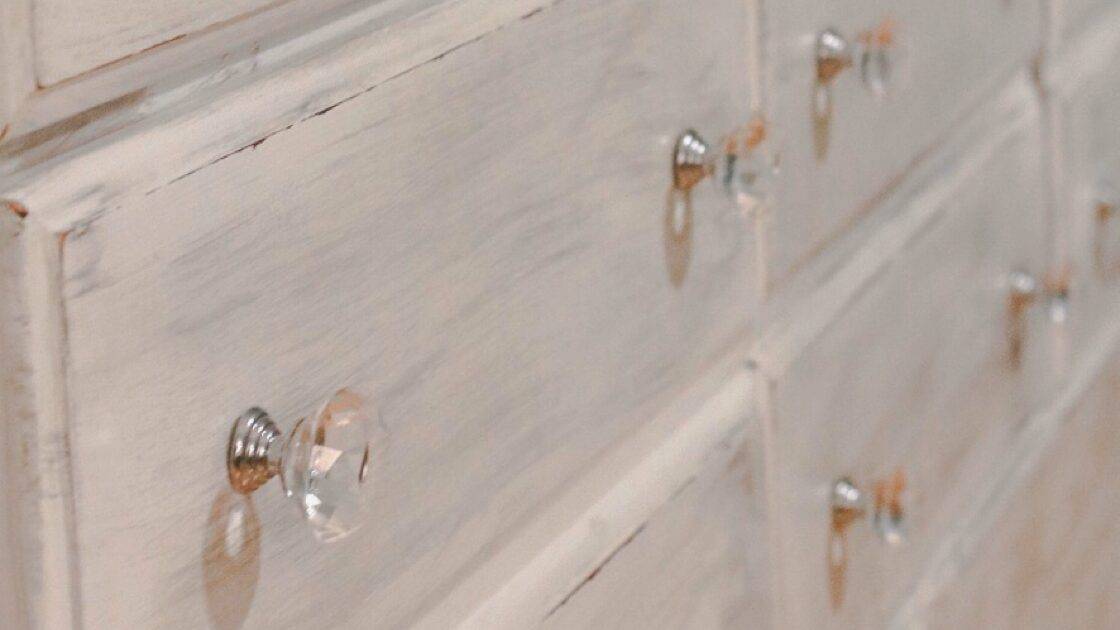
I found these little glass knobs on Amazon-they have a huge selection of drawer knobs and pulls. Their prices are great too, especially since I needed 22 knobs for this project.

DIY Dresser Makeover

Here’s my finished dresser after I put on all the knobs; isn’t it much prettier than before??

I ditched our sleigh bed and updated it with this elegant upholstered headboard to complete my bedroom makeover.

My finished room. Since this picture, I mounted the TV on the wall…I live in a house full of teenage boys & a husband and need somewhere to escape and watch Hallmark movies and HGTV😀.

Here is a view of the other side of the bedroom.

I hope I gave you some encouragement to save your own dated furniture-it’s really is amazing what a little paint can do!!

By: Jennifer Howard · In: Decorating Tips & Tricks, DIY Decorating Projects · Tagged: diy

you’ll also love

moss mushroom on trayEasy to Make Moss Mushrooms
wedding keepsake shadowboxHow to Dry Flowers & Projects You Can Make
mushroom print in vintage gold frameHow to Paint Black Picture Frames to Look Vintage

Reader Interactions

Comments

  1. Pat Johnson says

    October 31, 2021 at 8:51 am

    Love your updated bedroom. It’s a lot cheaper than buying all new furniture. When my husband and I were younger, we did a lot of refinishing of antiques. I still have a few of my favorites. I have always loved decorating the many homes we have lived in. Glad you are still able to enjoy your hobby of creating new things. I’m looking forward to seeing what you’ll make for Christmas.

    Reply
    • Jennifer Howard says

      November 2, 2021 at 12:37 pm

      Thank you Pat! It’s cheaper plus the furniture was made so much better!! It’s hard to found solid wood dressers anymore unless they are used!

      Reply

Leave a Reply Cancel reply

Your email address will not be published. Required fields are marked *

Next Post >

DIY | Dresser Makeover

Primary Sidebar

Search

Catagories

Behind the blog

Behind the blog
Meet Jennifer

Hey friends, I'm so glad you are here! I'm a life-long New England gal who started Cottage On Bunker Hill as a hub to share all my DIYs, decorating ideas, budget shopping ideas and so much more!!

About Me

Stay Connected!

Get The Latest

See Me In The October Issue!!

Footer

Categories

Archives

 •••Cottage on Bunker Hill does not accept guest posts and I only link to sites that I find myself. No need to email me with requests•••

COPYRIGHT CONTENT PERMISSION

All images and tutorials on this blog are copyrighted material.

I’m happy to allow you to use ONE photo with appropriate credit and link back to cottageonbunkerhill.com

Please contact me if you would like to use any media, tutorials, or ideas from this blog.  Contact Jennifer via email: jennifer@cottageonbunkerhill.com

FEEL FREE TO PIN AWAY! IT’S APPRECIATED!

Cottage On Bunker Hill is a participant in several affiliate programs including the Amazon Services LLC Associates Program, an affiliate advertising program designed to provide a means for sites to earn fees by linking to Amazon.com and affiliated sites. For more information, see full disclosure statement (here)

Copyright © 2023 · Theme by 17th Avenue