
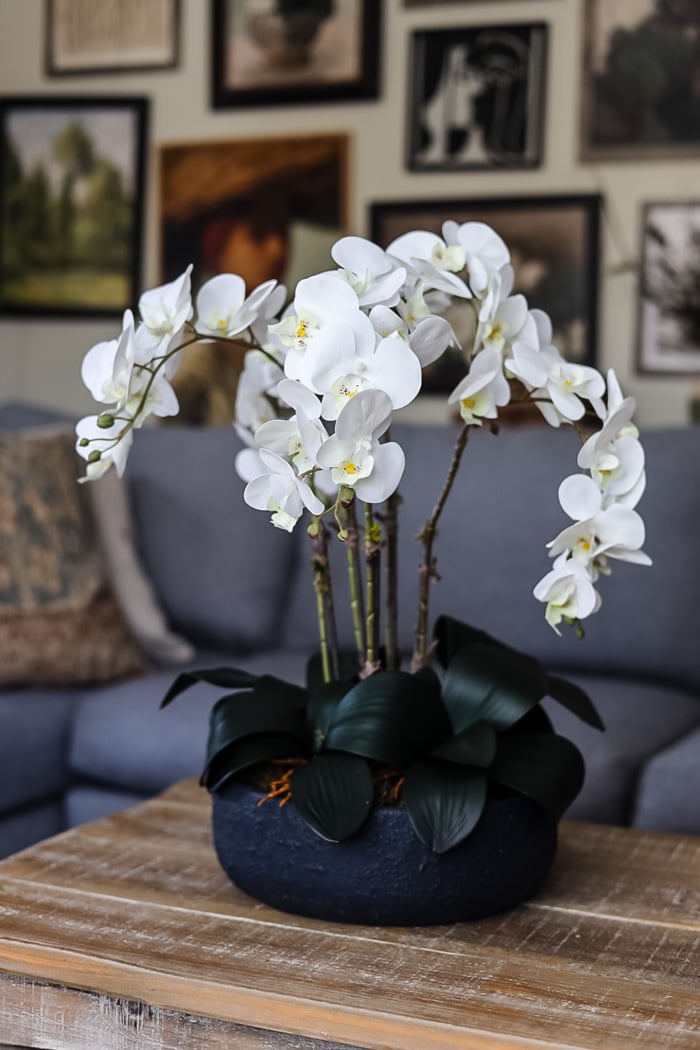
Want the luxe look of faux orchid arrangements like Pottery Barn, Ballard Designs, and Williams Sonoma without the $400 price tag? I’ll show you how to create a stunning DIY version—complete with a thrifted planter makeover!
High-End Spring Decor for Less: DIY Orchids & Stone-Textured Planter
This Spring, I’ve been swooning over the gorgeous faux orchid arrangements from high-end retailers like Pottery Barn, Ballard Designs, and Williams Sonoma. Their lush, elegant displays are absolutely stunning—but with price tags ranging from $300 to $450, I knew I had to find a more budget-friendly way to bring this luxurious look into my home. So, I decided to create my own DIY faux orchid arrangement, complete with a thrifted planter makeover, for under $30 (if you don’t have all the materials on hand yours will cost a little more but still way less than $400!!)
The best part? I transformed a plain white planter bowl from the thrift store into a chic, stone-textured masterpiece using a simple technique I’m excited to share. Paired with affordable faux orchids, this project delivers the same high-end vibe as the catalog versions—without the designer price tag. Today, I’m walking you through every step, from the planter makeover to arranging the orchids, so you can create your own stunning Spring centerpiece!

This post may contain affiliate links, which means I may earn a small commission if you make a purchase through my links, at no extra cost to you. Read my disclosure policy here.
Materials for this Project
- Faux orchid stems (I ordered this set of 5 from Amazon for $23)
- Large planter bowl (thrifted for $5)
- Floral foam block (Amazon or any craft store)
- Brown floral tape (Amazon or Michael’s)
- Floral stakes (I had these on hand)
- Raffia ( Amazon or Dollar Tree I’m using brown)
- Variety of moss (I used green moss and Spanish moss)
- Scissors or wire cutters
- Hot glue gun (optional, for securing foam)
DIY Stone-Textured Planter Makeover
I found this large planter bowl at the thrift store for just $5, but it needed a little love to match the high-end look I was going for. I decided to try a new technique to give it a stone-textured finish, and I’m thrilled with how it turned out! Here’s how I did it:
Materials for DIY Stone-Texture
- Planter
- Mod Podge
- Sand
- Foam Brush
- Optional: Clear Top Coat(or a coat of Mod Podge) to Protect
Creating the Stone Texture Effect
Check out the photo gallery below to see step-by-step photos of how I created the stone-textured effect. While I’ve used spray-can stone finishes in the past, I think this method looks even more authentic—and it’s much more affordable than the $20 spray paint option!


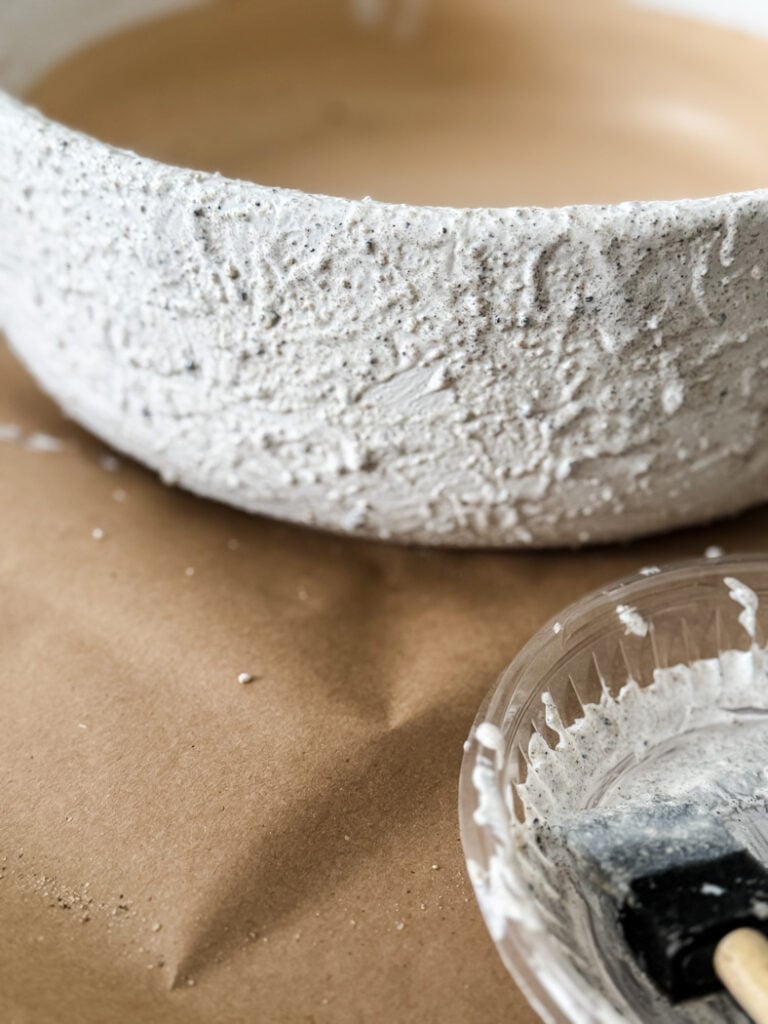


- Mix the Texture: Combined Mod Podge and play sand in a bowl. Stir until you have a thick, gritty mixture
- Apply the Mixture: Use a foam brush to apply the mixture to the planter first I brushed on a thin, even layer, then I went over the planter again dabbing the mixture onto the planter. This builds the texture. Let it dry completely (I left mine overnight).
- Paint: Once dry, paint the planter with a dark navy/black chalk or matte paint. I was inspired by Pottery Barn’s new Spring collection, and this color is perfect for the season.
- Seal: This step is optional but I would suggest a matte top coat or even another coat of matte Mod Podge to seal the paint.
- Style: The textured finish gives the planter a modern, high-end look that pairs beautifully with the faux orchids.
Assembling the Orchid Centerpiece
Now that the planter is ready, it’s time to create the star of the show—the faux orchid arrangement! Here’s how I put it all together for a luxe, high-end look.
Gather Your Supplies:

Before you begin, gather all your supplies for this project. If you ordered faux orchid stems like I did, you might notice they’re a bit bent from shipping. Take a few minutes to gently straighten them by hand—this will help them look more natural and polished in your arrangement.
Affordable Planter Ideas

Start by giving your thrifted or new planter bowl a good cleaning. I used warm, soapy water to remove any dust or residue, then let it dry completely. If your planter needs a little refresh, consider spray-painting (or hand-painting) it in a neutral tone like white, gray, or black for a cohesive look. I chose a dark navy/black inspired by Pottery Barn’s new Spring collection—it’s such a versatile and modern color!
Pro Tip: If your planter has any chips or imperfections, a coat of spray paint will not only refresh it but also hide those flaws.


Secure the Floral Foam:
Next, it’s time to prep the floral foam. Cut the foam block to fit snugly inside your planter bowl using a serrated knife or floral foam cutter. I’m using an entire block of foam for my large planter and it’s large enough to hold 5 orchid stems, if I were using more stems to make a super full arrangement I would use a second block of foam to fill in the planter.

If the foam feels loose, use a dab of hot glue (what I did) or floral tape to anchor it to the bottom of the planter. This step is crucial for keeping your arrangement stable and professional-looking.
Trim and Support the Orchid Stems:
Now, let’s prep the faux orchid stems. Trim them to your desired height using wire cutters or utility scissors, but leave a little extra length so you can adjust them once they’re in the planter. The orchids that I am using are 32″ and I trimmed off about 3 inches.

To make the stems look more realistic we will be using floral stakes. This gives them extra support and mimics the natural upright growth of real orchids.The floral stakes I had on hand were bright green, so I wrapped them with brown floral tape to blend in seamlessly with the orchid stems.
My best tip for this step? Keep the hand holding the floral tape steady, and use your other hand to spin the stake. This method makes the process quick and easy!
The stakes shown here (from Amazon) are already brown, but if you don’t have either of these, you could also use wooden skewers or small dowels. Save money by using what you already have at home—it’s all about working with what’s on hand!
Arrange the Orchids:

Here’s where the magic happens! Start inserting the orchid stems into the floral foam by placing one stem in the center and working outward to create a balanced, organic look. I’m using 5 stems if you want to add more to your arrangement I would suggest using an odd number. Don’t worry about fluffing and bending the orchid stems right now.

I attached floral stakes to the back of each stem using brown floral tape in two spots: about 1/3rd of the way from the top and then near the bottom of the stems.
Pro Tip: Don’t be afraid to play around with the arrangement—move the stems around until you’re happy with the flow and symmetry.
Insert the Orchid Leaves
What’s an orchid without its signature shiny leaves? The set of leaves that came with my orchids were a bit flat, so I took a few minutes to shape them for a more authentic, lifelike look. Gently bend and curve the leaves to mimic how they grow naturally—this small step makes a huge difference in giving your arrangement a luxe, high-end feel.

Once the leaves were shaped I inserted them around the planter at an angle until they looked natural.
Finish with Raffia:
For a final rustic touch, I wrapped brown raffia around the floral tape on the orchid stems, cutting the ends close to the stem. Raffia adds a natural, organic element that complements the orchids and moss beautifully. Plus, it’s an easy way to tie the whole arrangement together! For a “real” orchid touch you could use orchid clips too.

Add the Moss:
Now it’s time to give your arrangement a polished, natural look by adding moss. I used a mix of green moss and Spanish moss for texture and depth. Simply tuck the moss around the base of the orchid stems, making sure to cover all the floral foam. This step not only hides the mechanics of the arrangement but also adds a luxe, high-end finish that ties everything together.

Pro Tip: If you’re working with a large planter and don’t have enough moss (or want to save a little money), try filling the empty space with crinkled paper bags, bubble wrap, or even wrapping paper. Once the space is filled, add your moss on top for a lush, finished look. It’s a budget-friendly hack that still gives you a professional result.
Shaping the Orchid Stems for a Natural Look
One of the secrets to achieving that luxe, high-end look is taking the time to shape your faux orchid stems and flowers. Start by gently bending the stems so they naturally drape over the edge of the planter, just like real orchids would. Then, carefully adjust each flower and leaf, bending them slightly to mimic the organic, flowing shape of live orchids.

It might take a few minutes to get everything just right, but this attention to detail is what sets apart a DIY arrangement from the high-end versions. By making the stems and flowers look as natural as possible, you’ll create a stunning, lifelike display that rivals even the most expensive catalog arrangements.

Pro Tip: Step back every so often to view the arrangement from different angles. This helps you spot any gaps or imbalances.
Style and Enjoy:
Your DIY faux orchid arrangement is complete! Place it on a console table, dining table, or mantel to instantly elevate your home decor. Pair it with other natural elements like woven baskets, candles, or a stack of books for a cozy, layered look. This arrangement is so versatile—it works equally well in a modern, farmhouse, or traditional space. Step back and admire your work—you’ve just created a high-end look for a fraction of the cost!

DIY Gallery Wall w Free Art Print Download
Step-by-Step Instructions:
- Prepare Your Planter:
- If using a thrifted planter bowl clean thoroughly If it needs a little refresh, consider painting it or try the stone-effects technique that I did.
- Secure the Floral Foam:
- Cut the floral foam block to fit snugly inside your planter bowl. Use hot glue or floral tape to secure it in place if needed.
- Trim and Support the Orchid Stems:
- Trim the faux orchid stems to your desired height using wire cutters. To give them a more realistic look, attach floral stakes or thin dowels to the stems using brown floral tape. This will help them stand upright and mimic the natural growth of real orchids.
- Arrange the Orchids:
- Insert the orchid stems into the floral foam at varying heights and angles. Play around with the arrangement until you’re happy with the balance and flow.
- Add the Moss:
- Cover the floral foam with a mix of green moss and Spanish moss. This step gives the arrangement a polished, high-end look.
- Finish with Raffia:
- Wrap raffia around the base of the orchid stems or tie it around the planter bowl for a rustic, natural touch.
- Style and Enjoy:
- Place your finished arrangement on a console table, dining table, or mantel. Pair it with other Spring decor like candles, books, or woven baskets for a cohesive look.
Bring High-End Style Home
Creating this DIY faux orchid arrangement has been such a rewarding project—it’s proof that you don’t need to spend hundreds of dollars to bring high-end style into your home. With a little creativity, a thrifted planter, and some affordable materials, you can achieve a luxe look that rivals even the most expensive catalog arrangements.

The best part? This project is completely customizable. Whether you prefer a modern monochrome look or a more natural, organic vibe, you can adapt it to suit your personal style. I hope this tutorial inspires you to try your hand at creating your own stunning orchid arrangement. Trust me, the effort is worth it when you see the finished product gracing your home!
Here’s to bringing a little luxury into our homes—without breaking the bank!
See your projects featured! If you were inspired by this or any of my other DIY projects I would love to see them and add you to the Reader’s Spotlight gallery. Send a photo to me at jennifer@cottageonbunkerhill.com
xo, Jennifer
shop supplies
DIY Orchid Arrangement
visit my amazon storefront


Very pretty! I enjoy a good faux floral project, thanks for sharing!
Jennifer. This is so beautiful. I plan to share on Sunday’s DRA.
You’ve really have outdone yourself! This arrangement is beautiful and looks so much better than the pricey store bought versions! Well done, friend! 💚