Want to make a stunning Spring wreath that’s truly unique? This tutorial is all about using live bulbs – think mini daffodils and hyacinths – plus natural elements like moss, pussy willows, and feathers to create a showstopping wreath for your door. It’s a fun Spring DIY project that brings a burst of color and life to your home. Let’s get started!

Welcome Spring: Create a Stunning Natural Wreath
If there’s one thing that shouts “Spring is here!”, it’s a gorgeous wreath on the front door. Today, I’m so excited to take the classic Spring wreath and give it a twist – this one is bursting with life!
We’re using mini daffodils and hyacinth bulbs, soft pussy willows, whimsical feathers, and all sorts of natural textures. It’s easy, fun, and brings a touch of the blooming garden right to your doorstep.
This post may contain affiliate links, which means I may earn a small commission if you make a purchase through my links, at no extra cost to you. Read my disclosure policy here.
Materials For Live Wreath

- Oval Grapevine Wreath
- Mini Daffodil Bulbs (3)
- Hyacinth Bulbs (3)
- Live Moss
- Spanish Moss
- Seeded Eucalyptus (you could substitute baby’s breath or wax flowers)
- Pussy WIllows
- Dried Flowers(Sea Holly & Starflowers)
- Feathers
- Mini Bird’s Nest (optional)
Finishing Details
- Frayed Velvet ribbon
- Floral Wire or Natural twine
- Scissors/Wire Cutters
Step 1: Prepare Your Bulbs

In February you should be able to find potted Spring bulbs at your local nursery or even at your grocery store to use to make this wreath. Trader Joe’s is my go-to spot for potted bulbs at a great price.
For today’s wreath I will be using 3 hyacinth bulbs and 3 mini daffodils bulbs. Depending on the size of the wreath you are using you may have to adjust the number of flower bulbs that you need.

Start by gently removing the bulbs from the nursery pot. This can get messy, so lay down some newspaper or work outside if it’s a nice day.
Rinse the bulbs to remove dirt, but avoid washing it down the sink. Instead, fill a bucket with water, dip the bulbs to clean them, and pat them dry with a paper towel. Once finished, dispose of the dirty water outdoors.
Step 2: Build the Wreath Foundation
The foundation of this Spring wreath is the moss-wrapped bulbs. Here is how to do it:
gather moss


One of the unique things about this wreath is that I will be using live bulbs instead of artificial flowers.
To maintain the moisture around the bulbs and sustain the plant, I will use moss that I scraped up from my yard.
I used a hand excavator to peel up pieces of moss that were around my maple trees.
Wrap bulbs w moss

To cover the bulbs with moss you will need a heavy gave floral wire or jute twine. Gently wrap the bulbs in live moss, creating a little “bulb bundle”
To do this take a piece of moss and place it on the bulb with one hand, while wrapping the floral wire paddle around it to secure. Keep adding moss until the bulb is covered.

Find a spot on the wreath and then wrap the floral wire around the bulb bundle to secure it into place.
For my wreath, I attached the bulbs going in a counter-clockwise direction working my way up the right side of the wreath and down the left side
Another option for this wreath is to have your bulbs all facing upward starting in the bottom center.

Repeat the process with each of the bulbs you will be using.

First I did the 3 hyacinth bulbs then I did the 3 daffodils in between them.
Step 3: Fill, Layer, & Add Whimsy
Once the main foundation of this live Spring wreath, the bulbs, are in place it’s time to fill in the empty spaces on the grapevine wreath.
eucalyptus

For a touch of greenery on the wreath, I went with fresh-seeded eucalyptus (Trader Joe’s). It not only is a great filler for this wreath, the small flowers add another layer of texture.
Baby’s breath or wax flowers would also look pretty for a wreath like this, both were out of stock when I was at Trader Joe’s.

All I did was tuck clusters of the eucalyptus into the grapevine to keep them in place. No need for hot glue, but you could use floral wire if needed to secure it into place.
pussy willow
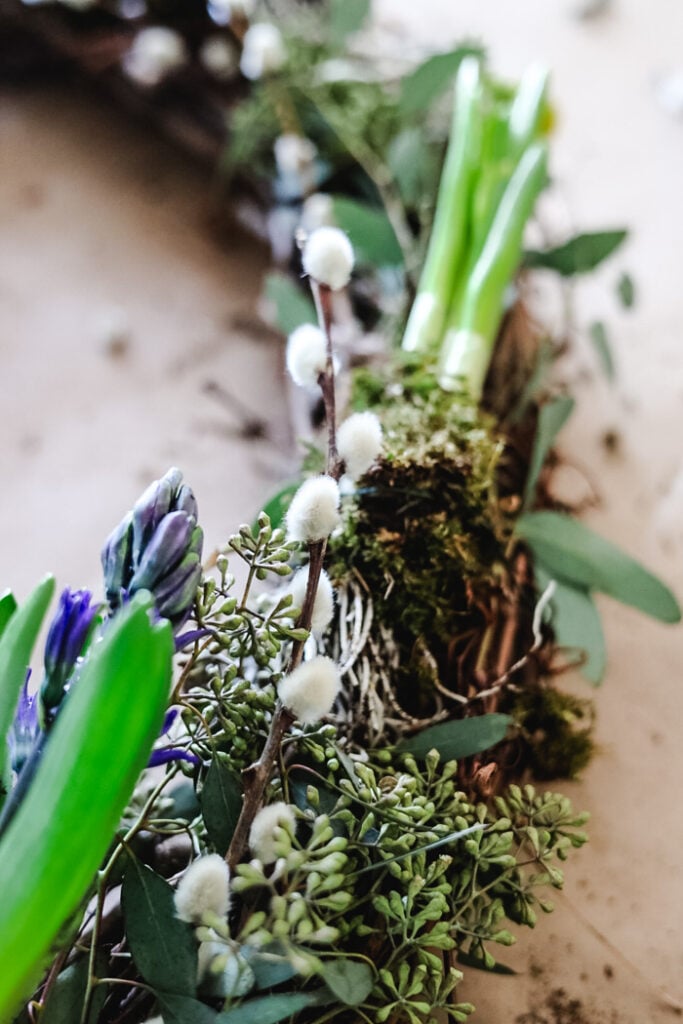
After the eucalyptus, I started to add small branches of pussy willow which is a perfect addition for any Spring wreath.
flowers

For another natural touch, I popped in Sea Holly and dried Starflowers saved from my garden.
Spanish Moss

Small clumps of Spanish moss are the perfect way to fill in any gaps around the wreath. Its organic texture and natural look beautifully complement the vibrant colors of the live bulbs and flowers.
For the best deal on Spanish moss, head to the Dollar Tree – the price is unbeatable and the quality is surprisingly good!
Whimsical touches

A couple of whimsical touches to add to the feel of Spring on this wreath are guinea hen feathers and a mini bird’s nest with eggs.
I bought a bag of feathers from Amazon and keep reusing them in different projects. Feathers are an unexpected touch but make your wreath look professionally done.

For a touch of natural beauty, I added a small bird’s nest to the bottom center of the wreath.
Three mini bird’s eggs, nestled in a bit of Spanish moss, create a charming focal point amongst the flowers.
You can find these adorable nests with eggs on Amazon (they sell them in 4-packs!) or at your favorite craft store during the spring season.
Step 4: The Final Touch – Your Bow

My spring bulb wreath wouldn’t be complete without the perfect bow! I love using a simple knot with a droopy, frayed-edge velvet ribbon. Want the secret to getting it at a great price? Skip online stores and head to Hobby Lobby! I always stock up on this ribbon when they have their 50% off sales. It’s a staple in my craft supplies that you’ll see in lots of my projects, even my Christmas decor! Find it in the sewing department with all the trims.
Caring for Your Live Wreath

To maintain your wreath, you will have to mist the moss-covered bulbs with water to keep them damp.
Also, I would not hang this outside if the temperatures are below freezing still where you live. It’s still getting cold here in New Hampshire at night so I have been bringing it in and putting it back on the door in the morning when it warms up.
And although this wreath is beautiful the bulbs will only last for a couple of weeks. But the good thing is that you can remove them and plant them in your garden when you are though!
It’s also pretty easy to remove the bulbs and pop in other florals once the bulbs go by.
I plan to add other live Spring flowers to these floral water tubes once I take off the bulbs, using the moss that was around the bulbs to disguise the tubes.
Finished Spring Bulb Wreath

What do you think?? Personally, I love how it came out! It was fun creating something different for my door to welcome Spring.

Creating this live bulb wreath is a delightful way to bring a touch of spring into your home. From choosing the flowers to adding the final ribbon, the process is enjoyable! Plus, the best part is watching your wreath bloom and change over the coming weeks.

See your projects featured! If you are inspired by this or any of my other DIY projects I would love to see them and add you to the Reader’s Spotlight gallery. Send a photo to me at jennifer@cottageonbunkerhill.com
xo, Jennifer
Fresh Flower Wreath Collection

Looking for more pretty ideas?See all of our wreath tutorials using fresh flowers & natural materials

Discover a wreath for every season! See over 30 of my wreath tutorials.



This wreath is amazing friend! Bring it on the plane!
Friend I think you have outdone yourself. This is stunning!
Thanks, Jen!!
Very pretty wreath! I love the addition of the bird’s nest. And the feathers…I wish I had guinea hens. Just regular hens here but their feathers aren’t nearly as interesting! Jan in MA
Jennifer
This wreath is amazing. I love every detail. Amazing. I’ll share a link on Sunday. DRA.