• Home
  • Blog
  • Meet Jennifer
    • Meet Jennifer Howard
    • Work With Me
    • Disclosure + Privacy
    • Contact
  • Shop
  • Nav Social Icons

  • Skip to primary navigation
  • Skip to main content
  • Skip to primary sidebar
  • Skip to footer
  • Home
  • Blog
  • Shop My Favorites
  • DECORATING
    • Decorating Tips & Tricks
    • DIY Decorating Projects
    • High End Dupes
    • Thrifting
    • Home Tours
    • Wreaths
    • Spring & Easter Ideas and Projects
    • Summer Decorating and Projects
    • Fall Decorating Ideas & Projects
    • Christmas Decorating Ideas & Projects
    • Shopping
  • GARDENING
    • Flower Gardening
    • Gardening Project Ideas
    • Vegetable Gardening
  • LIFESTYLE
    • Weekly Rewind
    • Recipes
    • Around New England
    • Visiting Magnolia
  • Meet Jennifer
    • Work With Me
    • Contact
    • Disclosure + Privacy
  • Mobile Menu Widgets

Cottage On Bunker Hill

Cottage On Bunker Hill

Home & Garden in New England

  • LIFESTYLE
    • Weekly Rewind
    • Recipes
    • Around New England
    • Visiting Magnolia
  • DECORATING
    • High End Dupes
    • Decorating Tips & Tricks
    • DIY Decorating Projects
    • Thrifting
    • Wreaths
    • Shopping
    • Home Tours
    • Spring & Easter Ideas and Projects
    • Summer Decorating and Projects
    • Fall Decorating Ideas & Projects
    • Christmas Decorating Ideas & Projects
  • GARDENING
    • Flower Gardening
    • Gardening Project Ideas
    • Vegetable Gardening
    • Grow With Me Gardening Series
  • Home
  • Blog
  • Meet Jennifer
    • Meet Jennifer Howard
    • Work With Me
    • Disclosure + Privacy
    • Contact
  • Shop

Rustic Christmas Tree Sign

In: Christmas Decorating Ideas & Projects, Christmas DIYs, DIY Decorating Projects

Disclosure: This post was written in collaboration with WORX tools; all opinions are completely my own.

So are you getting ready for the holidays? I kicked off this season by creating a rustic Christmas tree sign with the help of some of the WORX MakerX line of tools. Maker X is a brand new line of tools for crafters like us. 

SUPPLIES:

  • WORX MakerX Rotary Tool + Wood/Metal Crafter Combo
  • WORX Power Share Reciprocating & Jigsaw
  • 2’x2′ Plywood Sheet
  • Wood Board (16×20)
  • Unfinished Wood Discs (various sizes)
  • Wood Glue
  • Acrylic Paint
  • Wood Slices
  • Twine

Rustic Christmas Tree Sign

STEP 1.

I drew a simple outline of a tree onto the square sheet of plywood using a straight edge. The sides of the tree measured 16.5 inches tall and 12 inches across at the bottom; the tree stump is 4 inches wide by 2 in.

drawing christmas tree outline on plywood

STEP 2.

Using my jigsaw, I followed the pencil outline to cut out the tree shape. Jigsaws are pretty easy to use, you just have to take your time and follow the lines (and don’t get distracted by your son asking you if you know where his favorite sweatshirt is or you will get a little bump you have to sand out in the next step!!)

worx jigsaw cutting plywood

STEP 3.

Now it was time to try out the WORX MakerX tools! I grabbed the rotary tool, hooked it into the MakerX hub, attached the sanding band and went to work smoothing out the rough edges of my tree.

Worx MakerX Rotary Tool

I used the rotary tool to round out the corners on base of my tree.
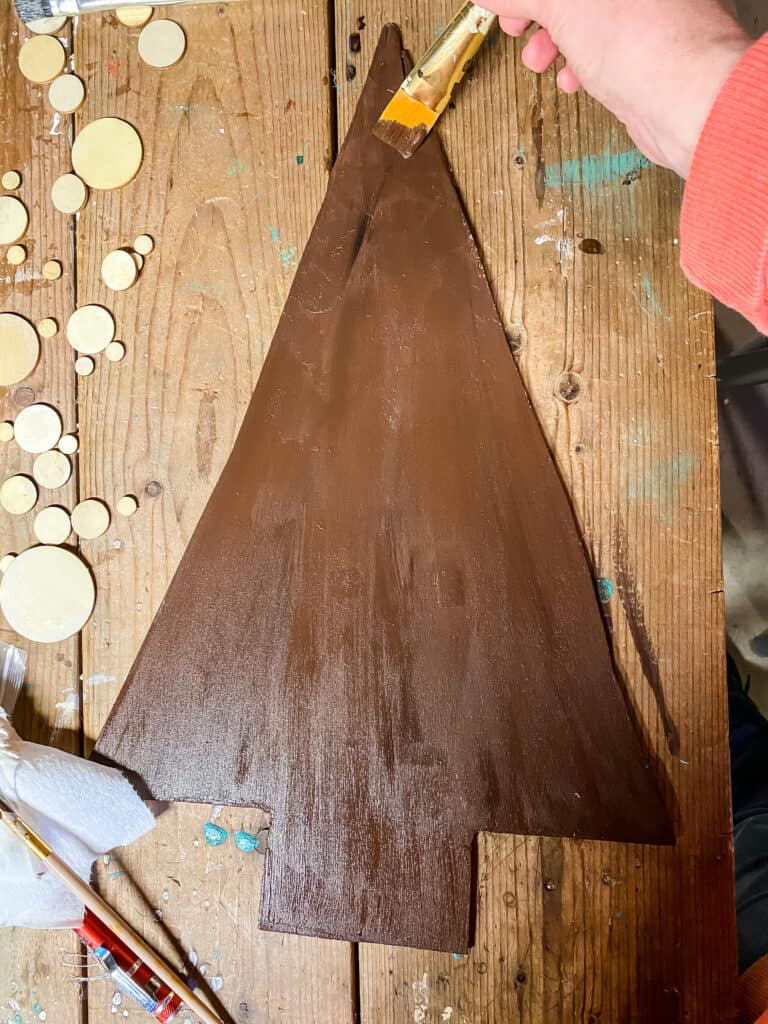
sanding with the MakerX rotary tool

STEP 4.

Next, I gave the tree form a quick coat of dark brown paint.

STEP 5.

Do you like puzzles? This part of my rustic Christmas tree project was fun! The wood discs come in a variety of sizes; I dumped out a few of each size into a pile and grabbed a small glue brush and wood glue.

wood discs

Brushing wood glue onto the backside of the discs I began gluing them onto the tree. I had to slide them around a bit and play with the different sizes to fill in the tree. The tiny discs were my best friend; they were great at filling in small areas!

gluing wood discs to tree shape
wood disc tree

STEP 6.

While the glue was drying on the tree, I moved onto painting the base board. I poured 3 neutral paint colors onto the board ( dark brown, tan, ivory).

Then blended them together creating an ombre effect.

  • blending paint on sign
  • ombre paint effect on wood board

When the paint was dry, I glued the tree to the board with wood glue. I noticed the base of the tree blended too much into the board so I brushed on a little ivory paint to make it stand out more.

STEP 7.

Now, I removed my rotary tool from the MakerX hub and attached the MakerX Wood And Metal Crafter. I had a cute idea for the top of my sign that I wanted to create using the wood burning tip.

I’ve never used a wood burning tool before so I practiced my technique on a piece of scrap wood…once I got the hang of it I was ready to go!

WORX MAKERX WOOD AND METAL CRAFTER

Using 2 inch wood slices I wrote out the letters p-e-a-c-e with a pencil.

wood slices

I clicked on the power switch and turned up the heat on the wood crafter to 900⁰. I guided the wood crafter over my pencil outline and burned  the letters into the wood slices.

* My top tip is not to lift up the wood crafter as you are burning in the letters; do it in one smooth stroke.*

wood burning letters into wood slices
wood burning letters

To finish up my sign, I strung the letters and 2 wooden snowflakes onto a thin piece of twine; making a simple knot around each letter to secure it to the twine and make a garland. I attached each end of the twine to the back of the board with my staple gun.

wood peace garland

I also attached a small length of nautical rope with my staple gun to the back to make a sturdy hanger.

Now I was ready to hang up my first decoration of the season!!
Rustic Christmas Tree SIgn

I cut a couple of small branches of fresh pine and a pine cone from my yard and tucked them into the top of my sign.

I hung up my rustic Christmas tree sign on my faux brick wall. You can see my tutorial on one of my favorite projects here

Happy Holidays!

By: Jennifer Howard · In: Christmas Decorating Ideas & Projects, Christmas DIYs, DIY Decorating Projects · Tagged: christmas decor

you’ll also love

wreaths pinterest imageA Wreath for Every Season: 30+ DIY Wreath Ideas
My Top 13 Must-Have Craft Supplies & How I Used Them In Projects
ornament filled with dried baby's breathDIY Easy and Beautiful Dried Flower Ornaments

Reader Interactions

Comments

  1. Stacy says

    November 9, 2020 at 7:39 pm

    What a fantastic project! I want one!!! It turned out beautiful!

    Reply
    • Jennifer Howard says

      November 10, 2020 at 6:17 am

      Thanks, Stacy!!!

      Reply

Leave a Reply Cancel reply

Your email address will not be published. Required fields are marked *

Next Post >

Christmas Tray | DIY

Primary Sidebar

Search

Catagories

Behind the blog

Behind the blog
Meet Jennifer

Hey friends, I'm so glad you are here! I'm a life-long New England gal who started Cottage On Bunker Hill as a hub to share all my DIYs, decorating ideas, budget shopping ideas and so much more!!

About Me

Stay Connected!

Get The Latest

Featured In:

Footer

Categories

Archives

 •••Cottage on Bunker Hill does not accept guest posts and I only link to sites that I find myself. No need to email me with requests•••

COPYRIGHT CONTENT PERMISSION

All images and tutorials on this blog are copyrighted material.

I’m happy to allow you to use ONE photo with appropriate credit and link back to cottageonbunkerhill.com

Please contact me if you would like to use any media, tutorials, or ideas from this blog.  Contact Jennifer via email: jennifer@cottageonbunkerhill.com

FEEL FREE TO PIN AWAY! IT’S APPRECIATED!

Cottage On Bunker Hill is a participant in several affiliate programs including the Amazon Services LLC Associates Program, an affiliate advertising program designed to provide a means for sites to earn fees by linking to Amazon.com and affiliated sites. For more information, see full disclosure statement (here)

Copyright © 2023 · Theme by 17th Avenue