
Here’s a rustic and natural Spring wreath using a variety of organic materials to create a unique look for your front door this season,
Spring is all about fresh beginnings, and what better way to welcome the season than with a Rustic and Natural Spring Wreath? I created this beauty for my front door, and I’m obsessed with how it turned out! The mix of natural elements and a sweet little bunny adds just the right touch of charm. Plus, it’s so easy to make—you’ll have it done in no time
This wreath was influenced by a magazine that I have been loving since I came across it last year. It’s called Jeanne D’Arc and it’s published in Denmark…but I read the English version online.
How To Make a Natural Spring Wreath
There’s something so special about using natural materials to create home decor. For this Spring wreath, I bent grapevine into a delicate teardrop shape and adorned it with fresh pussy willow stems, soft moss, tiny flowers, and real hollow quail eggs. The result? A stunning, all-natural wreath that brings the beauty of the season right to your front door. Best of all, it’s surprisingly easy to make—let me show you how:
This post may contain affiliate links, which means I may earn a small commission if you make a purchase through my links, at no extra cost to you. Read my disclosure policy here.
Supplies:
Materials for this Project
- Grapevine Wreath
- Hollow Quail Eggs
- Guinea Hen Feathers
- Preserved Moss
- Fresh Pussy Willow Branches
- Dried Flower Sprigs
Step 1. Making the Wreath Base

The wreath I imagined was going to be a teardrop shape so I got creative to find something in my giant wreath pile (don’t laugh…I’m serious!) I had a large grapevine wreath that was kinda falling apart already so what I did was cut through the grapevine that was wrapped around the wreath holding it together. Then I took it apart.
The wavy grapevine branch in the picture is what was wrapped around the wreath.
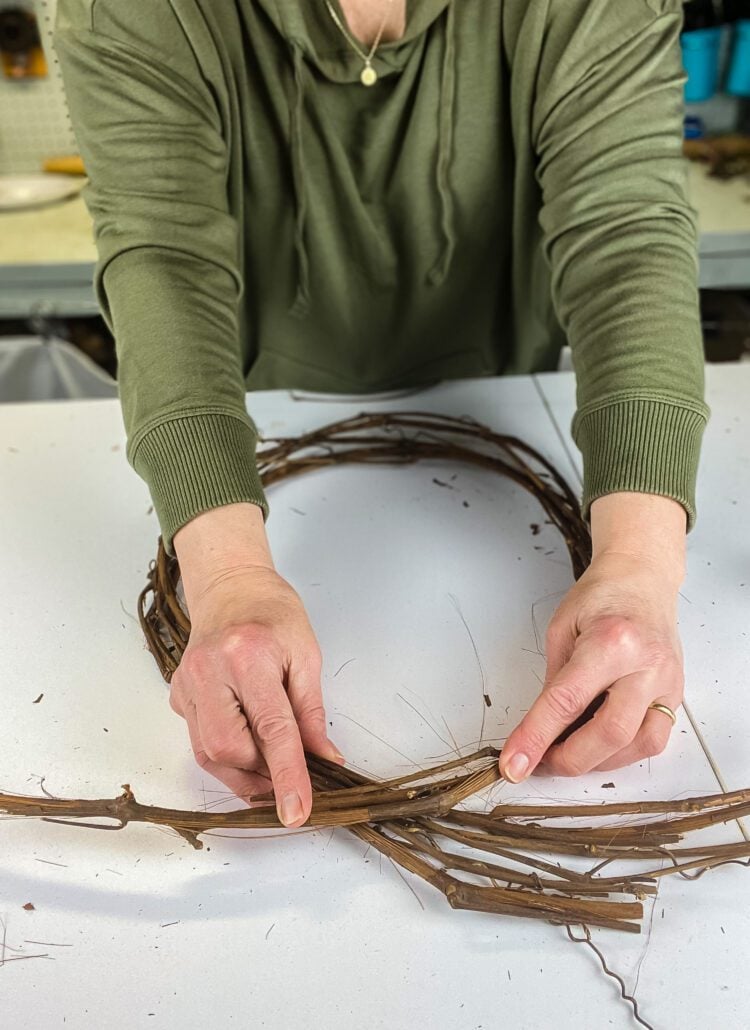
Next, I removed a few of the grapevine branches from the wreath, placed them on my flat table, and crossed the branches at the top so the ends flared out on both sides. (flared might not be the right word..but I’ve only had 1 cup of coffee this morning so far!)
Secured it with floral wire wound around all the branches a few times and pulled tight.
Step 2. Add Fresh Pussy Willow Stems

Now it was time to layer natural elements into my wreath. I’m using fresh pussy willow stems, I found them at Trader Joe’s but at this time of the year, it’s easy to find them in grocery stores or local nurseries too.
You are going to want to use fresh branches because they are pliable, I did a test on some of the pussy willows I have from last year and they just snap when you try and shape them.

What I did was bend the branches to the shape of the wreath and secured it with my paddle of floral wire Adding the pussy willow branches going upward on both sides of the wreath and having the ends cross each other on the top of the wreath.
Step 3. Fill in with Moss

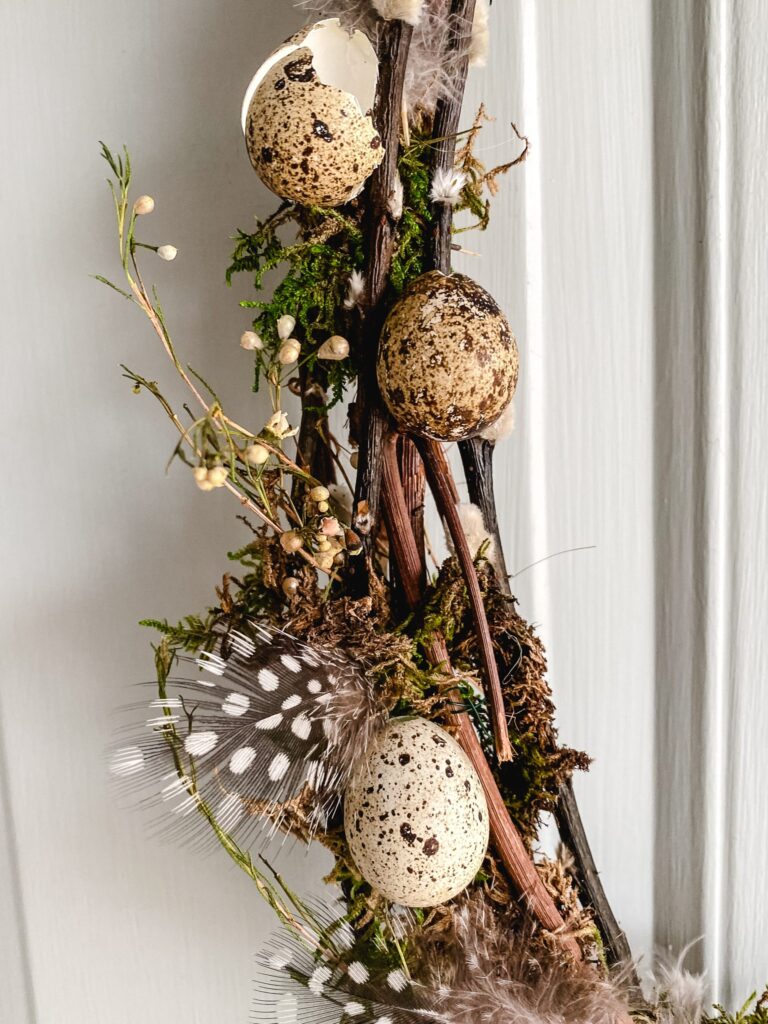
Now that the base of my wreath was assembled I wanted to add more natural touches to this Spring wreath by adding preserved moss, real hollowed quail eggs, guinea pheasant feathers, and a few stems of dried wax flowers.
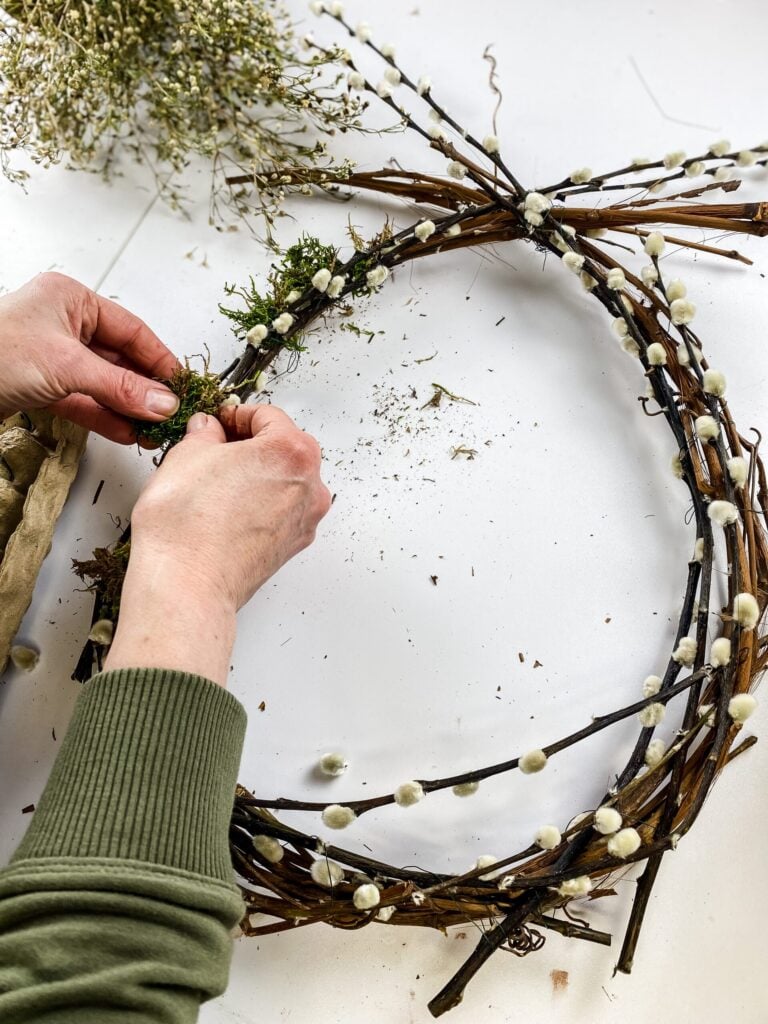
After the branches were in place I added clumps of preserved moss throughout the wreath. I just stuck the pieces in between the grapevine

The moss is a little messy to work with so plan accordingly!
Step 4. Add Quail Eggs

For this part, I used a hot glue gun and added quail eggs around the wreath. These little eggs are so pretty but also very delicate to work with.
I found them on Amazon and I sprinkled them throughout my Spring decor in nests and even in my pot of African Violets. You can check out my Spring Home Tour here to get more easy decorating ideas.

I cracked a couple while I was gluing them on but actually really dug how organic it made the wreath look. But when I dropped the wreath on the floor when I was trying to hang it up…insert that clenched teeth emoji here...I had to replace a couple of the eggs!!
Step 5. Add Dried Flower Sprigs

Last month I bought a bunch of white wax flowers from Trader Joe’s and dried some of the sprigs out.
They were the perfect color and texture to complement this wreath, all I did was tuck in little sprigs all around the wreath. Any small dried flower would work…even a tiny artificial baby’s breath bunch would look pretty.
Step 6. Add a Few Feathers
My final addition to this rustic and natural Spring wreath was black and white guinea pheasant feathers. They really added the perfect amount of flair to the wreath!

Finished Wreath

OK, I love how this one came out! It’s exactly what I had pictured in my mind when I started making it. Total work time was less than 30 minutes for this wreath.
See your projects featured! If you were inspired by this or any of my other DIY projects I would love to see them and add you to the Reader’s Spotlight gallery. Send a photo to me at jennifer@cottageonbunkerhill.com
xo, Jennifer
more of my favorite diy wreaths
Fresh Flower Wreath Collection

Looking for more pretty ideas?See all of our wreath tutorials using fresh flowers & natural materials


I love how you took the wreath apart and created this shape. So clever!
It’s really one of my favorites!! Thanks, Wendy!
Loving this pretty wreath, Jen! It’s just perfect for spring!
Thanks, Anne!!! Now I just need Spring to get here!
That wreath is so pretty Jen!
It’s one of my favorites! Thanks Stacy!
Jennifer,
I love that magazine also. This wreath is perfect for spring. Thanks for sharing your creative ideas with us,
Your wreath is so pretty, Jennifer. I love all of the natural elements you used. And I agree that the quail eggs and feathers are the perfect finishing touches. Pinned!
Super cute! I’m going to have to make one. Hugs to you.
Yes, totally would fit your pretty style!!
I love your quail egg wreath! It turned out so beautiful!
Thanks, Debbie!! I love the look of the eggs…it’s my 1st time working with them.