
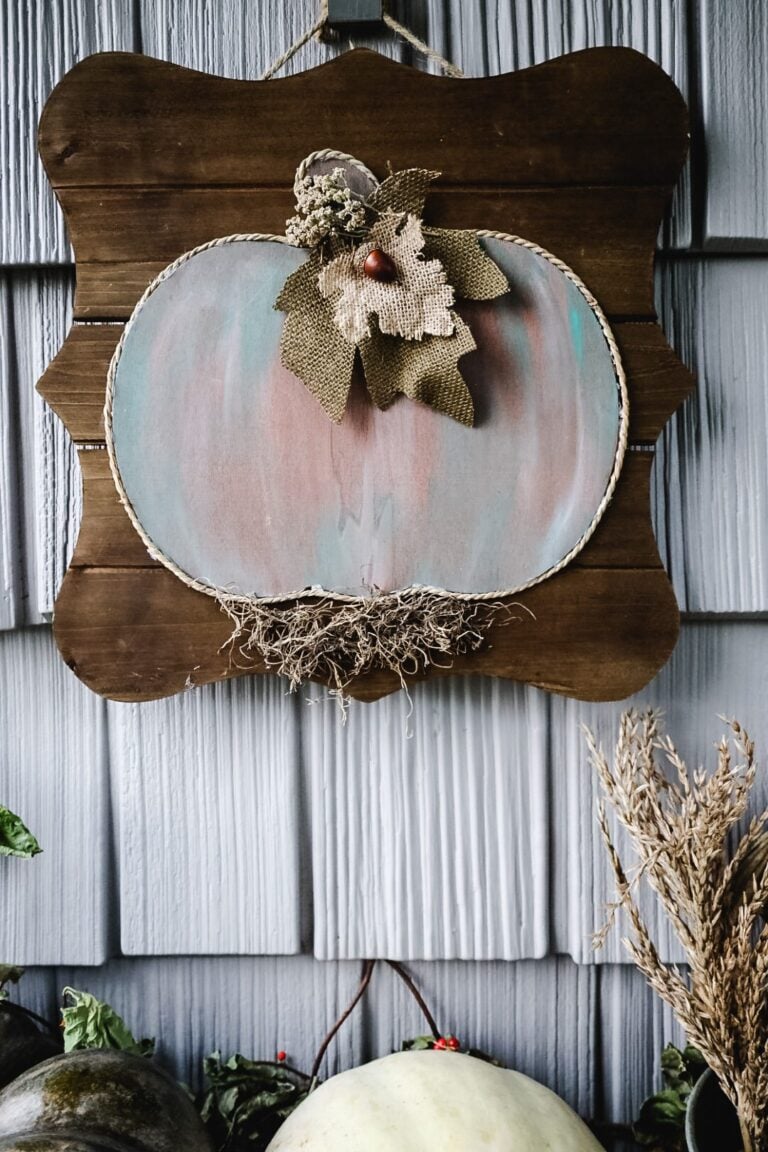
I just finished decorating my front porch and made this Fall porch sign to hang up on the porch wall. Sometimes it’s quicker to just whip up a quick sign than to shop around for something (plus I just love to DIY)
There’s nothing quite like a warm, welcoming Fall porch. And while I adore pumpkins and mums, I think a personalized touch truly makes it feel like home. This super simple DIY Fall Porch Sign is the perfect way to add a big dose of rustic charm without a big investment of time or money. Using a store-bought pallet sign and some basic craft supplies, you can create a custom piece that welcomes the season (and your guests!) with open arms. Let’s get started!
Why You’ll Love This Project!
- Budget-Friendly: Uses an inexpensive wood craft sign.
- Fully Customizable: Paint it any color or add any word or phrase you love (“Thankful,” “Gather,” “Hello Fall,” etc.).
- Beginner-Friendly: No fancy tools or advanced skills required!
- Quick & Satisfying: You can easily finish this in an afternoon.
Quick & Easy DIY Fall Sign
My Fall porch sign started out with an unfinished wood sign that I picked up at Michael’s. I grabbed it a while back because I liked the shape and the darker stain it had on it already.
Materials for this Project
- Wood Pallet Sign
- Unfinished Pumpkin Sign (Dollar Tree or Craft Store)
- Paint
- Burlap Leaves
- Twine (detail on edge of pumpkin)
Gather Your Supplies
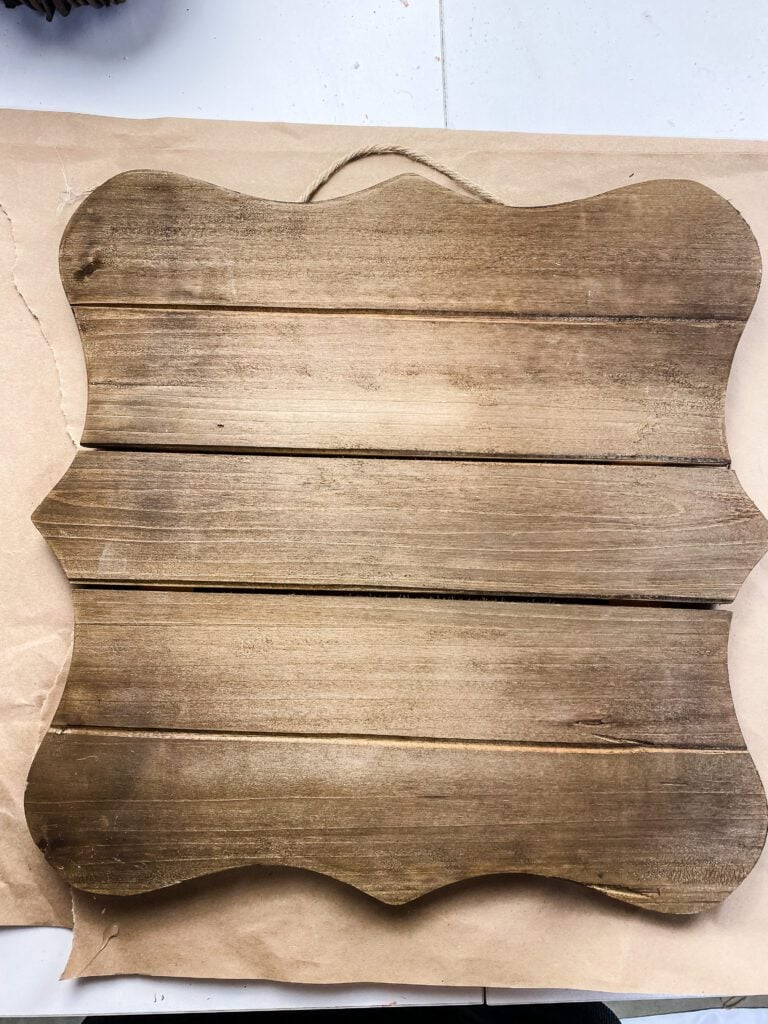
While my specific sign isn’t available anymore, don’t worry! This project is still totally doable! Wood pallet signs are a craft store staple. Check the wood section at Michaels, Hobby Lobby, or even Walmart for a blank wood plaque with a similar rustic look. You can often find them in various sizes, which is perfect for customizing your Fall message.
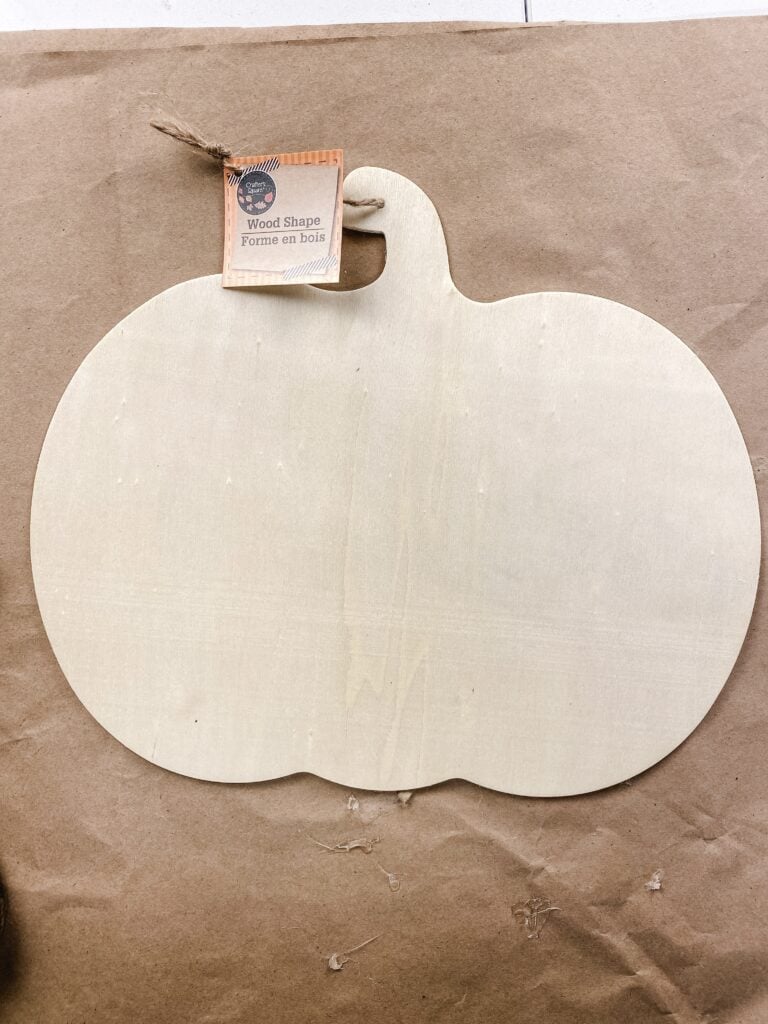
In my craft stash, I also had this wood pumpkin shape sign from the Dollar Tree. They are still available there or at your craft store.
Step 1: Paint & Blend the Pumpkin Form
The first step to creating that vintage, metallic look is to build up color with a dry-brushing technique. This adds incredible depth and dimension, making the pumpkin feel more organic and timeworn.
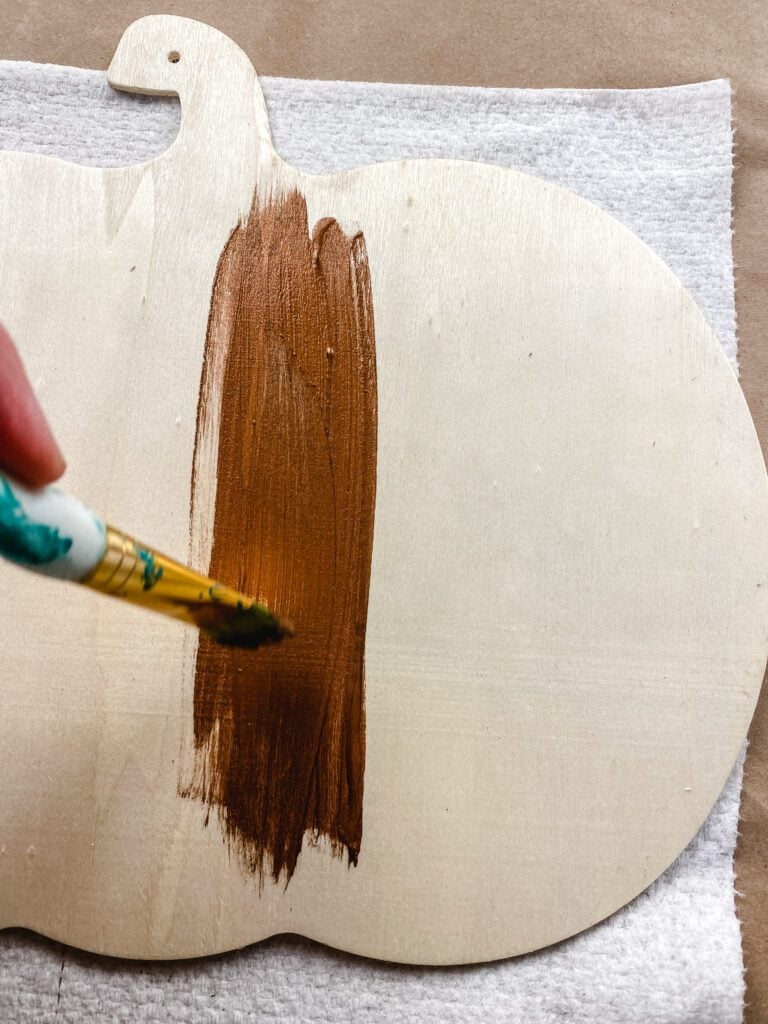
Base Coat: Start by painting the entire wooden pumpkin form—front and sides—with a base coat of Antique Copper metallic craft paint. Ensure you have full, even coverage and let it dry completely. This rich copper tone will be the warm foundation that peeks through later.

Dry Brush with White: Once the base coat is dry, dip the tips of your brush into white craft paint. Wipe off most of the paint on a paper towel until the brush is almost dry. Then, lightly whisk the brush over the high points and curves of the pumpkin. Imagine where the light would naturally hit a real pumpkin. This step begins to add shape and highlights.

Add Teal Accents: For a touch of unexpected, rustic charm, repeat the dry brushing process with a teal paint. Focus on the lower curves and opposite side of your white highlights to create shadow and contrast. Don’t worry about being perfect the randomness adds to the vintage feel.


Blend: While the paints are still damp, you can gently go over the edges where the colors meet with a clean, dry brush to softly blend and diffuse them together. The goal is a soft, mottled, and beautifully blended effect, not harsh lines.
Step 2: Add a Textural Edge with Rope
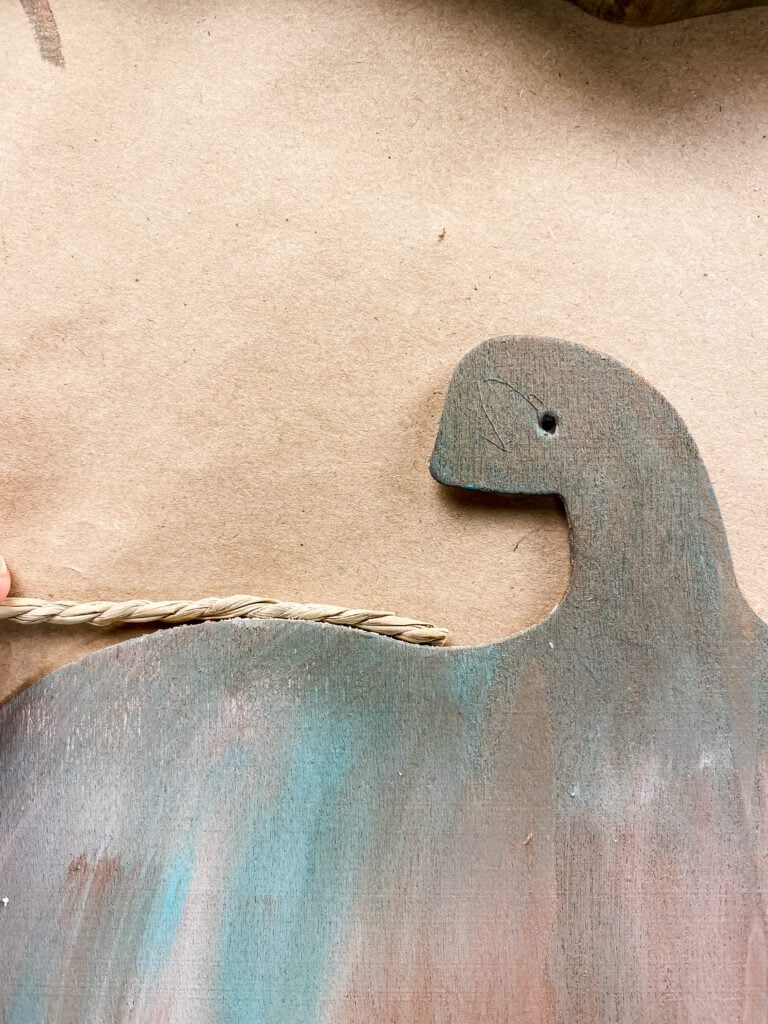
For a little extra rustic detail and texture, I framed the pumpkin by adding a length of seagrass rope around the edge using my hot glue gun.
No seagrass? No problem! Jute twine or a thin nautical rope would give a very similar cozy, natural effect.
This is one of my favorite crafting mantras: always try to use what you have on hand before buying anything new. It’s sustainable, budget-friendly, and often leads to the most unique and personal results!
Step 3: Assemble & Add the Final Rustic Details

Now for the fun part—bringing it all together! This is where your sign really starts to come to life with personality.
- Attach the Pumpkin: Using your hot glue gun, securely attach the painted pumpkin to the center of your wooden sign.
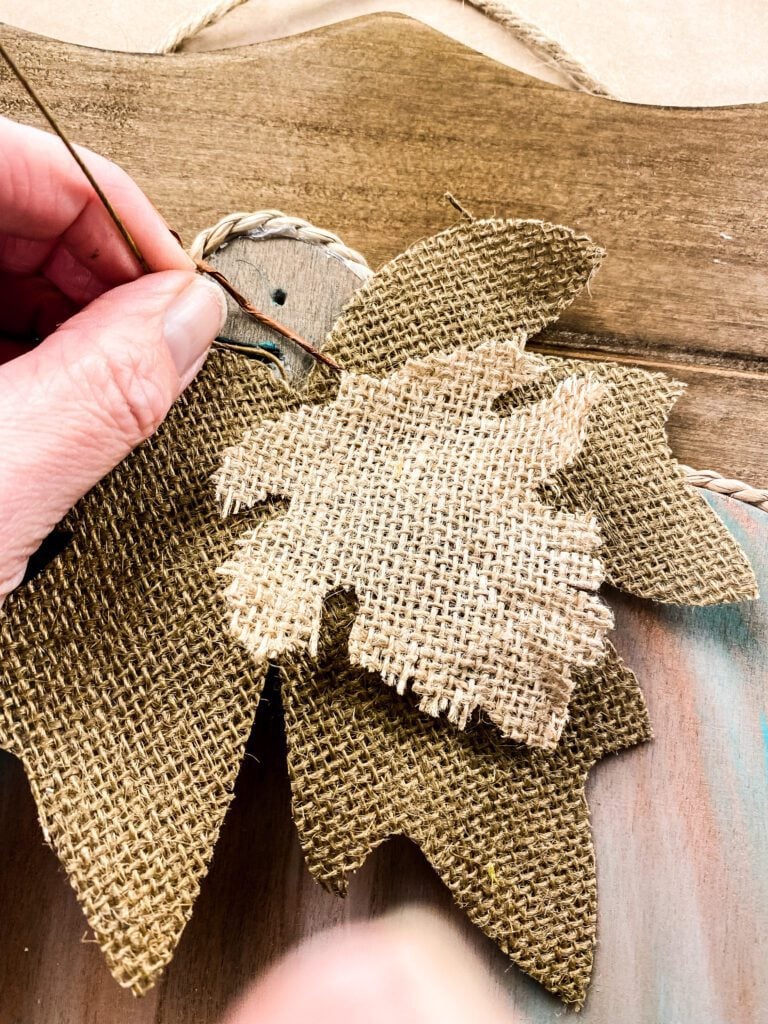
Add Burlap Leaves: For a touch of rustic texture, I hot-glued a couple of burlap leaves near the pumpkin’s stem. My larger leaf is from the Dollar Tree, and the smaller one is a well-loved favorite I’ve recycled for years—proof that great decor can last!

- Embellish with Natural Elements: To finish the sign, I:
- Glued a small clump of Spanish moss at the base for a woodsy, organic feel. (A word of warning: if you hang your sign outside, the birds might try to borrow some for their nests… I speak from experience!)
- Tucked a sprig of dried flowers and an acorn into the burlap leaves for a final pop of autumnal charm.
Now It’s Your Turn!
And that’s it! In just an afternoon, you’ve created a beautiful, custom piece of decor that will last for seasons to come. I love leaning my sign right next to my front door amidst a pile of pumpkins and gourds. It also looks gorgeous propped on a mantel or as part of a fall entryway table display.

I hope this project brings a cozy, handmade touch to your home this Fall. If you make one, I’d be absolutely thrilled to see it!
See your projects featured! If you are inspired by this or any of my other DIY projects, I would love to see them and add you to the Reader’s Spotlight gallery. Send a photo to me at jennifer@cottageonbunkerhill.com
xo, Jennifer

Fall Inspiration
decorating + DIY ideas:


Adorable fall porch sign!
What a great idea Jennifer! And so easy. I would love to share on my Saltwater Sounds wrap-up for Sunday.
Thanks! Share away!!
This is so pretty, friend. I can’t believe how easy it was too! Hope you enjoy your weekend!
Thanks Jen! I love simple DIYs
Jennifer,
So cute! I’ll share a link on my Sunday Dirt Road Adventures.
Thanks Rachel!! Someday we’ll have to play a DIY version of Chopped where someone gives us a basket of random crafty things and we have to create something!!