
Paper mache bowls are very trendy right now and some are very expensive. I will show you step by step how to make a paper mache bowl for under $10. It’s an easy DIY project (but a little messy!).
DIY Paper Mache Bowl: Step by Step Guide
Paper mache bowls are having a moment, they are all over my favorite high-end websites. I’ve seen them everywhere: Pottery Barn, Studio McGee, Ballard Designs, and Restoration Hardware just to name a few. One thing that all of those places have in common is that they are pricey…some close to $200!! Geez, with 200 bucks we could decorate an entire room over here!!
Today I’m going to show you how I made one for about $7! Then we can all go out for lunch and shopping with the money I just saved you…Let’s go!
This post may contain affiliate links, which means I may earn a small commission if you make a purchase through my links, at no extra cost to you. Read my disclosure policy here.
Step 1. Mixing the Paper Mache
There are a few different methods for making paper mache that I have read…some with blending newspaper to pulp or using toilet paper. Well, that all seemed like a lot of work so I used CelluClay Instant Paper Mache and all I had to do was mix in water.

For 1 pound of the instant paper mache, you add 32 ounces of warm water.
One important note, when I poured the water into the bowl it created a cloud of paper dust so if I ever do this again I would probably do this part outside. You can see that it got all over my sweatshirt…if I didn’t have my baseball hat on my hair would have been covered too!!

It is a bit of a messy task mixing it together with your hands. I’m not going to lie to you dear readers…it feels a little yucky!!
Step 2. Making The Bowl
To make the paper mache bowl you are going to need another bowl to use as the template (that is not the right word but I’ve only had one cup of coffee and can’t for the life of me think of the correct term…)
You just need to find a salad bowl or serving bowl in the shape you want to create (I’m sure there are bowls at the dollar store that would work too).
Cover the bowl with plastic wrap. This will allow the paper mache bowl to release when it’s dry.

Then start covering the bowl with handfuls of the paper mache mix.
What I did was grab a handful and then flattened it out and pushed it onto the bowl.
Every time I grabbed another clump of the mixture I pushed it down so the paper mache overlapped with what was already on the bowl.
Photo credit goes to my son Lucas…I hadn’t thought this part through and my hands were so covered in the paper mache that I didn’t want to wreck my camera. So I ran upstairs and pulled him from his video game to come and be my photographer…only one sigh and half an eye roll, so not bad for a teenager!!!

Most of the designer paper mache bowls had some sort of edging detail on them. So what I did was roll pieces of the paper mache like a snake…just like if you were using play-doh. Then just pushed them onto the bowl and mold them to the shape I wanted.

Using the same technique I made a base for the bottom of the bowl. I turned the bowl over and made sure that the base was even and gave it a slight push.

NOTes:
Now, to be honest, this was the point of the project I thought to myself “Is this going to be a Pinterest fail???”…
I was going for a bumpy kinda look but if I had dipped my fingers in water I could have smoothed out the paper mache for sure.
Step 3. Let the Bowl Dry
Now comes the waiting game! The paper mache takes days to dry completely. Mine may have take longer because I had it drying down on my craft table in the basement and it was pretty cold.

After 2 days when the outside of the bowl started to feel slightly hardened I flipped it over and removed it from the ceramic bowl so the inside could start drying.
I had tried this after 1 day but the paper mache wasn’t strong enough yet and I was afraid it would collapse in on itself.

What I should have done was to bring it upstairs to my warm house and I think it would have expedited the drying time. I did put a small fan on the table blowing in the direction of the bowl for about a day and a half.
So for me it was 5 days until the paper mache was dried out enough to paint it. I’m sure it was 75 out instead of 35 and my basement was freezing it would not have taken so long.

You will definitely know when the paper mache has dried out because it goes from a spongy feeling (it totally reminded me of that Crayola Model Magic kids clay) to a hard feeling.
Step 4. How to Paint the Bowl

First, I painted the entire bowl, inside and out, with a cream colored paint.

Next, I dipped the tip of my paint brush in a brown paint and started dabbing the brush over the bowl. Once I was done this I let it dry completely.

For the second coat what I found that worked perfectly to get that “check out this 1000 year old bowl that I just dug up” look was to crumple up a sheet of paper towel and dip it in the cream and brown paints and dab it onto the bowl

By doing that I really achieved an ancient stone look.
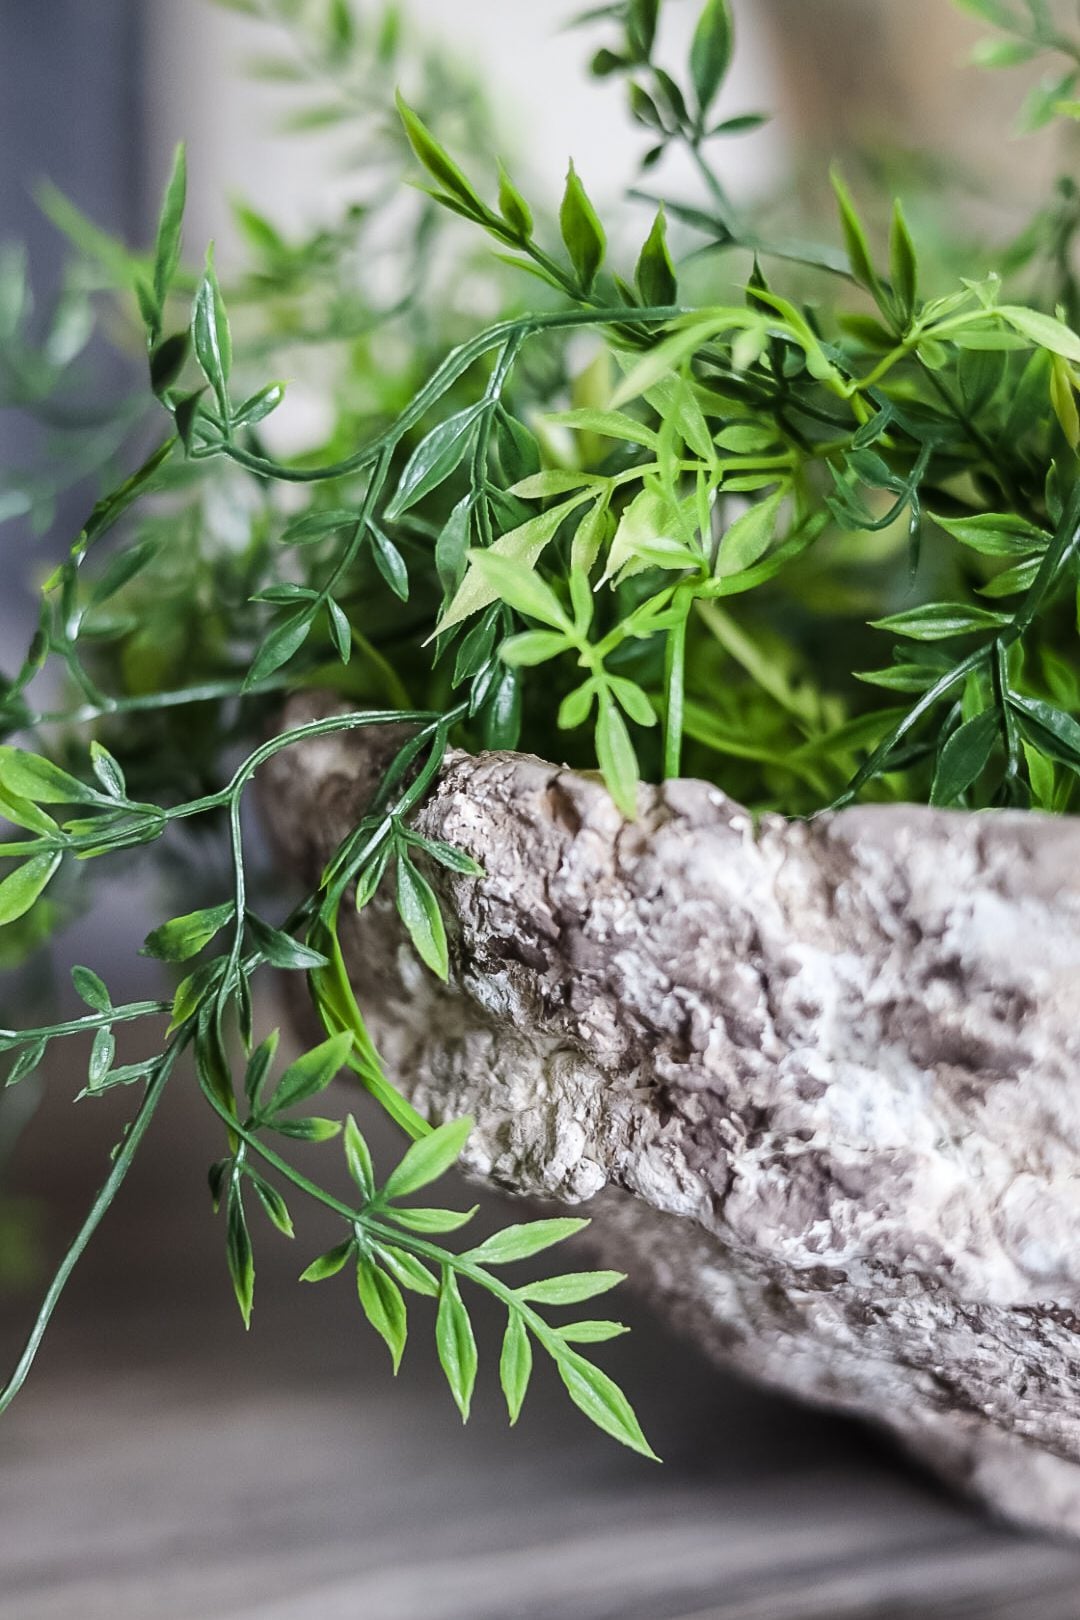
The Finished Paper Mache Bowl

Once I put some greenery in the bowl I really loved how it looked!
I like how old and rustic the bowl came out. I’ve read that after the bowl is completely hard that you can sand down the rough edges with a sanding block.

I’ve noticed that every day the bowl feels a bit harder as all the water is evaporating out of the middle of the bowl.
How sturdy is the paper mache bowl?
Well, the bowl feels strong but I think if I threw it down on the floor it would probably break. It’s definitely sturdy but I will still be careful with it. Definitely more decorative than functional is how I would describe it!!
What can I use a paper mache bowl for?
A few ways that I thought of using the paper mache bowl in my home would be for artificial plants and flowers, decorative moss balls, and filling it with large starfish and shells.
paper mache bowls


Hi Jennifer. My mixture of celluckay didn’t come out in lumpy clumps like your. Maybe I mixed too thoroughly cuz directions said leave no white powder so I kept mixing. Also at first my mixture was too wet and would not have stuck to mold. End result is pretty smooth. I’m going to order more and try again.
I am definitely going to try this project again! I have another bag of the celluclay down in my studio…just need a rainy day to want to stay inside and do it!
Love it, and thank you for your “organic” details and links.
My weakness is wanting to do so much at one time…and you know how that turns out.
Sandra
LOL Sandra!!! That is my life…I’m always working on so many projects at the same time!!
❤️
I have to admit at first I thought, this looks pretty rough. But once it was done it looks fabulous! Really does look authentic. Thanks so much for sharing your ideas. You’ve inspired some new ideas for me. Wonderful piece. Thanks again. -Linda
You and me both Linda!! This was definitely one of those projects that I had my doubts about until it was done!
I think the bowl is sensational. Looks like it was taken from a cave in the Middle East.
I wonder after it is fully cured if it could be sprayed with Neverwet and put outside. I think I will try that and get back to you in a couple of years after it is all done. It will probably take a very long time to cure but it’s worth it.
Thank you for sharing.
Thanks!! I’m going to make a smooth bowl next. I’ll look for the Neverwet too!
Jennifer,
I’ve wanted to try this but never have. I’d like to share a link on my Sunday, Dirt Road Adventures. Thanks for the inspiration.
Thanks so much, Rachel!! I’m going to try making a smooth, smaller bowl next.
You’re bowl is awesome!!! So cool! You in a hat…LOVE!!!
Thanks Ames!!
I do not see the powdered medium. All I’m finding is the clay already wet and soft. Will this work? Also, did you use acrylic paint? Did you see the bowl with a finishing spray? How much “clay” do you need? One pound, five pound? Thx, Sharon
Hi Sharon,
I used 1 lb of the CelluClay product that I linked and all I had to do was add water to it…there wasn’t any added glue or anything for this paper mache.
-It will totally depend on the size of the bowl you are using for a mold as to how much you would need but 1 pound did a decent-sized bowl. For an oversized bowl then I think 2 pounds would work.
-I used a mix of acrylic and chalk paint because that’s what I had on hand but they both worked perfectly.
– I didn’t bother to seal it but I am just going to use it for artificial plants.
Let me know that you saw this, if not I will shoot you an email with all the info you need! Thanks for stopping by- Jennifer