

Winter in New England signals a shift for us gardeners. Our vibrant summer beds may be sleeping beneath the snow, but if you look closely, you’ll see the garden is far from empty! If you look closely, you’ll see the quick flutter of a Black-capped Chickadee, the brilliant flash of red from the resident Cardinal, the big Eastern Bluebird family, and the various types of woodpeckers who visit daily.
What You’ll Find In This Guide
The “Why”: Why winter feeding is a crucial act of care for birds in cold climates.
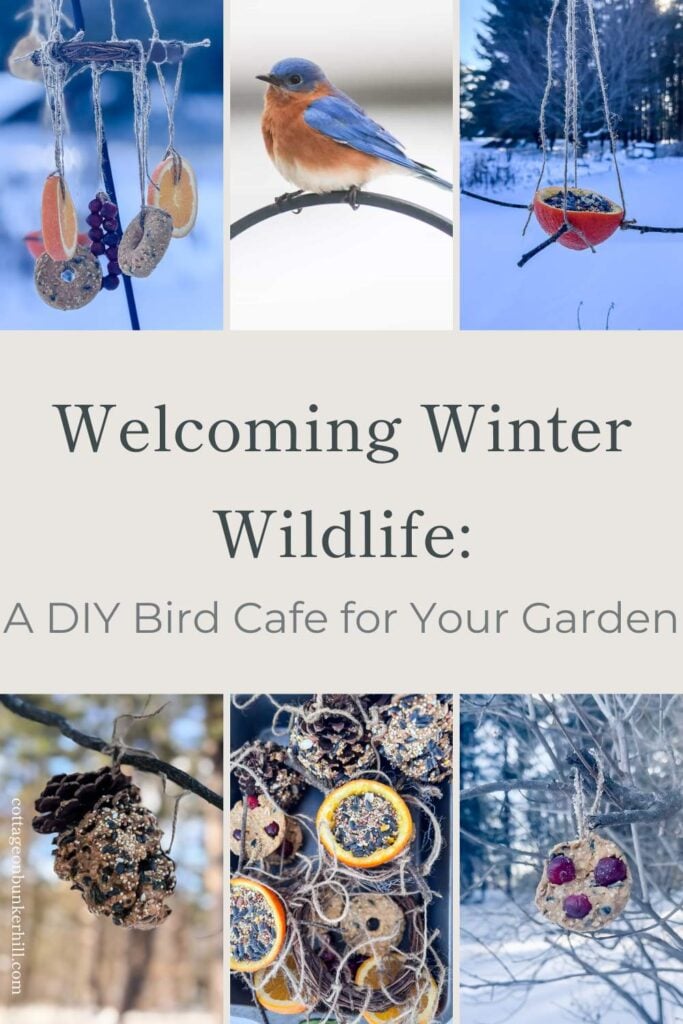
The Star Recipe: Our detailed, tried-and-true recipe for all-natural, high-energy suet cakes (and the silicone mold trick that makes it easy!).
Four Simple DIY Feeders: How to make a sunny orange feeder, a classic pinecone feeder, a rustic cranberry garland, and a quick chicken wire suet basket.
The Grand Finale: How to combine your creations into a beautiful “bird cafe” mobile.
Styling & Strategy: Tips on where to hang your feeders to create a beautiful, functional winter bird sanctuary you can enjoy from your window.
In our cold climate, these resilient birds burn through an astonishing amount of energy just to stay warm, while their natural food sources lie frozen or buried. This is where we, as stewards of our little patches of earth, can make a profound difference. Offering high-fat, nourishing food isn’t just a hobby; it’s a vital lifeline during the deepest cold.
But let’s be honest, this ritual feeds our souls as much as it feeds the birds. One of my greatest joys at Cottage on Bunker Hill is the year-round theater of birds outside my window. In winter, it’s a favorite ritual of mine. There is no greater simple pleasure on a bitter day than being tucked inside with a cup of coffee watching a lively crowd flit and feast against the silent white backdrop of the garden. That’s the spirit behind the project I’m sharing today.
I spent a quiet morning in my kitchen, melting, mixing, stringing, and crafting a handmade banquet to turn my yard into a welcoming winter bird cafe. From a hearty homemade suet recipe to a foraged pinecone feeder and a beautiful grapevine wreath mobile, each project is simple, natural, and deeply satisfying. So, pull up a chair, imagine the scent of peanut butter and cranberries, and let’s create!

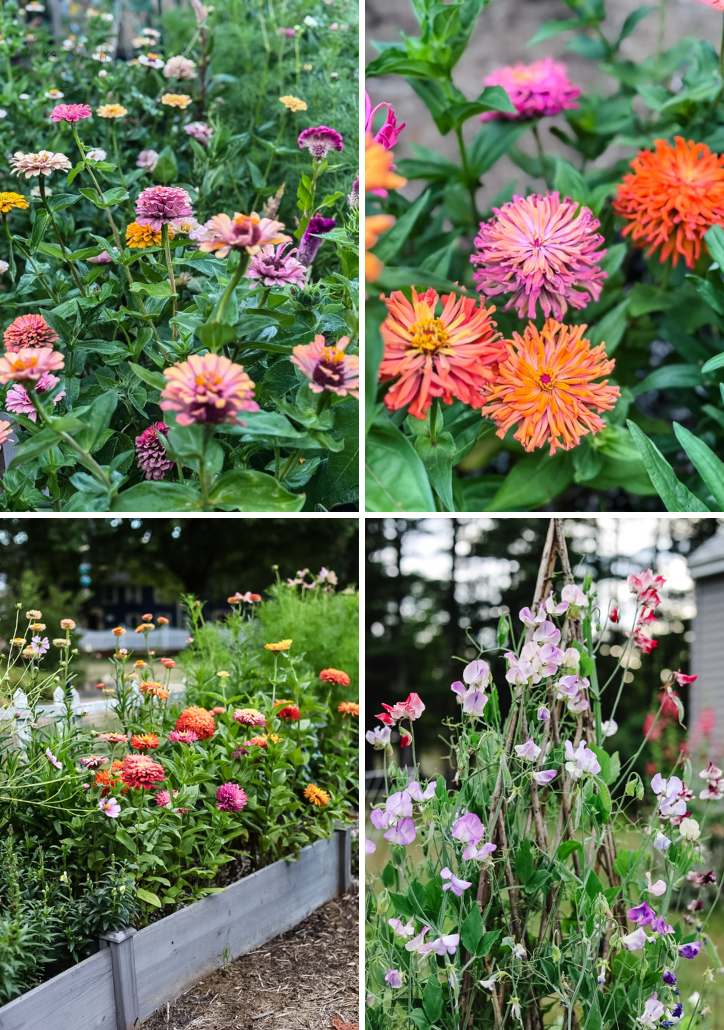
Welcome! I’m Jennifer from Cottage on Bunker Hill. A home gardener for over 20 years, I’ve spent the last 5 specializing in our cut flower garden, learning through trial, error, and a lot of dirty knees what actually works. My focus is on growing flowers with a purpose, whether for a vase on the kitchen table or for lasting projects, using simple, repeatable methods that fit into a real, busy life.
This post may contain affiliate links, which means we receive a small commission if you purchase through our links. See our disclaimer page for more information.
DIY Bird Feeders to Make This Winter (A New England Gardener’s Guide)
So, let’s get started! I’ll show you exactly how I make nourishing suet at home, plus share a handful of charming feeder ideas you can whip up with everyday items.
Materials That I Used for DIY Birdfeeders
- Peanut Butter Suet (recipe following)
- Silicone Donut Pan/ Muffin Pan
- Large Oranges/ Grapefruit
- Fresh Cranberries
- Jute Twine
- Cotton Kitchen Twine/ Large Needle
- Pinecones
- Small Grapevine Wreath
- Piece of Chicken Wire
Project 1 – The Hearty Homemade Suet
The Star of the Show: All-Natural Suet Cakes
While store-bought suet cakes are convenient, nothing beats knowing exactly what’s in the food you’re offering your feathered neighbors. This simple, nourishing recipe uses just a few wholesome ingredients to create high-energy cakes that will keep birds visiting all winter long. The best part? You probably have most of it in your kitchen already.
The Cottage On Bunker Hill Suet Recipe
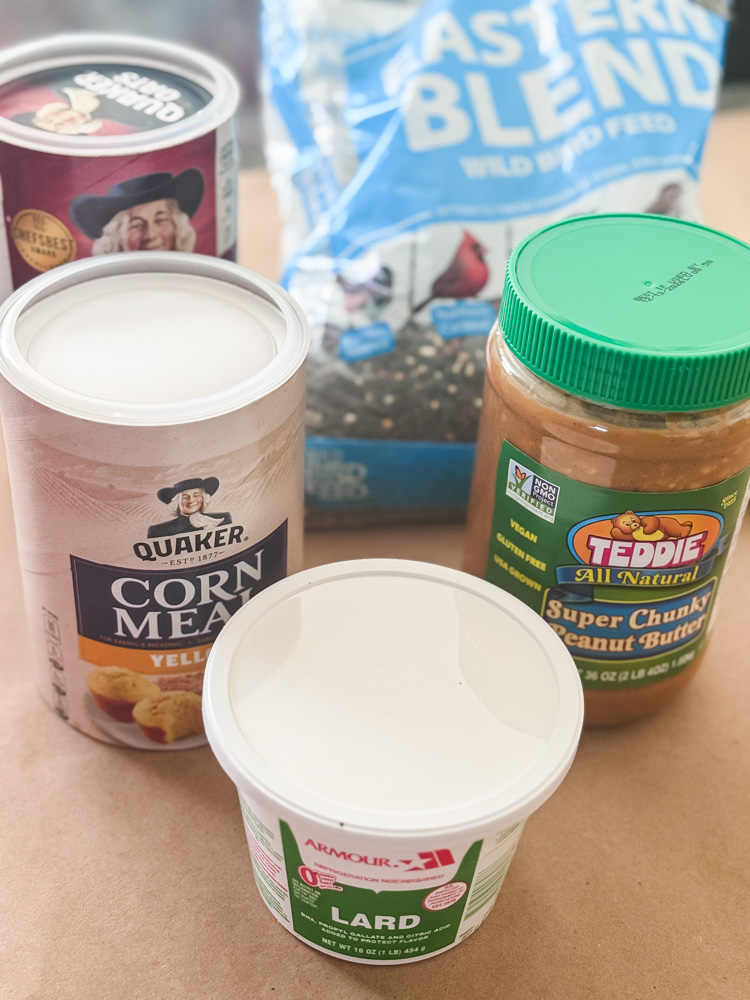
What You Will Need
- 1 cup lard or beef fat (the high-energy base)
- 1/2 cup natural peanut butter (a crucial note: use unsweetened, no sugar added!)
- 1 cup cornmeal, old-fashioned oats, or a combination (I used half and half for texture)
- 1 cup quality wild bird seed mix
- Optional: Dried unsweetened berries, chopped unsalted nuts (my seed mix already had nuts)
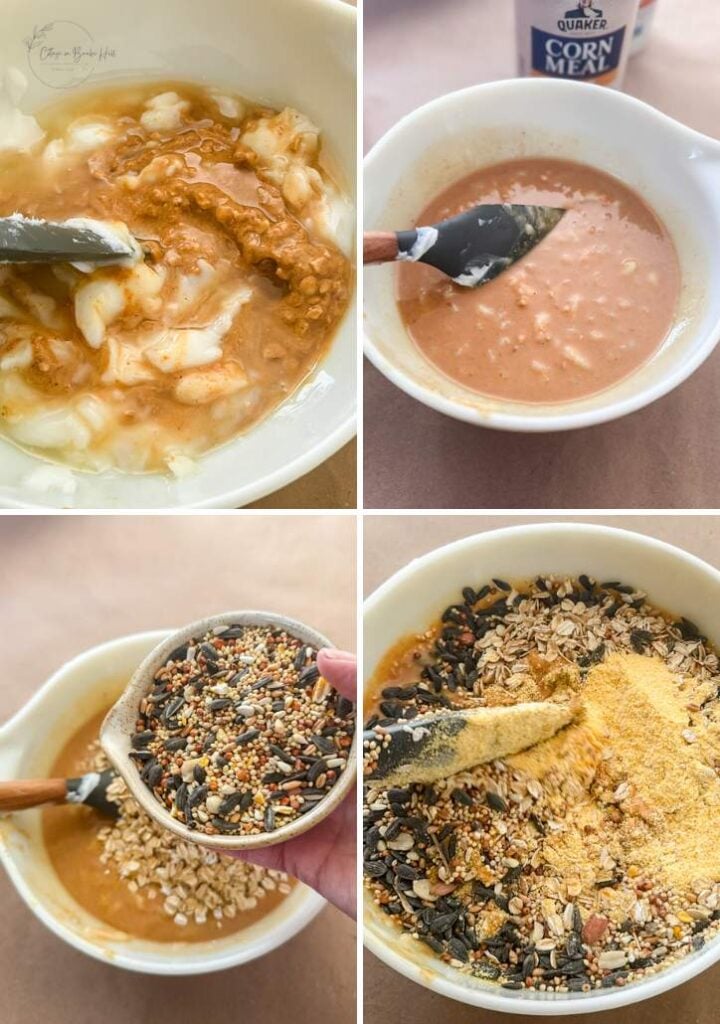
Method: A Simple Melt & Mix
Since I wanted to make a large batch of suet for today’s project, I doubled the suet recipe.
- Melt: In a large microwave-safe bowl or a saucepan over low heat, gently melt the lard and peanut butter together until just liquid and smooth.
- Combine: Stir the mixture well until it’s fully blended.
- Mix-Ins: Remove from heat. Stir in the cornmeal/oats until incorporated, then fold in the bird seed (and any optional extras). You’ll have a thick, lumpy, fragrant paste.
- A Key Tip: Check your ingredients for safety-ensure everything is unsalted, unsweetened, and free of seasonings. Birds’ metabolisms can’t process added salt or sugar like ours can.
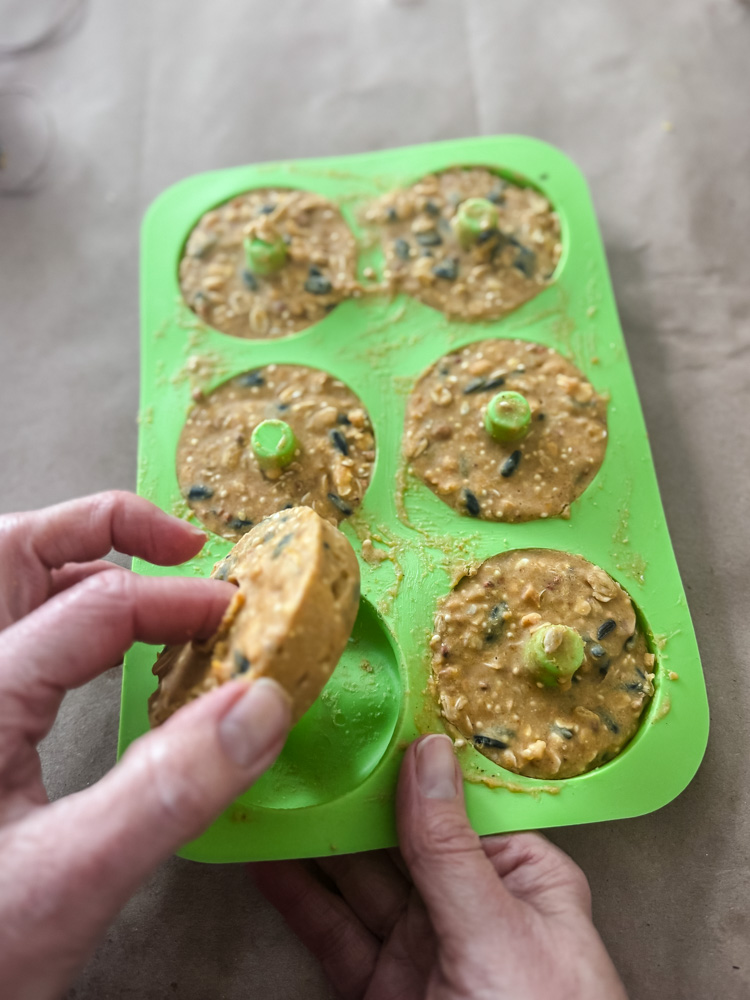
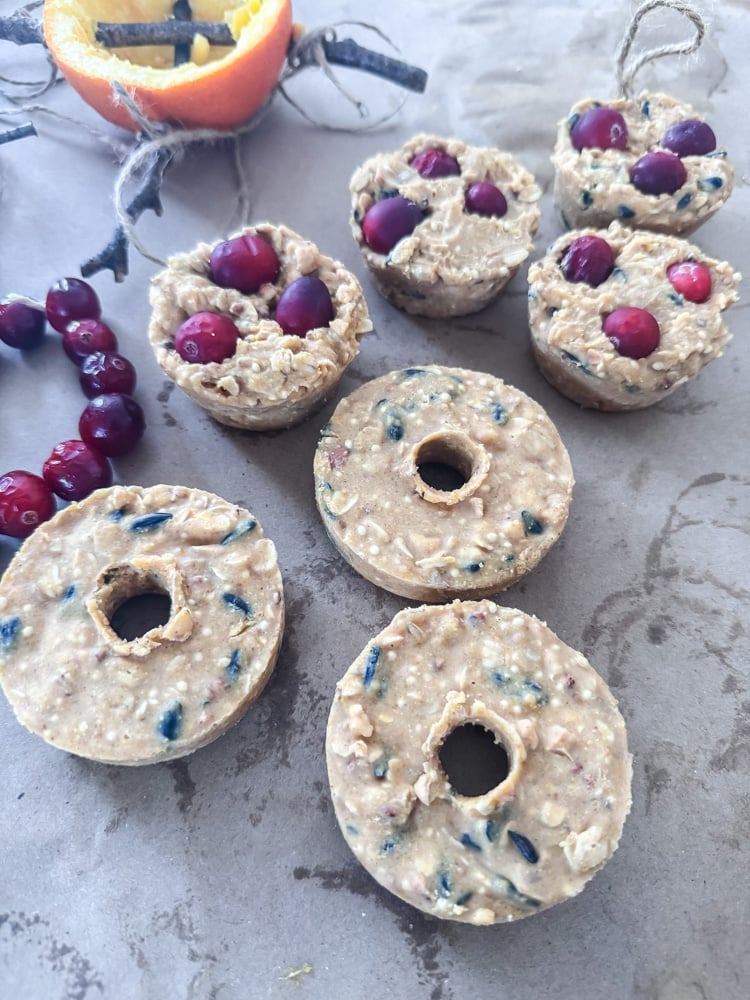
Molding & Setting: The Silicone Secret
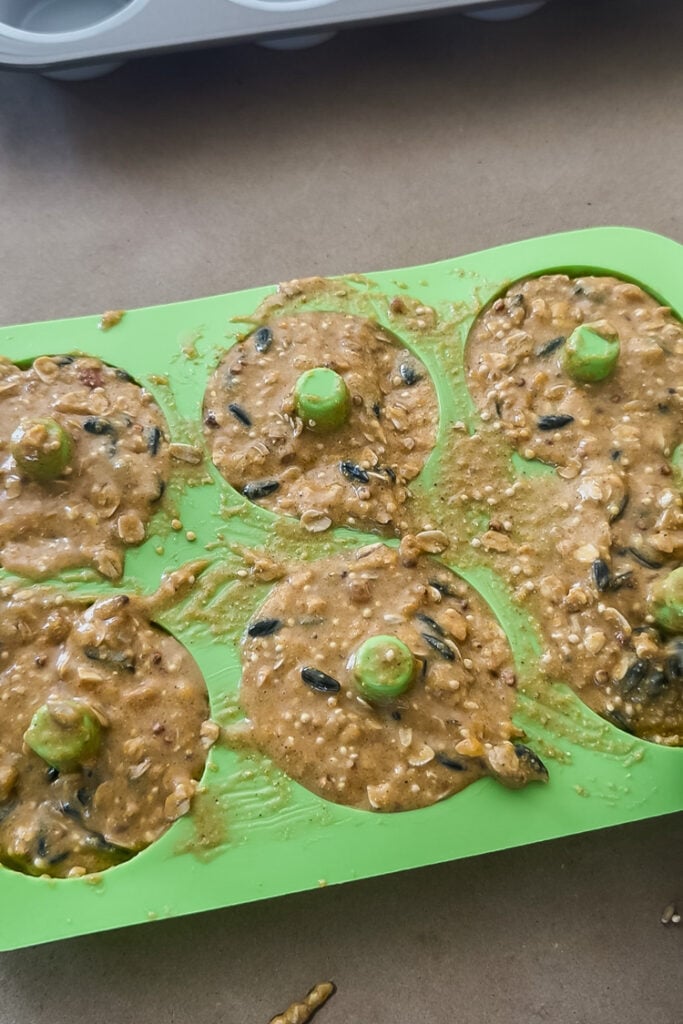
This is where the project gets fun and almost effortless! I used silicone baking molds: a donut mold for classic “suet rings” and a muffin pan for easy cakes. The flexibility of silicone means the set suet pops out perfectly without any sticking or prying.
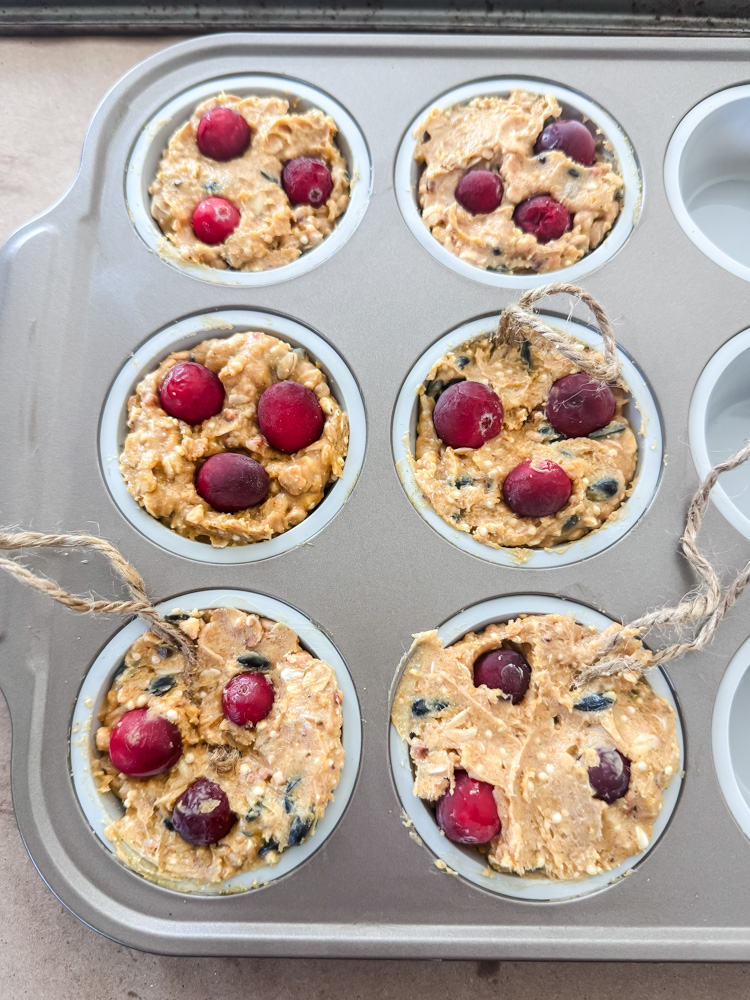
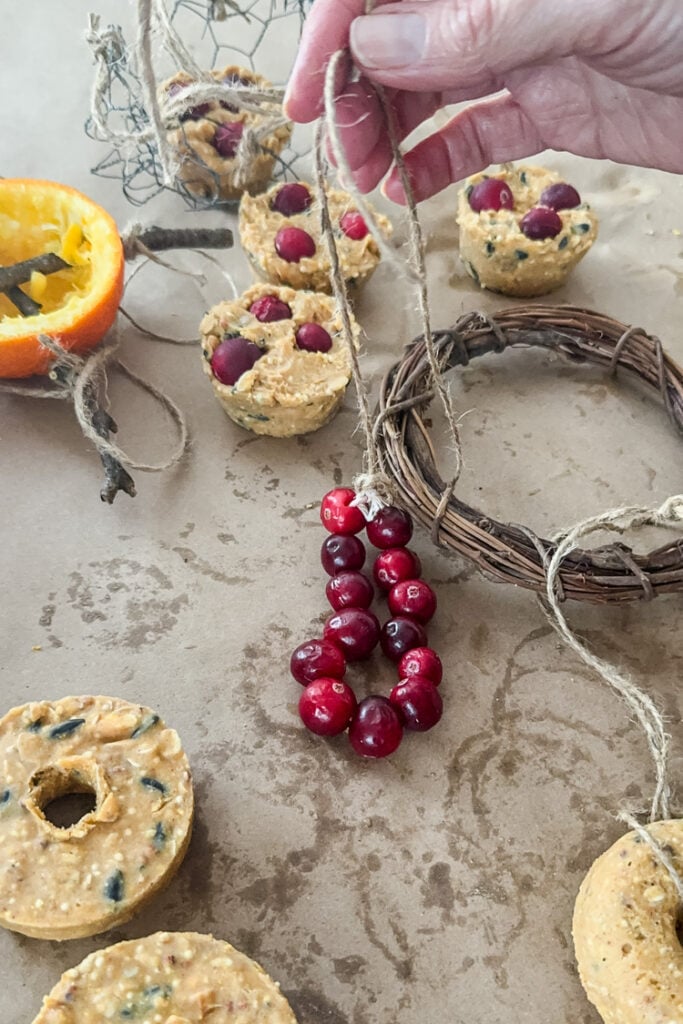
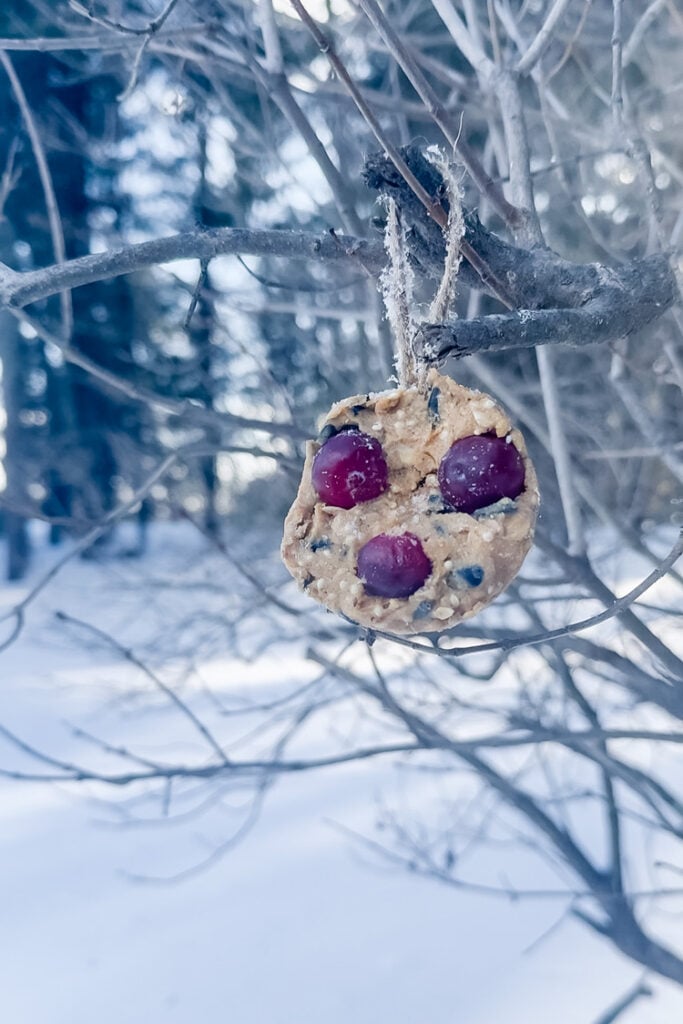
Pro Cottage Tip: Before the suet sets, you can add special touches. I pressed a few dried cranberries into the tops of the muffin-sized cakes for color and added fruit. For an even easier hang, I looped a short piece of jute twine into the center of a few while they were still soft, creating a built-in hanger after hardening.
Setting: The suet needs to firm up completely. You can place the molds in the refrigerator/freezer for a few hours or, if you’re blessed with a New England winter like I am, use nature’s freezer! I placed my trays on my front porch and covered them(safe from curious squirrels!) and let the cold do the work. They were rock-solid in no time.
I’ve created this printable download of the suet recipe for you to save & use.
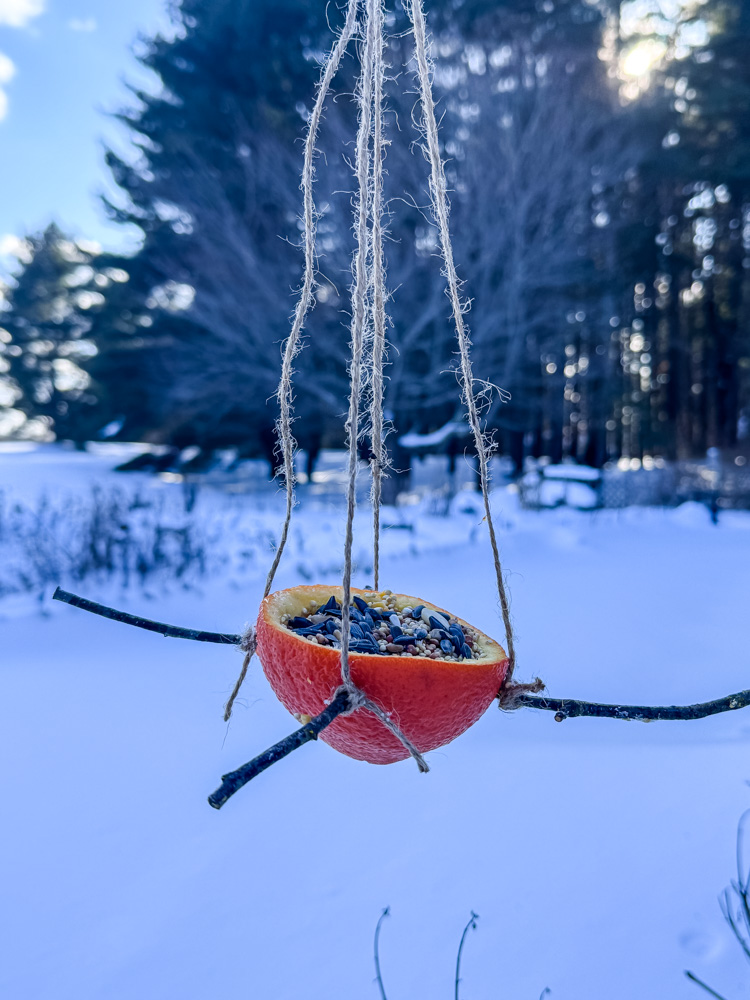
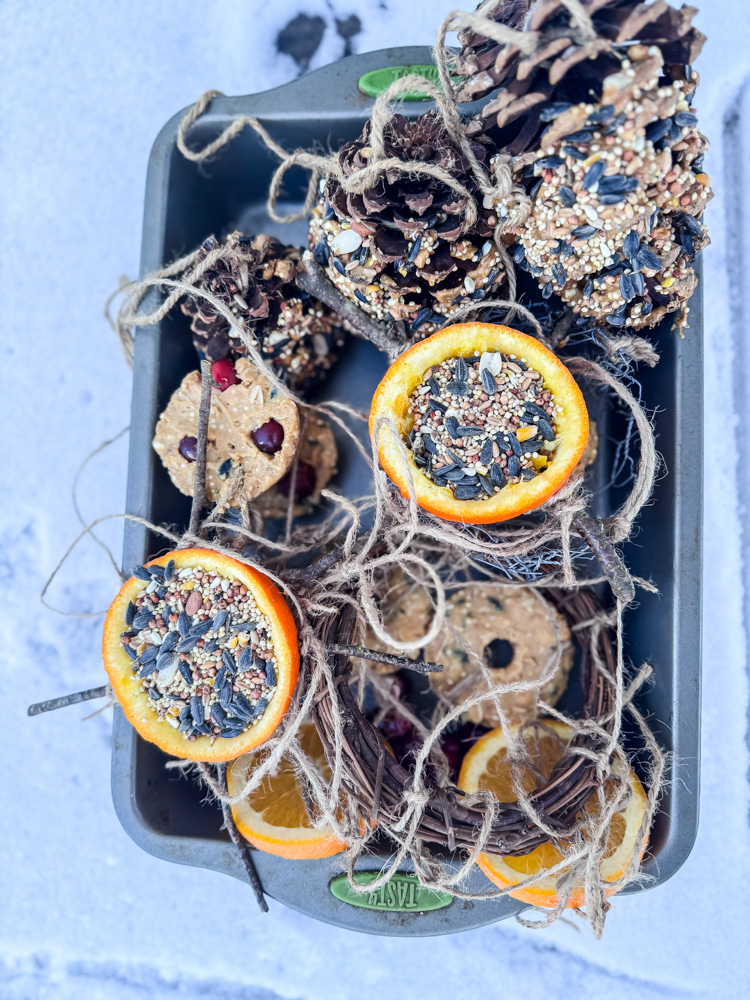
Project 2: The Citrus Surprise Feeder
The Sunny Orange Half Feeder
This project is proof that the simplest ideas are often the most beautiful. It’s biodegradable, bursting with a cheerful pop of color against the snow, and takes mere minutes to put together. All you need is an orange, a stick, some twine, and birdseed.
What You’ll Need
- 1 large navel orange or grapefruit
- A sharp knife and a spoon
- 2 small, sturdy twigs (for perches)
- Jute twine or sturdy string
- Wild bird seed mix
Step-by-Step Instructions:
Cut & Hollow
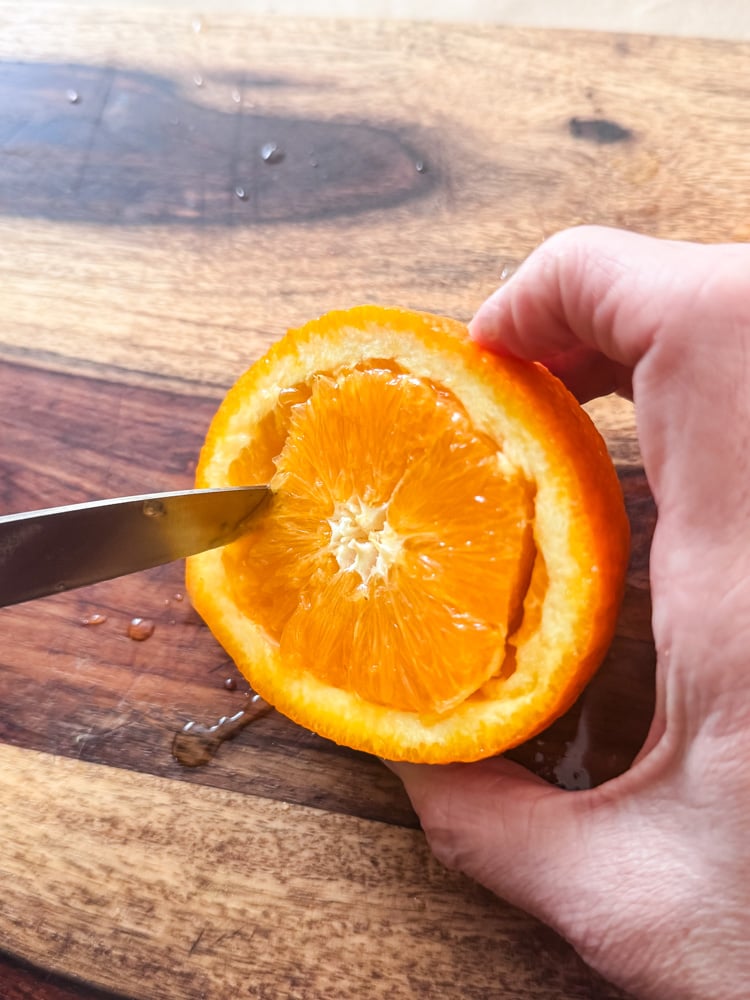

- Cut & Hollow: Slice your orange in half horizontally. Use a spoon to carefully scoop out the fruit pulp, leaving a clean, empty cup. (I took a snack break and ate the fruit!)
- Create Perch Holes: About halfway down the side of each orange half, use a skewer, nail, or the tip of your knife to poke four small holes evenly spaced around the circumference. I used a lobster pick.
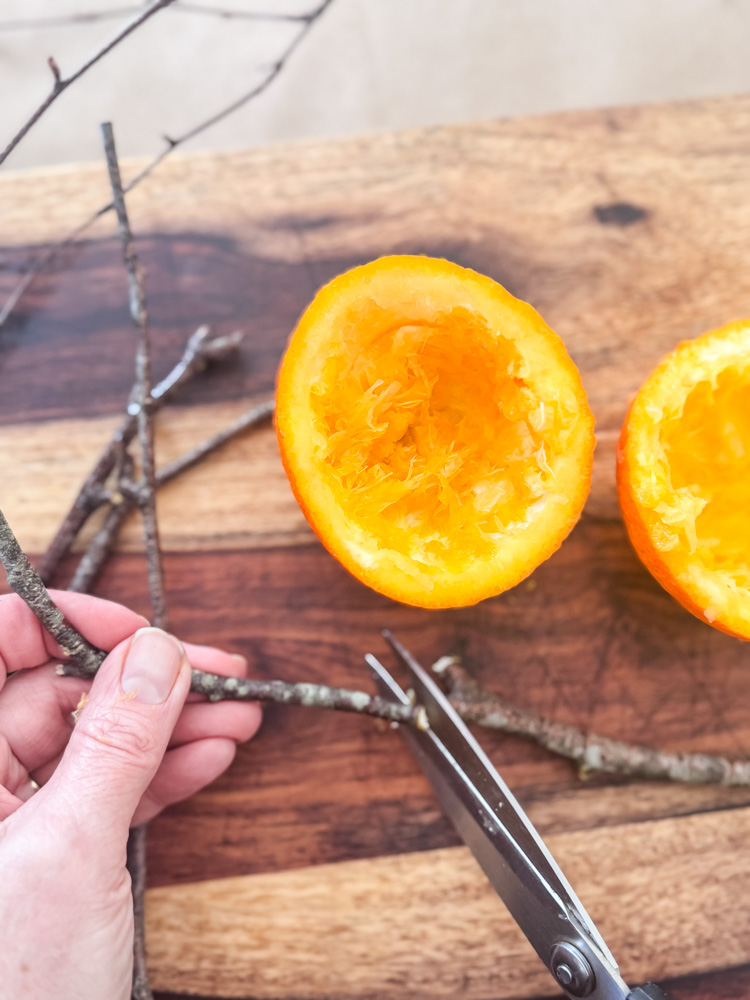

Gently weave two small, sturdy twigs through the opposite holes so they cross in the center, creating a stable, natural perch system for the birds.
- The Four-Point Hanger: Cut four equal lengths of jute twine (the length depends on where you want to hang it; 12-15 inches is a good start for flexibility). Tie a secure knot around each twig where it exits the orange. Gather the four loose ends above the orange and tie them together in one final, sturdy knot, creating a perfect hanging loop. Trim any excess.
- Fill & Hang: Fill your orange cup with a quality birdseed mix. Find a sunny, visible spot on a tree branch or shepherd’s hook and hang your creation!
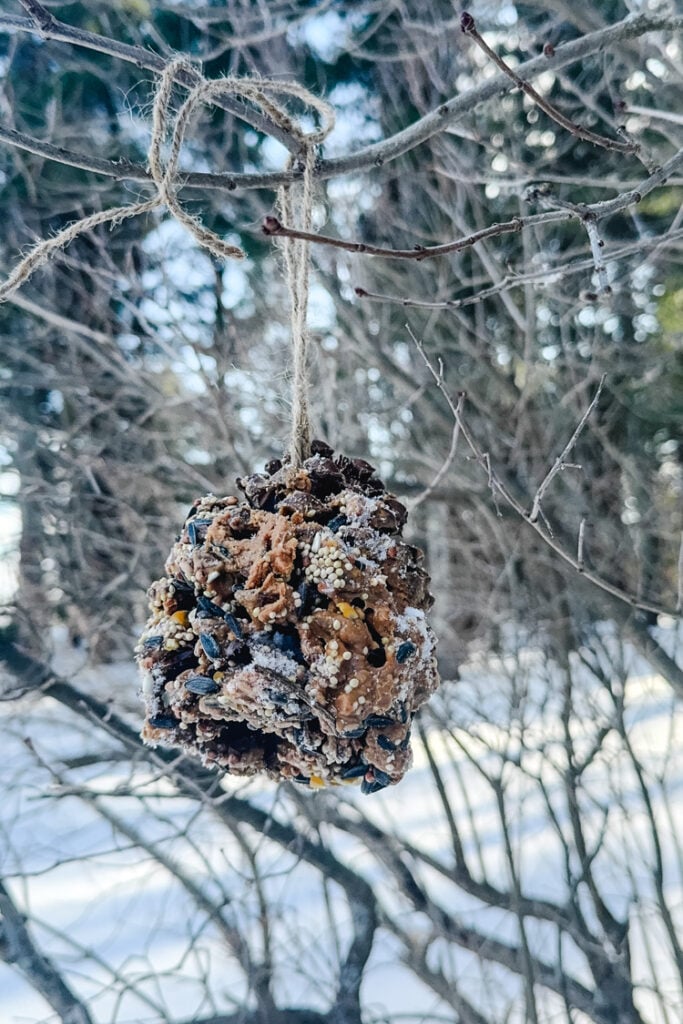
Project 3: The Classic Pinecone Peanut Butter Feeder
The Ever-Reliable Pinecone Feeder
Some projects become classics because they just work, and this is one of them. It’s a perfect activity to do with little helpers, and it forages for a natural material right from your yard (or a winter walk!). The textured scales of a pinecone are nature’s perfect vessel for holding a thick layer of energy-packed peanut butter and seeds.
What You’ll Need
- Dry, open pinecones (any size)
- Natural, unsweetened peanut butter (or lard for a nut-free option)
- Wild bird seed mix
- A small butter knife or spatula
- A plate or shallow tray
- Jute twine or string
Step-by-Step Instructions:
Tie First, Spread Second

Tie First, Spread Second: Before things get messy, cut a long piece of jute twine and securely tie it around the top few scales of your pinecone, leaving long ends to make a hanging loop later. This is your most important step-it’s much harder to attach the string after the pinecone is coated!
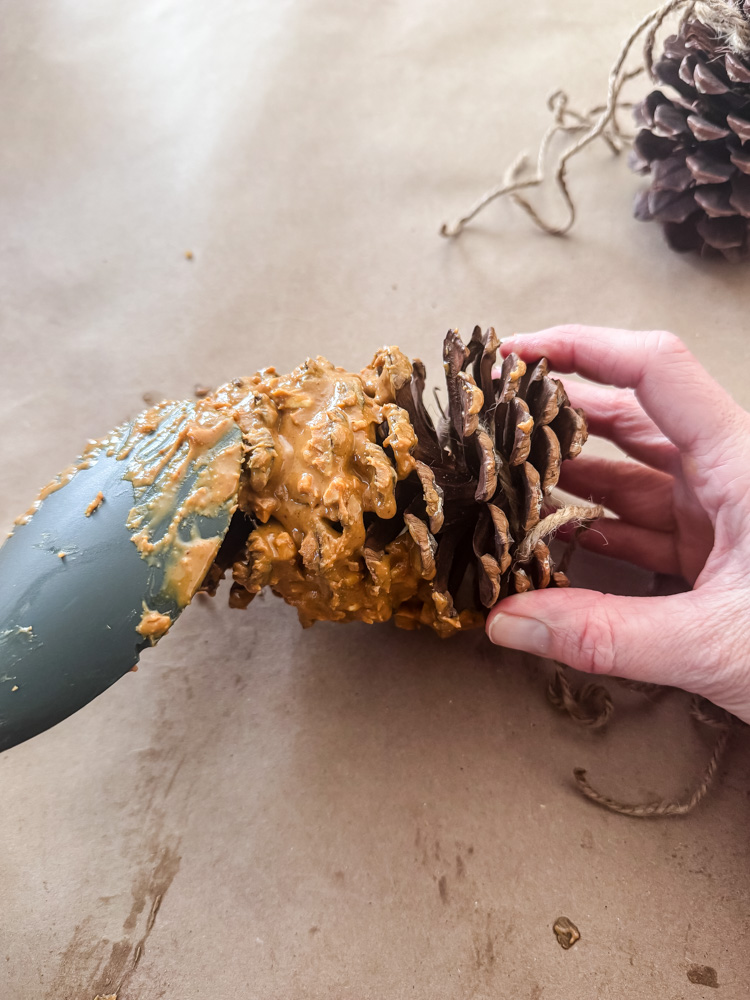
- The Peanut Butter “Glue”: Using your knife, generously spread the natural peanut butter into the crevices of the pinecone, working from the bottom up. Don’t be shy—get it deep into the scales. This sticky fat is the vital adhesive and a high-energy food itself.
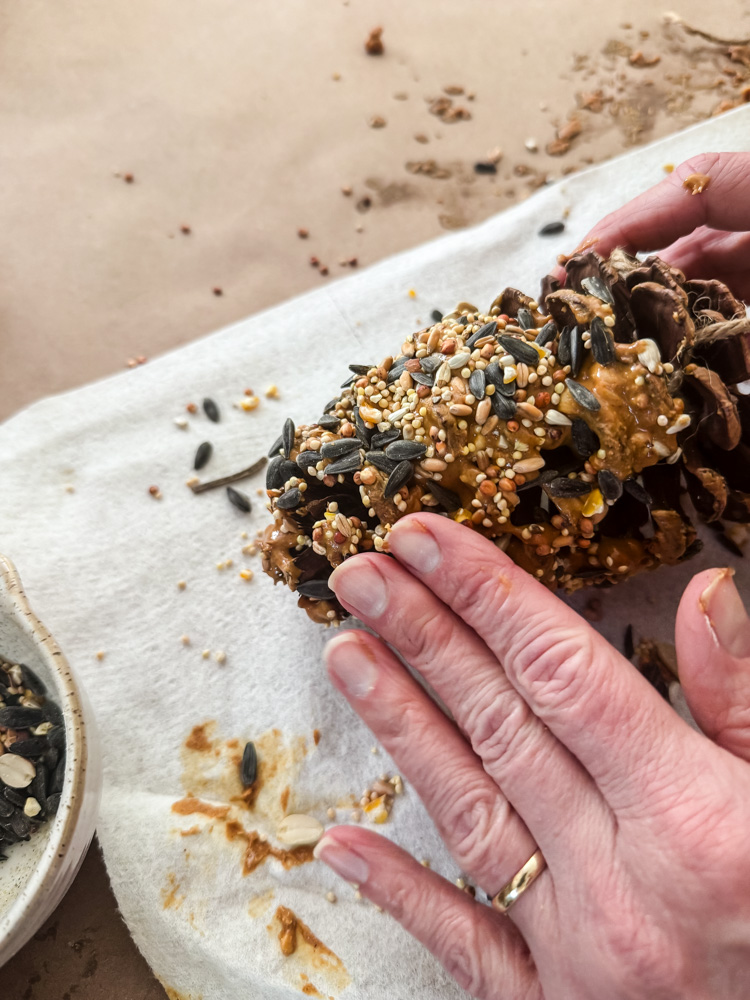
- The Seed Coat: Pour your birdseed mix onto a plate or into a shallow tray. While the peanut butter is still soft and sticky, gently roll and press the coated pinecone into the seeds until it’s completely covered. You can sprinkle extra seeds onto any bare spots.
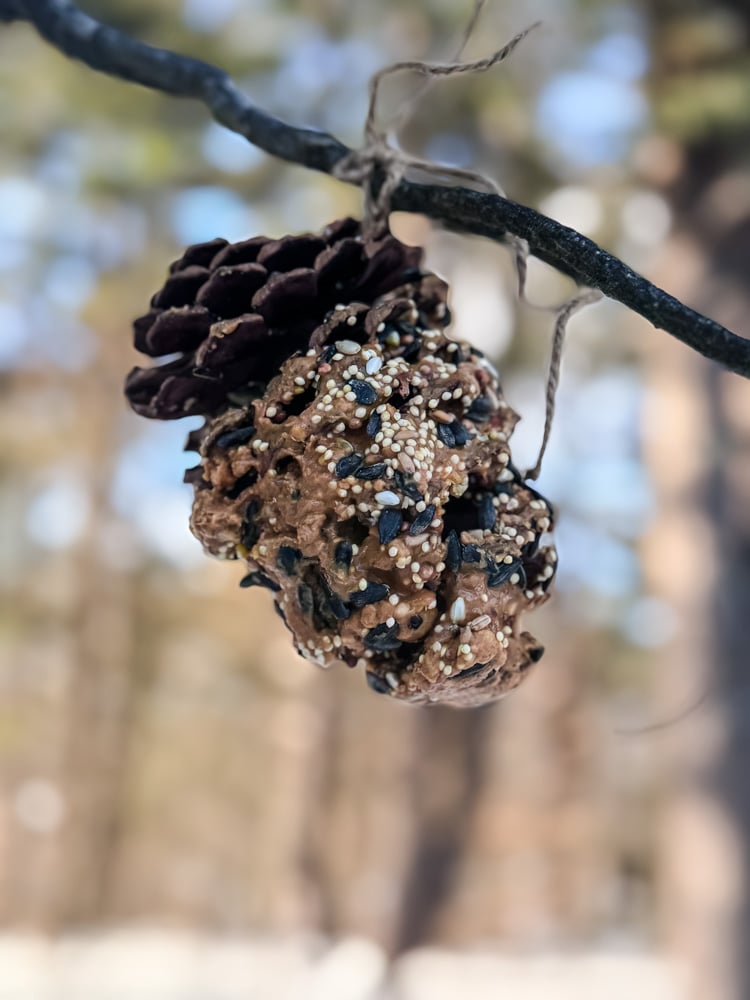
Harden & Hang: You can hang your feeder immediately, or for a less messy set-up, let it firm up on a piece of parchment paper in a cool spot (like your porch!) for an hour. Then, find a sturdy branch, hook, or fence post to tie it on.
A Gardener’s Note: In my experience, titmice, nuthatches, and chickadees adore these feeders. They’ll cling acrobatically to the pinecone, picking out seeds with delight. I love hanging these in my backyard quince bush-the thorny branches give the birds a safe landing spot nearby. I also tuck them into my large lilac bushes where I know some of my feathered friends hang out.
Project 4: The Rustic Cranberry Garland
This project is pure, simple joy. It’s less about being a primary food source and more about offering a sweet, decorative treat. The vibrant red cranberries create a stunning visual against the white snow and bare branches, and birds like robins, bluebirds, and cedar waxwings will appreciate the fruity supplement. I think of it as the perfect “Berry Bangle” for our Bird Cafe mobile (coming up)!
What You’ll Need
- Fresh or dried cranberries (unsweetened)
- A sturdy needle (upholstery needle works well)
- Strong, biodegradable thread (like baker’s twine)
- Scissors
Step-by-Step Instructions:
Thread The Needle & String The Berries
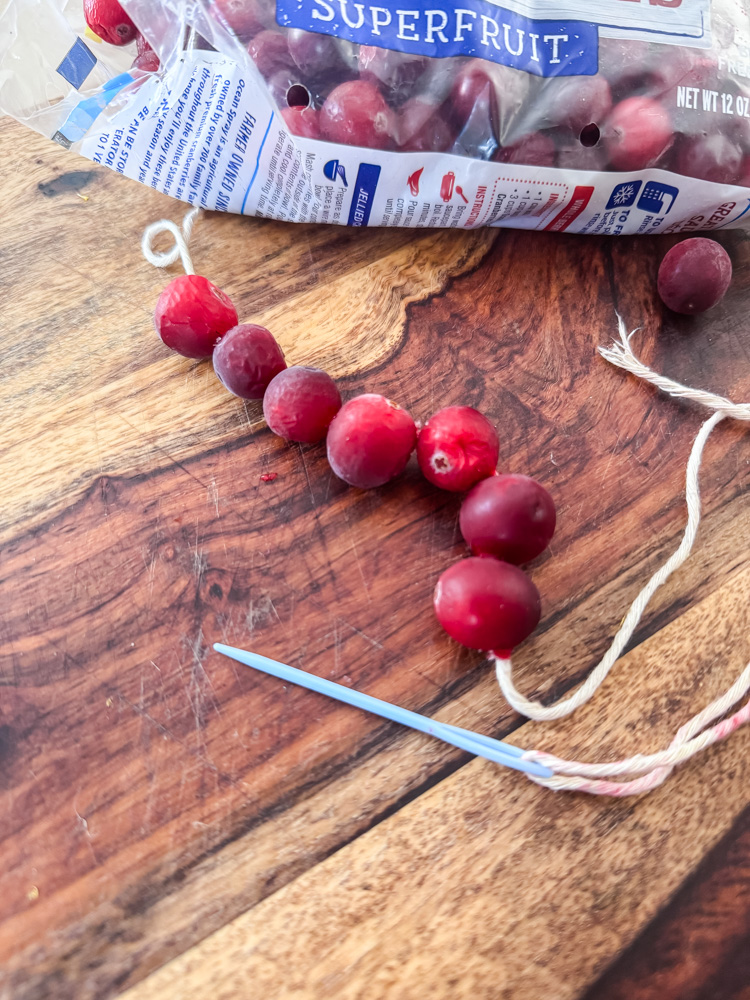
- Thread Your “Needle”: Cut a length of your cord- anywhere from 1 to 2 feet long, depending on how long you want your garland. Thread it through your needle and tie a knot at the very end.
- String the Berries: Simply pierce each cranberry through the center and slide it down the cord until it rests against your end knot. Continue until you have a beautiful strand. Leave several inches of cord free at the top for tying.
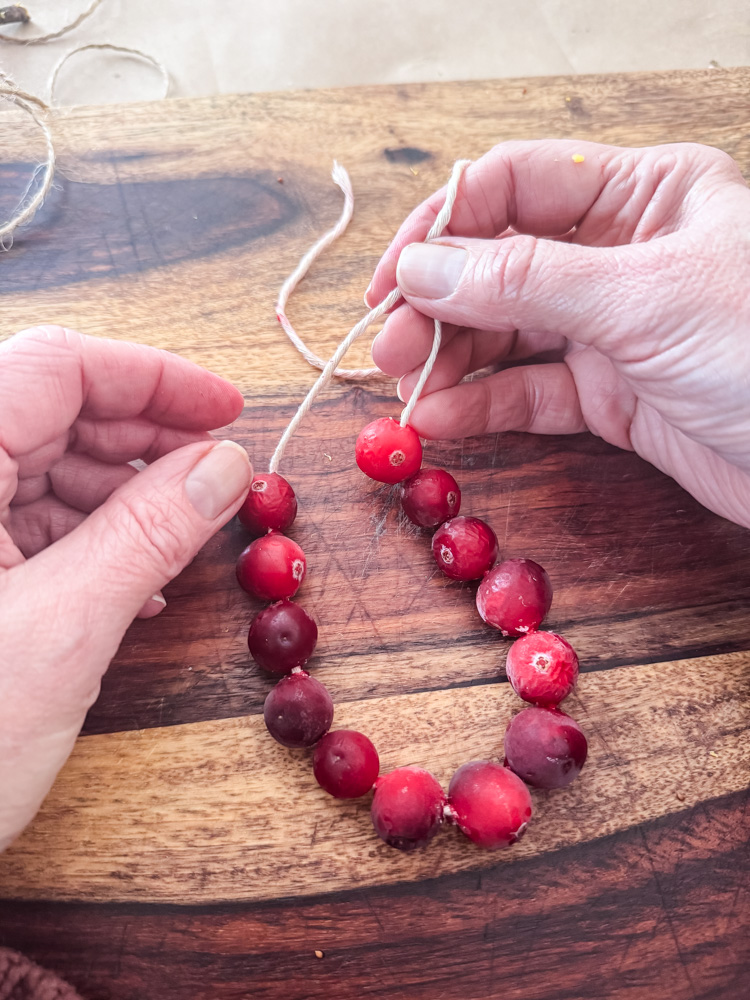
- Create & Place: For a straight garland, tie the loose end to a branch when you’re finished. For a circular “bangle” to add to our wreath mobile, simply tie the two ends of the cord together in a secure knot once you’ve strung your desired length.
- Hang with Intent: Drape your creation over low-hanging branches, weave it through shrubbery, or, as I did, incorporate it into the grapevine wreath mobile. It provides a festive touch and a welcome source of moisture and fruit sugars.
Why It’s Worth It: While it might be nibbled slowly, this garland’s true magic is in its beauty. It transforms a bare winter bush into a bright spot, reminding us that gardening in winter can be just as creative and soul-nourishing as in summer.
Project 5: The Simple Suet Basket
The Quick & Easy Suet Pouch
Not all feeders need to be complicated. This project is for the gardener who loves a rustic, functional aesthetic and wants to offer a straight-up suet buffet in minutes. Using a small piece of chicken wire, we can craft a perfect little basket that lets birds cling naturally while they feed, and allows for excellent drainage-a key feature in our snowy, wet climate.
What You Will Need
- A square of chicken wire (about 8″x8″ or 10″x10″ is a great start.
- Wire cutters (and gloves for handling sharp edges)
- Pliers
- Jute twine
- Suet cake
Step-by-Step Instructions
Simple Suet Basket
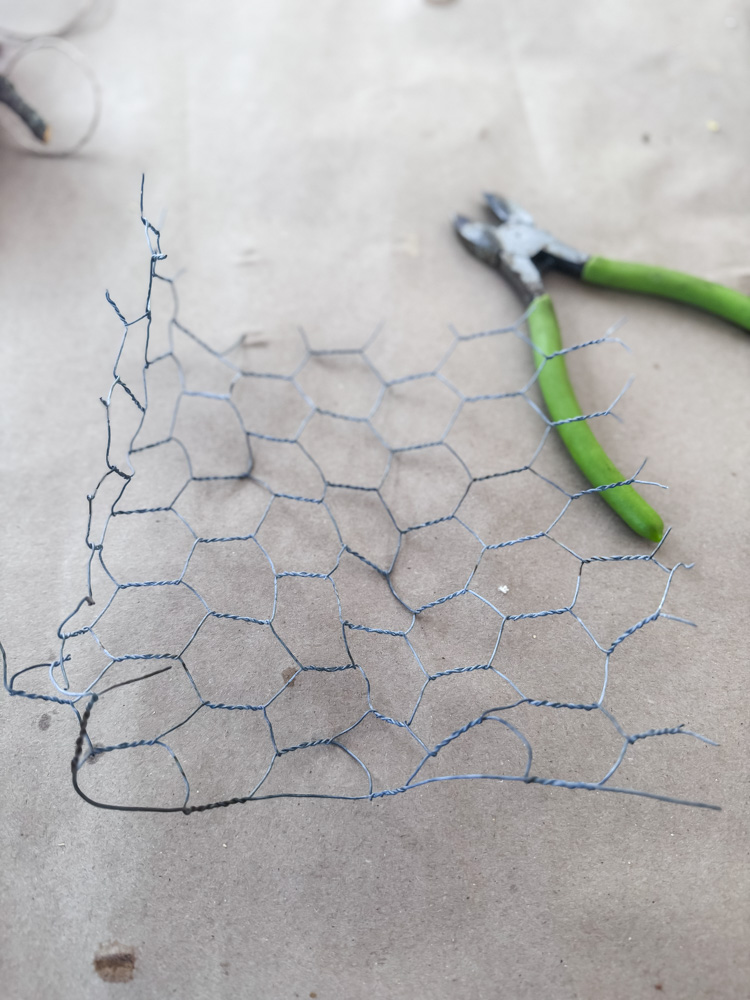
Cut & Shape: Wearing gloves, cut your wire to your desired size. For a small pouch, an 8″x8″ square is perfect. Gently roll or fold the square into a loose circle shape.
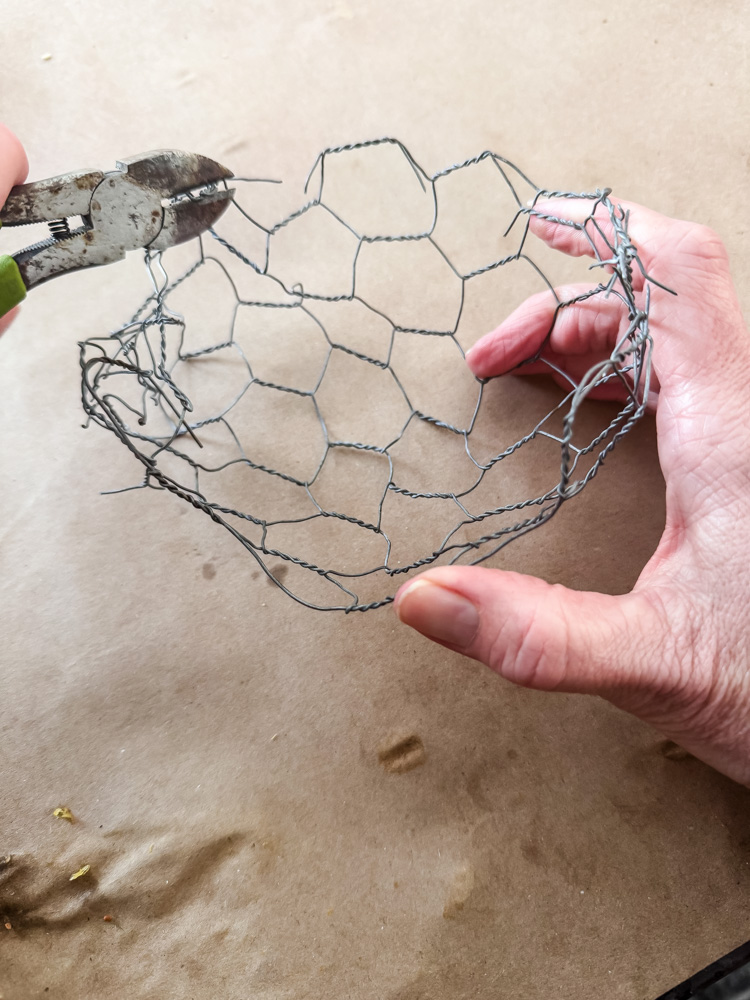
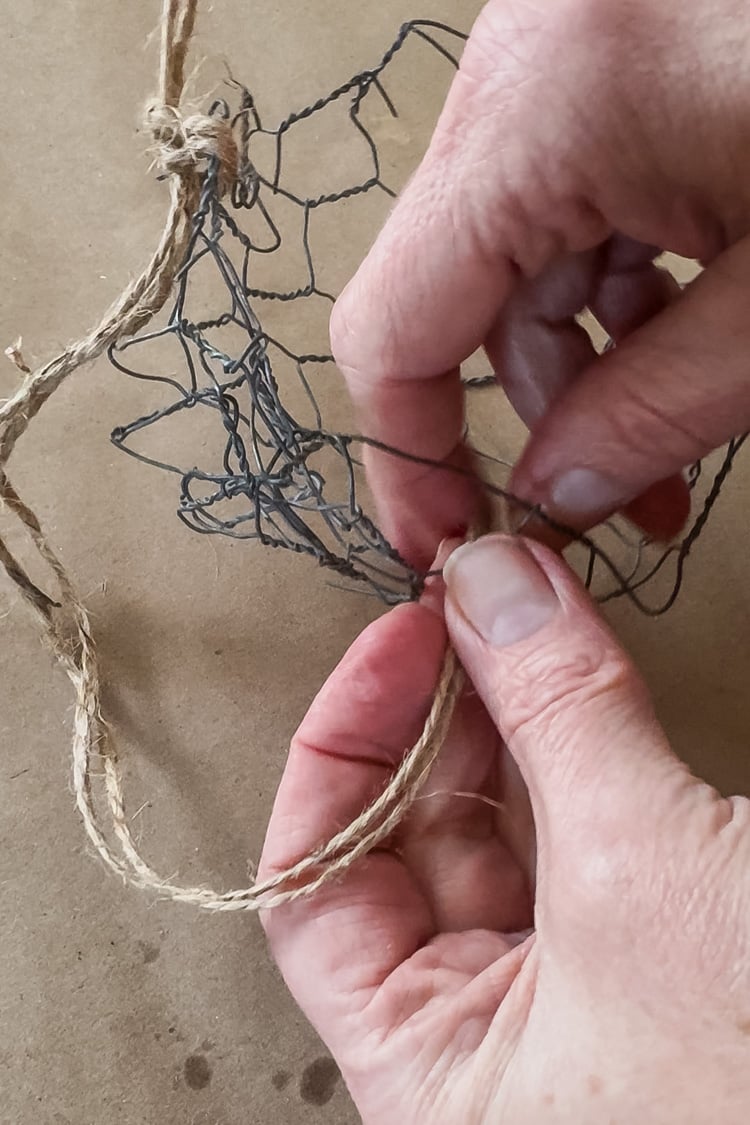
- Secure the Seam: Using the pliers, twist the cut edges of the wire together along the seam to form a secure basket.
- Create the Hanger: Cut 4 equal-length pieces of jute twine (the length will depend on where you want to hang it). Form basket handles on each side, doubling up the jute for sturdiness.
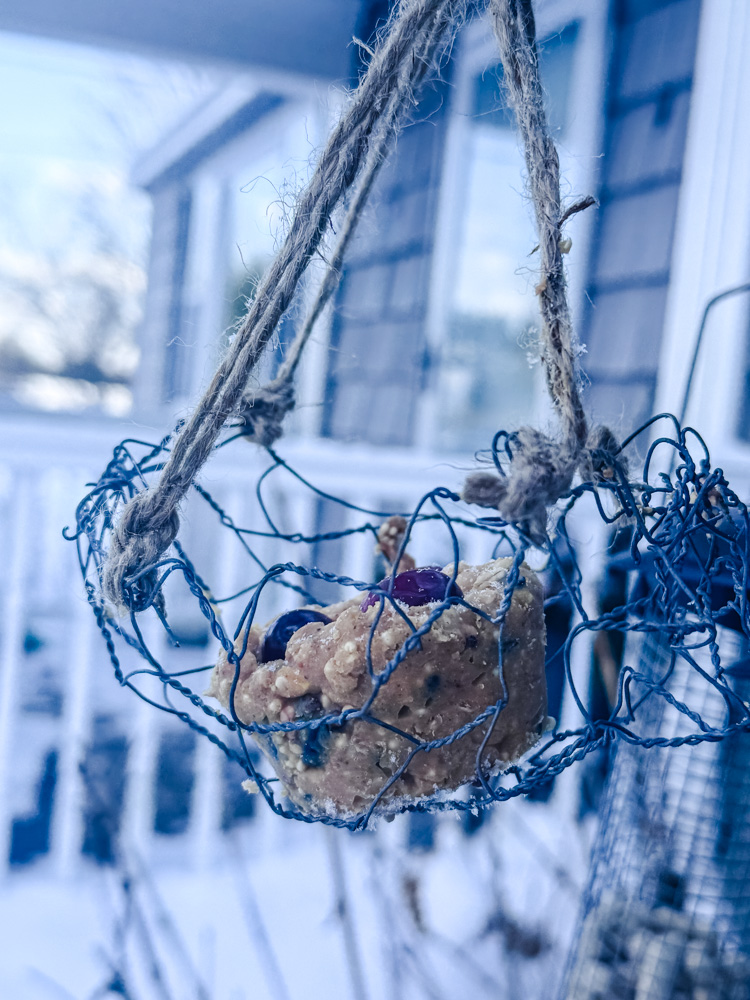
Fill & Hang: Fill your rustic basket with one of the suet cakes. Hang it from a branch, fence, or hook. The open weave allows rain and snow to pass through, preventing seed from spoiling- a crucial tip for our New England winters!
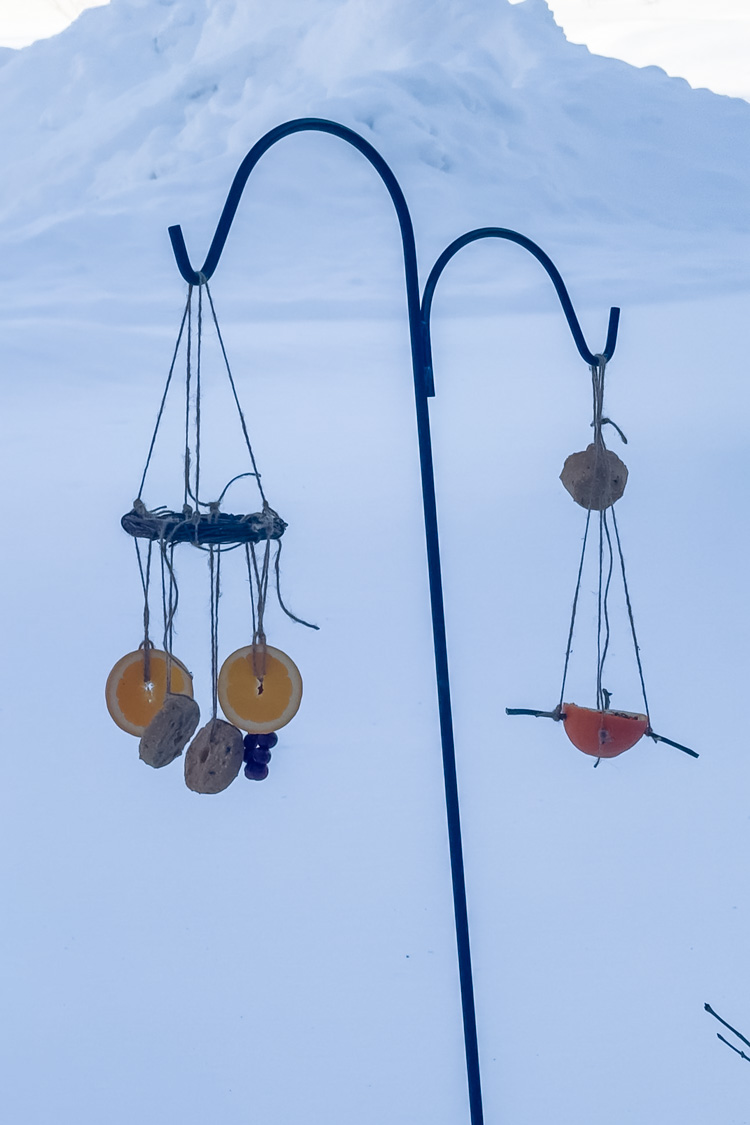
Project 6: Creating Your Winter Bird Cafe
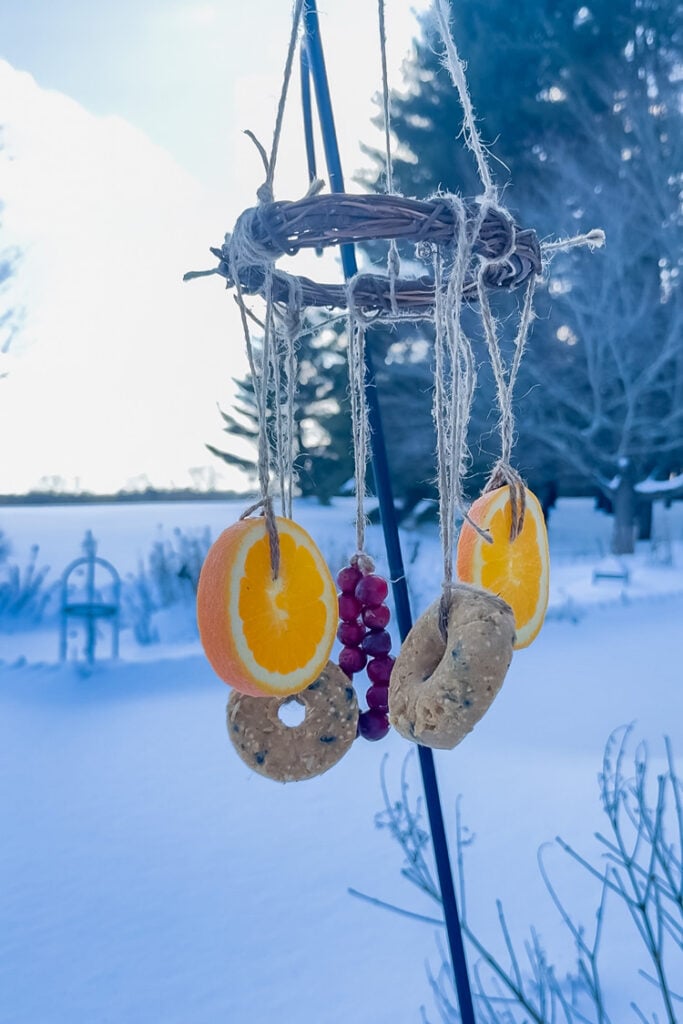
Bringing It All Together: The Grapevine Wreath Bird Cafe
The true magic happens when we combine our handmade pieces into a single, stunning focal point. Inspired by the classic concept of a “bird cafe” where different treats are offered together, I wanted to create a piece that was as beautiful as a winter ornament and as functional as a busy diner. Enter the grapevine wreath mobile, the perfect rustic centerpiece for your winter garden.
The Concept: Think of a wreath not as something hung flat against a door, but as a horizontal chandelier. It becomes a structural base from which you can suspend various feeders at different heights, creating a dynamic, spinning display of food and color that birds can’t resist.
How To Assemble Your Mobile
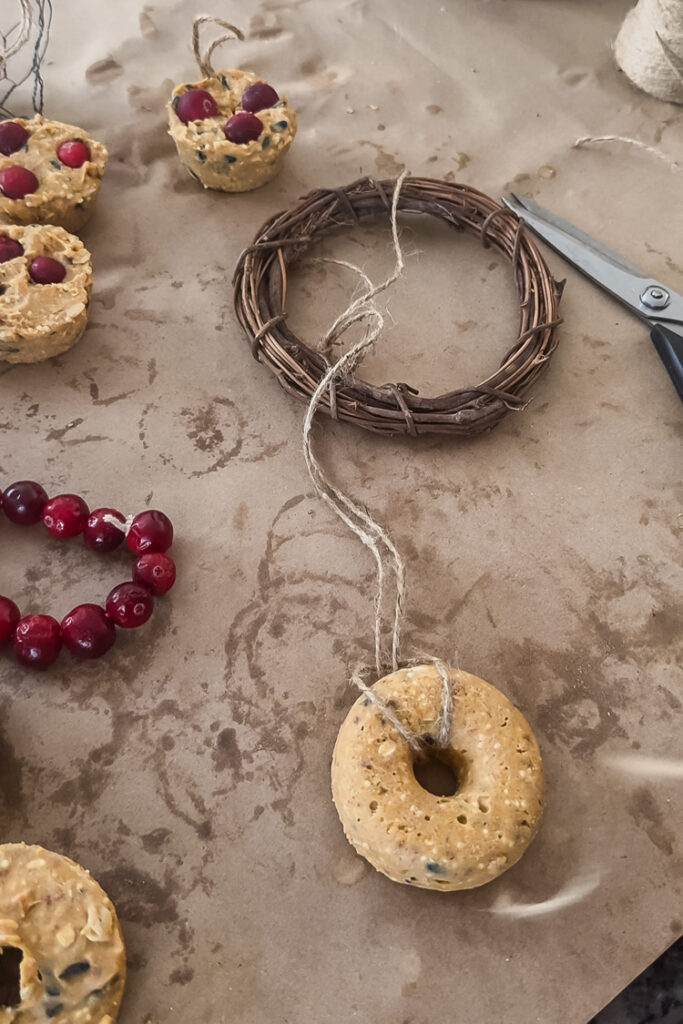
- Gather Your Base & Bounty: You’ll need a small to medium grapevine wreath, the suet “donuts” from your silicone mold, your cranberry garland (our “Berry Bangle”), a few dried orange slices (or a fresh orange half feeder!), and an assortment of jute twine in varying lengths.
- Attach the Treats: This is the fun, artistic part. There’s no wrong way!
- Suet Donuts: Tie a long piece of jute through the center hole of a suet donut and secure it firmly to the wreath. Vary the lengths so they hang at different levels.
- Berry Bangle: Drape your cranberry garland across a section of the wreath or tie it in a graceful loop.
- Citrus Accents: Use short pieces of twine to attach dried orange slices directly to the vine, or hang a full orange half feeder.
- Create the Hanger: Cut three strong pieces of jute (about 18 inches each). Tie them equally spaced around the wreath’s frame. Gather the three ends above the wreath, pull them taut so the wreath hangs level, and tie them together in one final, sturdy knot. This creates a stable triangular hanger.
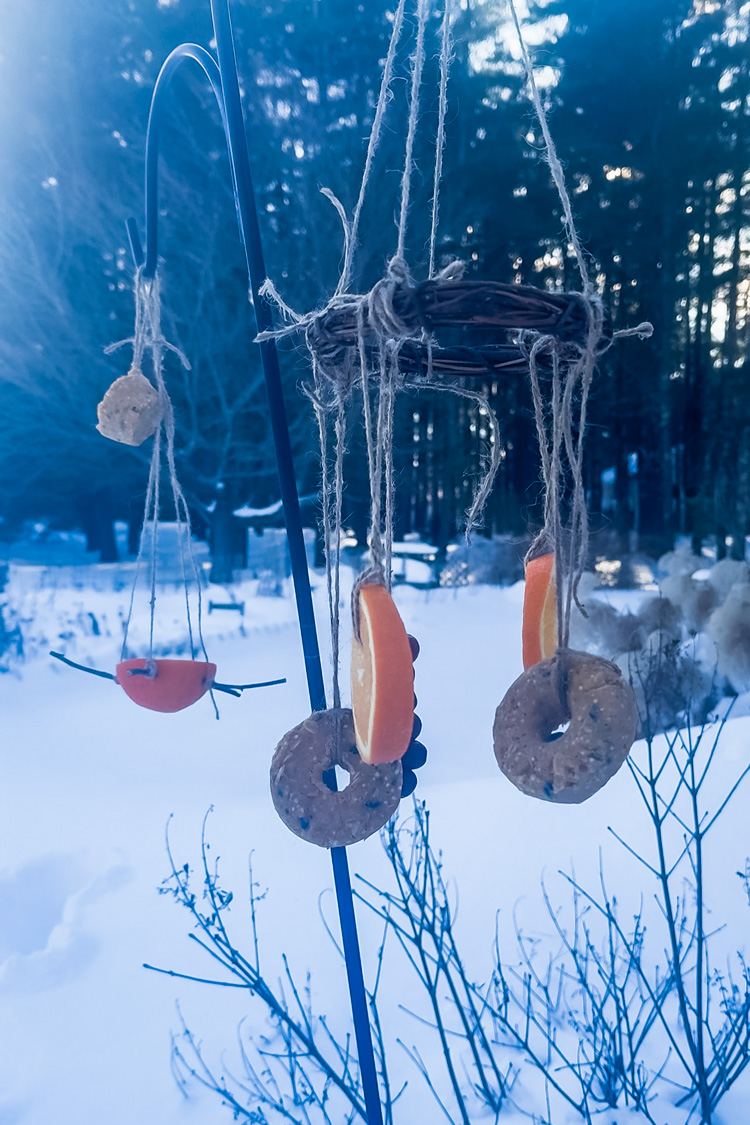
The Grand Finale: Styling & Hanging Your Winter Bird Cafe
Scattering the Feast: A Winter Gardener’s Trek
With all our feeders crafted and suet hardened, the final, and most satisfying step is placing them in the garden. This isn’t just about utility; it’s about creating little scenes of life and beauty to watch from the warmth inside.
I bundled up for a trek through the deep snow (we’re talking over-my-knees drifts from this week’s storm!) to turn my yard into a proper Winter Bird Cafe.

The Front & Center Show: The Living Room View
My top priority was creating a beautiful focal point I could enjoy daily. I chose a spot right outside my living room window, where a tall, dual-armed shepherd’s hook stands firm against the snow.
- The Main Attraction: On the highest hook, I hung the grapevine wreath mobile, our complete “Bird Cafe” with its suet donuts, cranberry bangle, and citrus accents. It spins gracefully, a mesmerizing sculpture of food and natural texture.
- The Perfect Pairing: On the second hook, I hung one of the sunny orange feeders. Together, they create a layered, inviting station.
This strategic placement means that with a cup of coffee in hand, I have a front-row seat to all the action, from the sparrows’ quick visits to curious woodpeckers.
Scattering the Bounty: Safety, Cover, & Charm
The rest of the feeders were placed to create a network of snack stops, offering safety and variety.
- For the Backyard Crew: I hung several peanut butter pinecones from the bare, thorny branches of my quince bush and from a low branch on the old maple tree. These spots offer quick cover for shy birds like titmice and nuthatches.
- The Secret Suet Station: I tucked suet cakes deep into the heart of my lilac bush, providing a sheltered, private dining spot for smaller, timid birds.
- The Simple Suet Basket found a home on my multiple-hook bird feeder outside my big kitchen window.
Feeding Birds, Feeding the Soul
There’s a special kind of quiet satisfaction that comes from looking out your window on a frosty morning to see a busy, fluttering crowd at the Bird Cafe you built with your own hands. These projects: from stirring the bowl of suet to stringing cranberries in a quiet moment, do more than fill feeders. They connect us to the winter garden in the most heartfelt way.
We started with a purpose: to offer a lifeline to the blue birds, cardinals, and woodpeckers who bring our frozen landscapes to life. We crafted with simplicity, using natural materials and pantry staples. And we ended by creating not just feeders, but beauty-a spinning mobile, a pop of citrus color, little tokens of care scattered among the snowdrifts.
This is winter gardening at its coziest. It connects us to the steadfast rhythm of nature and fills the quietest season with movement and life. It reminds us that our gardens are never truly asleep, only waiting for us to notice.
I hope this guide inspires you to spend an afternoon crafting for your birds. If you do, please share your creations—I’d love to see your own winter bird cafes come to life. Happy crafting, and happy bird watching!
With warmth from my cottage to yours,
xo, Jennifer
P.S. A gentle gardener’s reminder: Once you start feeding, try to be consistent through the season, as birds come to rely on your help.


We feed our feathered friends too. Jim and I enjoy watching them and make sure the birds are well feed especially in the winter.
I love these ideas!!!
Now that’s a bird cafe! Everything turned out amazing. I would love to try making my own suet cakes. Nice job, friend!