

Do you have a plastic playhouse that your kids love but it’s getting a little bit worn out looking? Here is a way to give it a new look and save yourself from buying a new one.
How to Paint A Step 2 Plastic Playhouse
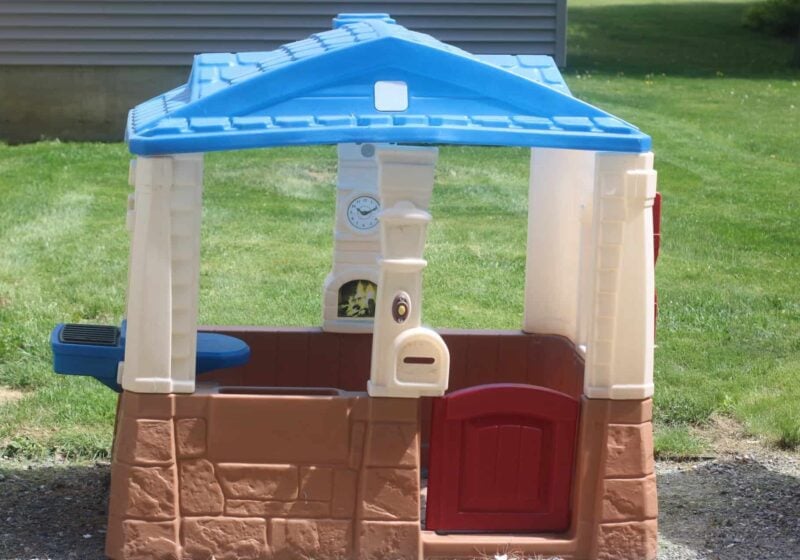
Another project I had on my Spring to-do list was to give my plastic Step 2 playhouse a makeover. It was starting to get a little faded looking but it’s still in great shape…and I’m not going to lie, I was sick of the beige and red paint!
I did a little Pinterest research to see how other people had tackled the job. I read a few times to use a primer first and to be patient and let the paint dry for 24 hours before painting another coat.
Prep Work
The first thing I did was to take the playhouse apart. It was really simple, just a few screws held it together.
I cleaned every nook and cranny really well, the paint won’t adhere to it if it’s dirty.
Pick Spray Paint Colors
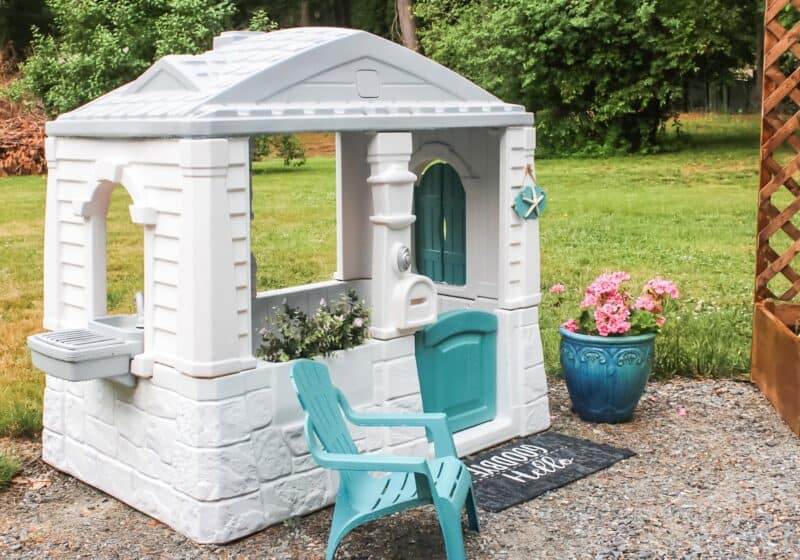
My goal was to make it look like a little beachy cottage. I went with white/ teal/ light gray as my color scheme.

PLAYHOUSE SPRAY PAINT COLORS
spray paint used for playhouse makeover
- 4 cans Rust-oleum “Blossom White” in satin finish- house
- 1 can Krylon Fusion “Matte Glacier Gray”- roof and sink
- 1 can Rust-oleum “Vintage Teal” in satin finish- door and shutters
- 1 can Rust-oleum “Metallic Aluminum”- grill, faucet, doorbell
- 2 cans Rust-oleum White Primer
- 2 cans Rust-oleum Satin Clear Protective Finish
***UPDATE: AFTER 3 MONTHS THE RUST-OLEUM PAINTS ARE HOLDING UP GREAT…BUT THE KRYLON PAINT ON THE ROOF IS PEELING BADLY.***
Makeover

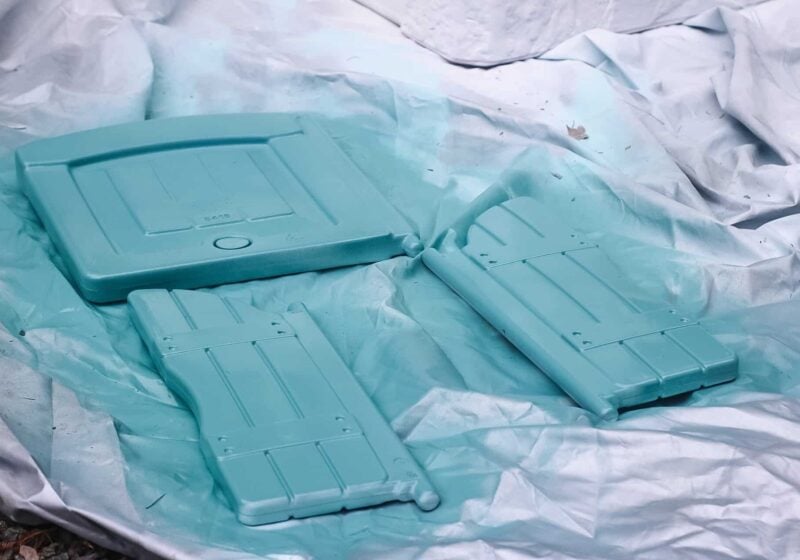
I put down a huge tarp to work on so I could move from section to section.
My Step 2 playhouse has a floor that looks like wood that I wanted to keep so I covered it with newspaper and taped it in place with blue painter’s tape.
I also reattached the walls of the playhouse after I was done cleaning them thoroughly to make the painting task easier.
The first step was to coat everything with the white primer.
The plastic on the door and shutters of this playhouse are a smoother texture than the rest of the house and I gave them two coats of primer.
Looking back at my playhouse makeover project I probably wouldn’t have taken off the shutters…they were such a pain to get back in afterward!!
I actually ended up using a box cutter to cut a little more room on the opening and let the shutters sit in the hot sun to get a little more flexible. I had to touch up the spray paint a little afterward because I was a little too aggressive!
My advice would be to leave them on and cover that side of the playhouse with newspaper and spray the shutters in place, then cover the shutters in paper and do the rest of the playhouse.

The top section of the playhouse was still a slightly different shade from the bottom…even after the 3rd coat of white just to the top.
I was surprised because the bottom was so much darker than the top. It’s really not that noticeable now that the playhouse is put back together.

Remember to let each coat of paint dry completely; it will help with the durability of the paint.
After the paint was all dry I put the roof and door/shutters back on.
Then I did 2 coats of the clear protective topcoat on all the surfaces.

I found a little Adirondack chair at a local discount store and gave it a coat of teal paint to match the door and shutters.
I also drilled a couple of holes in the bottom of the “flower box” and added some greenery.
Finished Step2 Playhouse Makeover

I bought the rug at Dollar Tree last year…I knew it would come in handy someday!

I painted a wooden plaque I had in my craft bin and glued a starfish to it to make the playhouse look beachy. (I attached it to the playhouse using a monkey hook). I love the coastal, beach look in the summertime; you can take a peek at the front porch that I just decorated here.

Doing a makeover to your playhouse is not a one-day project; it’s important to be patient and let the paint dry between coats.
Also, don’t use a plastic tarp for painting, the spray paint will peel off when you try and lift the piece off.
I do love how much better it looks now!
More Ideas For The Kids!


What a cute make over.
Thanks! It was a fun one!
Awesome awesome awesome! Thinking of keeping the same playhouse of ours outside. Any words of wisdom? I’m worried water from rain and snow is gonna sit on the floor of the house. Is moving it outside gonna cause me to have to tip over the house after each session of precipitation? Hope to read from you soon. : )
Vanessa, Yes..if we have heavy rain I do tip it up to dump the water. I keep it outside all year…and I store some of the kid’s bigger outdoor toys inside of it for the winter. My biggest piece of advice is to stick to the Rustoleum brand spray paint…not to knock Krylon but it definitely wasn’t durable for the roof but at the time there wasn’t any gray Rustoleum in stock and I wanted to start the project. My daycare kids play with it constantly so I don’t mind dumping the water, what makes more of a mess is their playsand “cakes” they bring in the house and then dump all over the floor!!! My email is jennifer@cottageonbunkerhill.com if you ever have any questions.
I drilled drainage holes in the floor and any area where the water sits after it rains. (there are some spots on the roof that collect water and the grill)
That’s a great idea…probably easier than me lifting it up and tipping out the rain!!