How To DIY Busy Boards
(that your kids will love!)
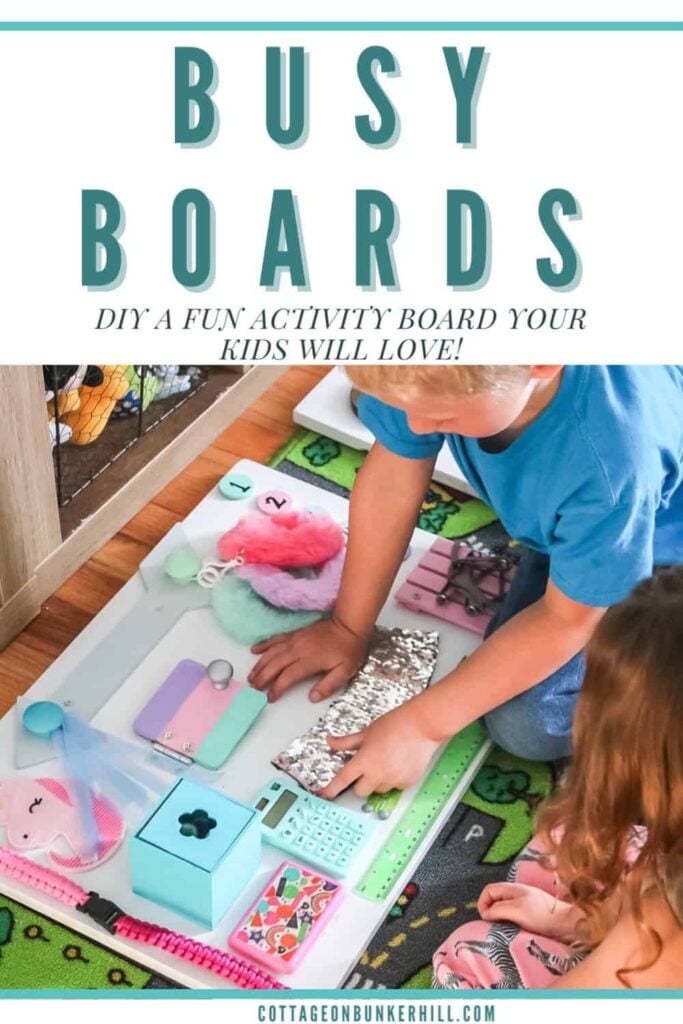
Toddlers are a busy bunch, right??!! Besides being a blogger I also have a small home daycare and have been working with little ones for a looooong time!! I’ve wanted to put a busy board together for a while…I knew the kids would love it!
I actually had 2 different boards in mind to DIY; I wanted to make one that focused on fine motor skill development and one that was more sensory and incorporated fun textures.
Dollar Tree was where I found most of the things for my busy boards. They were stocked for back-to-school and had all kinds of cool, fun things I could use.
Raid your junk drawer…there are probably all kinds of things in there that could be used for your own busy board.
What Can You Use To Attach To A Busy Board?
I knew I wanted to have some items that teach skills they will need for getting dressed themselves; for this skill, I’m adding a zipper, paracord bracelets for opening/closing clips, velcro, and shoe tying.
Dollar Tree had so many textured items to use. I found some fuzzy circle clips, a sequined sleeve for a coffee cup, a magnet, and some pretty ribbon.
I grabbed a few wooden items…I actually didn’t know what I was going to do with them but got them anyway. Some of my projects are free form and I start by going in one direction and end up going in a completely opposite way!

I bought a couple of door locks and a light switch at Walmart. I rifled through my tool box and found a few more interesting things.

Making The Board
Using a panel from Lowe’s that measured 16 x 48 inches, I cut it down the middle with my saw to make the 2 busy boards. I painted the boards with 2 coats of white semi-gloss paint and let the boards dry overnight before moving on to the next step.


Adding The Busy To The Board
I painted a quick coat of colorful acrylic paints on all the wooden items.


It took me a while to figure out how I was going to lay everything out on the boards. I didn’t even end up using everything I purchased.
I started by attaching all the wooden items to the boards. I drilled pilot holes before attaching them with screws to the boards (the wood is pretty weak and would have split if I just tried to screw them directly on.)


I used a small hinge to attach the wood square and added a knob to make it a door. Underneath I Mod Podged a cute kitty picture so when the kids open the door they have a surprise waiting! I also glued a row of wood disks and wrote 1-5 on them.


I USED A COMBINATION OF GORILLA GLUE, SCREWS, UPHOLSTERY NAILS, & STRONG VELCRO TO ATTACH EVERYTHING TO THE BOARDS.


THE FUZZY CIRCLE CLIPS AND RIBBON WERE ZIP TIED TO THE KNOBS.


I love that the kids love these busy boards! I try to incorporate as many Montessori-based learning toys into my little program to encourage fun learning while the kids are here. You can see some of my favorite learning toys for kids here.
A FEW OF MY FAVORITE LEARNING TOYS!

PIN IT FOR LATER