
This faux terracotta clay beaded garland was inspired by a set that I saw at Pottery Barn. This DIY uses large wood beads and paint to recreate the look of clay.
This Fall I am on a Pottery Barn lookalike kick! I just love so many of the new Fall items and have been figuring out ways that I can DIY them…then share the tutorials with you!!
Today I am going to show you how I just made a faux terracotta clay beaded garland out of a bag of big wood beads from Amazon.
Fall Decor on a $25 Budget

Today I’m doing an under $25 Fall decor challenge with a few of my blogging friends hosted by Heidi of Eleanor Rose Home. Wait until you see all of the creative ways they decorate on a budget!! If you are coming over from my girl Kelly at The Tattered Pew, welcome! I’m Jennifer a lifelong New Englander who loves to teach readers how to create high-end looks on a low-end budget!!
This post may contain affiliate links, which means I may earn a small commission if you make a purchase through my links, at no extra cost to you. Read my disclosure policy here.
How to Make DIY Faux Clay Bead Garland (Pottery Barn Inspired Project)
Here is my inspiration garland from Pottery Barn.

Spray Paint the Wood Beads

To make this beaded garland I started with 20 beads from a bag of 30mm wood beads from Amazon. The bag of 30mm wood beads was under $15 when I purchased them.
In all honestly, I had ordered 50mm beads and they were mislabeled but I decided to just go with it (50mm beads are around 2 inches and the 30mm are a little over an inch each)…so either size works great for a beaded garland (you can check out the faux sea glass beaded garland I made this Summer
To cover the unfinished wood beads I grabbed a can of clay shade spray paint. Looking back on the project I definitely think you could use a can of brown paint too.

My easy trick for painting the wood beads is to string them onto a dowel and rest it over a box, in this case, an old recycle bin. This way I can turn it and get all the sides of the beads as I spray paint them.

Once the paint was dry on the beads it was time to move inside to my workshop.
Add Textured Paint

To recreate the textured look of real terracotta clay I mixed together acrylic mocha craft paint with Plaster of Paris. Use any orange-brown craft or chalk paint to recreate this project.
Baking soda would be a perfect substitute and will work just as well as the Plaster of Paris but I had a box handy to use (really you don’t need to run out and buy it for this project).

What I am trying to create is a chunky mixture of the paint and plaster powder.

Using a big rounded paintbrush I dipped the brush tips into the paint mixture, tapped off the excess on a paper towel, then dabbed the paintbrush around the wood bead.

I did let some of the base color peek through, it is going to help the wood beads look more like terracotta clay by building variations in color.
Off track…but don’t they remind you of cinnamon sugar munchkins???
Apply Dark Wax

After the paint was completely dry I dabbed a small amount of antique wax (Waverly) onto each of the beads. So as not to overdo it with the wax I poured a small amount of wax onto a paper towel, dipped the tip of the brush bristles into the wax, and then tapped my paintbrush on the paper towel to remove most of the wax.
A dark brown acrylic paint would get you the same look
Stringing The Bead Garland

To make the bead garland I used a length of jute rope and wrapped the end with a piece of Scotch tape. That way the rope will pass easily and quickly through the wood beads without the fray ends giving me a hassle.

For this beaded rope garland, I did not tie knots between each bead and just strung the beads on so they are touching.

Once I had the 20 beads strung onto the rope I tied a simple knot on each end leaving the loop open so I could attach a tassel.
Adding a Tassel

To finish off the bead garland I added a tassel by cutting 40 pieces of thin jute string (20 for each end of the garland). You will want to cut the string to about 8 inches long.
I gathered one of the bunches and ran 19 of the strings through the open loop of the rope and then tightened the rope around them.

With that last jute string, I wrapped it around the bunch and tied a knot.

Then took a pair of scissors to even out the ends of the tassel and repeated the process for the other end of the beaded garland.
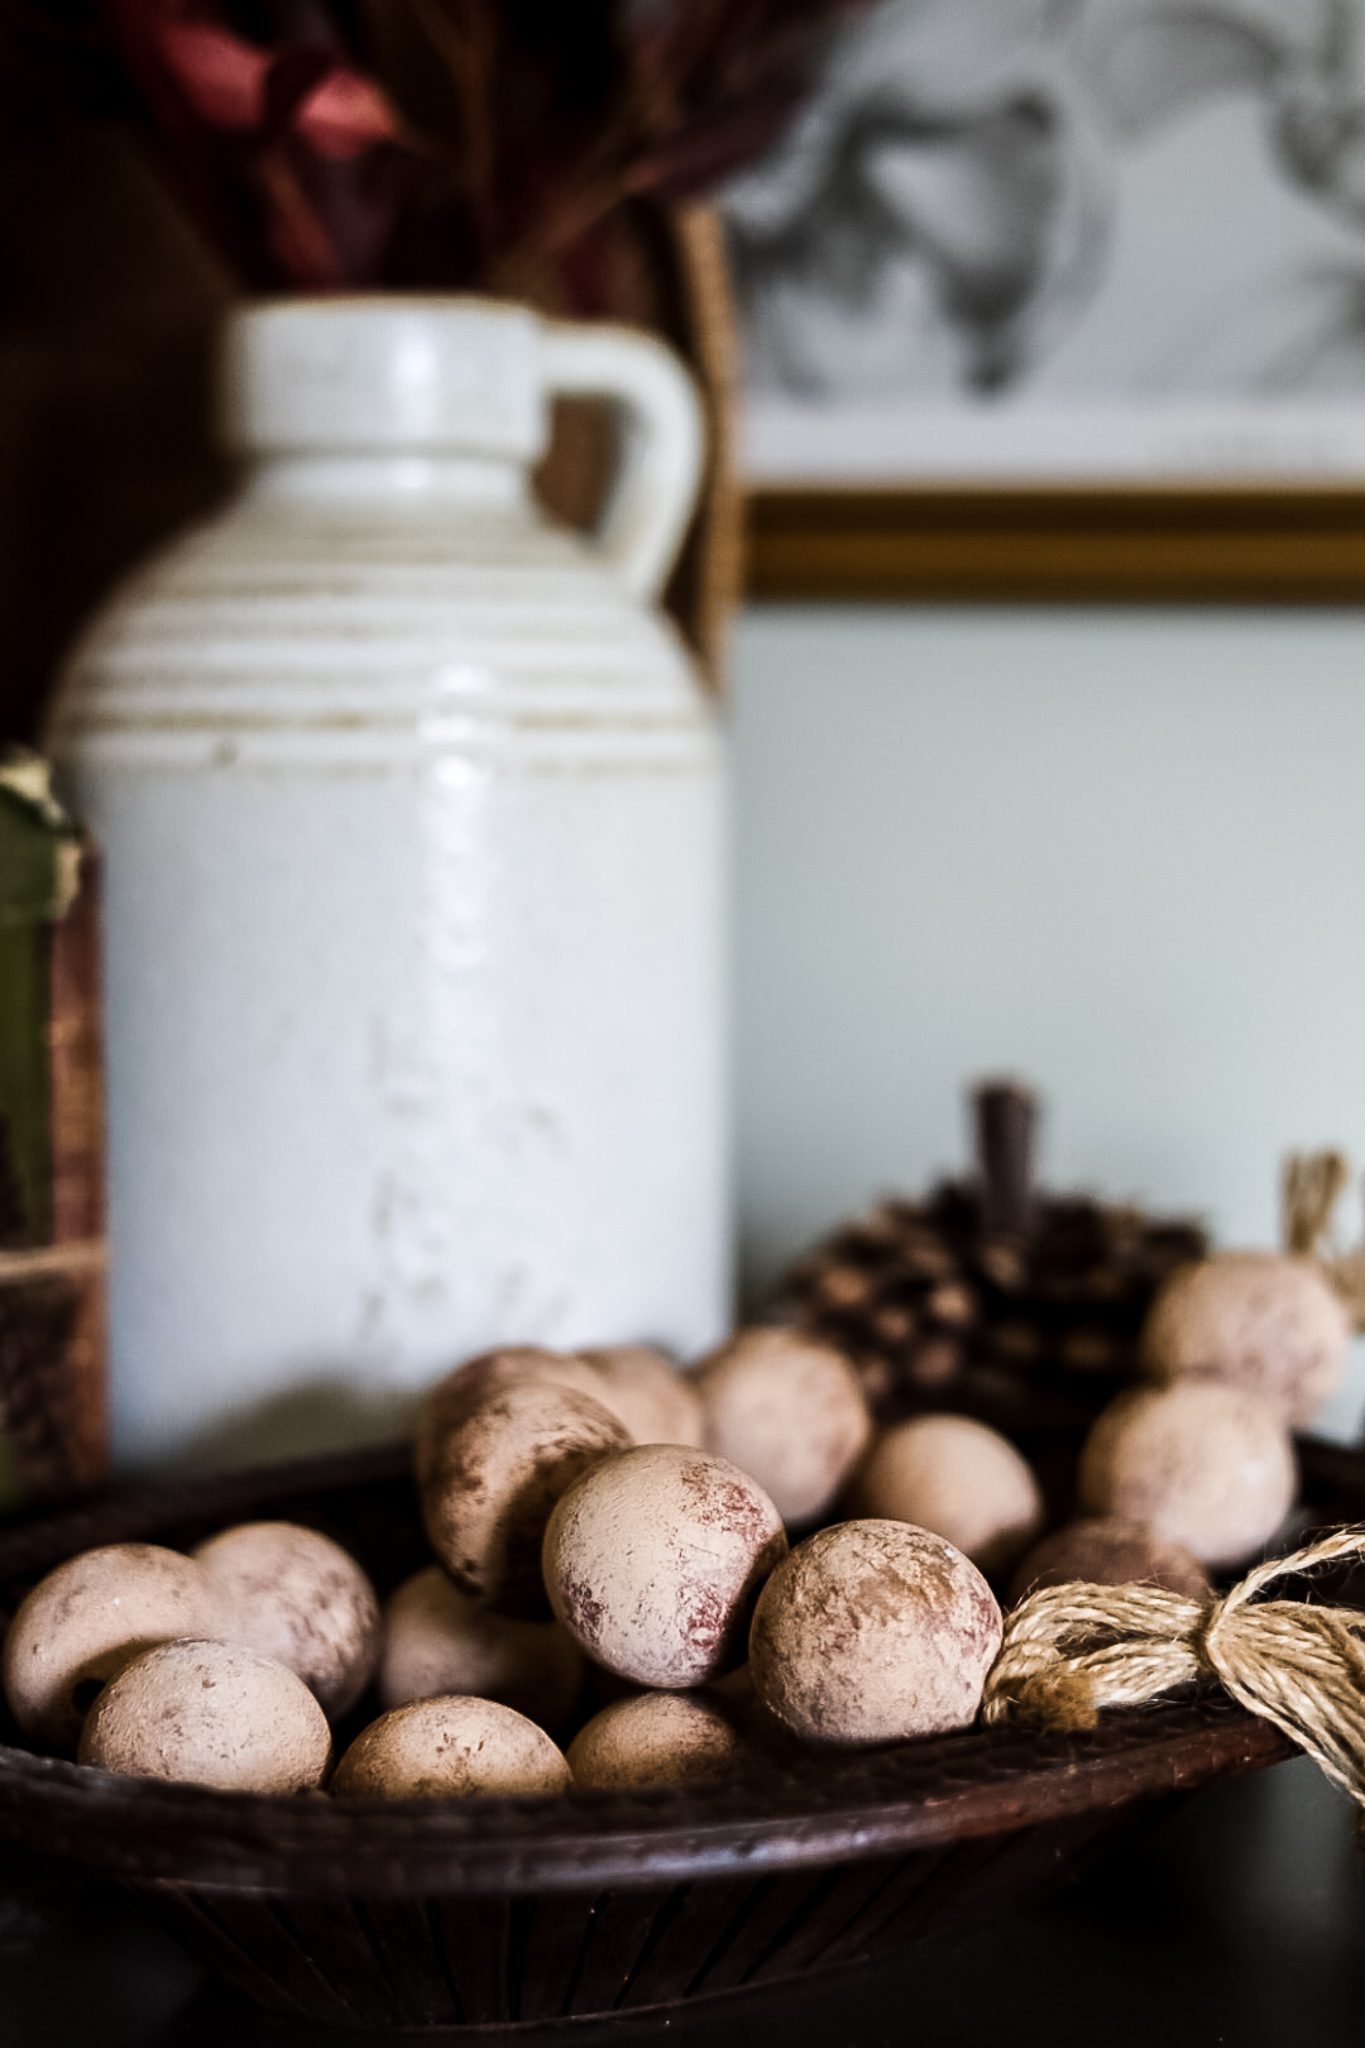
Faux Terracotta Clay Beaded Garland

What do you think?? My faux version of the Pottery Barn terracotta clay beads cost me under $15 for 30 beads (I only used 20 so I have some leftover for another project too) and I had the other supplies. The PB version is almost $100.

The clay bead garland fits in perfectly with my natural vibe this Fall!
To complete this corner of my console cabinet I added the beads to a $1 thrift store basket, added a couple of the pinecone pumpkins that I made last Fall, and another Pottery Barn knockoff vase that I just made (you can check that out here tomorrow!), vintage books, and a Magnolia jug with my Fall crush…Target’s preserved burgundy eucalyptus stems.

What do you think?? My faux version of the Pottery Barn terracotta clay beads cost me under $15 for 30 beads (I only used 20 so I have some leftover for another project too) and I had the other supplies. The PB version is almost $100.
More Fall Décor on a Budget Inspiration
Eleanor Rose Home | The Country Peony | Green Valley Gable | Stilettos & Shiplap | Cottage In The Mitten
Le Cultivateur | Midwest Life & Style | Robyn’s French Nest | The Tattered Pew | Cottage on Bunker Hill
Pin for Later!


I entered my name and email address and I get a message that says I need a required email. I did enter one.
Jennie
You are so amazing! I love all of the fun DIY projects you make. Would you like to share this one with me on “Meet me in the She shed one day? or is there something else you would be willing to share?
Oh my goodness! You know we have been talking about these beads. They turned out amazing and without the big $99 price tag. Love them!!!!
Love this idea. I like anything that looks old, chippy and just a little bit rough around the edges so this is definitely for me! Thanks for sharing.
Jennifer,
I love those beads! I keep saying I’m going to make some. You’ve inspired me.
Jennifer, these are fabulous!! I’m sharing them this weekend on my Saturday roundup!!
You are the best! Thanks so much, Kim!!
I love this DIY! So brilliant. Thank you so much for the inspiration.
Thank you, Elizabeth!!
I am so in love with this DIY! I can’t wait to try it! Pinning for later!
Thanks so much Stacey!!
You’re so clever!!! I love these!!
I love a good Pottery Barn dupe! These look amazing!!!
Your beads turned out beautifully, Jennifer. You truly are the queen of DIY dupes. I can’t believe what they are charging for the PB version. That is just insane! Pinned so I can try to make my own! Thanks for sharing.
Oh my gosh, I love this Jennifer!!! What a great idea and what a great way to save money! You are creating the most fabulous dupes!
Is there anything you can’t dupe?! You’re amazing and the beads of course look beautiful! I’ll take a dark blue set! 💙
This turned out super cute! Great idea. Happy Fall, my friend.
These turned out to be so pretty. You are the Queen of PB dupes. Pinned!